You are using an out of date browser. It may not display this or other websites correctly.
You should upgrade or use an alternative browser.
You should upgrade or use an alternative browser.
Rebody Z3 Tribute GT project
- Thread starter Foglem
- Start date
Time for a quick update!
I am definitely planning on getting uprated struts for the hood (bonnet? This is a British forum afterall...) but in the meantime I have managed to re-connect the old ones. That is at least a huge help lifting the front so often.
I decided to use hood pins as I wasn't crazy about my first choice in releasing the hood lock. I gutted the locking mechanisms but retained the secondary hook. The idea is that I will release the hood pins (yet to be installed) then reach under the front end and push up on the knob.

Maybe I'll come up with something more ...elegant? in the future. For now it works and I'm happy with it.
The license plate plate and light have been mounted. I unfortunately forgot to take a pictures of what I did. The license plate light stuck out a bit too far and a bit too angled down originally. It sort of had a drooping look I didn't like too much. I cut out the fiberglass and added in a recessed metal plate to mount the light to. I couldn't go too far in but that little bit corrected some of the angle and I think makes a big difference.


Once the exhaust is extended out I think I'll be over the moon for the look back here. I also started playing with the trunk lock ideas. I think I will go with hood pins on the trunk as well. Possibly on top, BUT, here's an interesting idea. What if I install a single hood pin upside down? Mount the pin to the trunk lid and put the release button under the vehicle out of view. I won't address that seriously until I get the rear end permanently fitted.

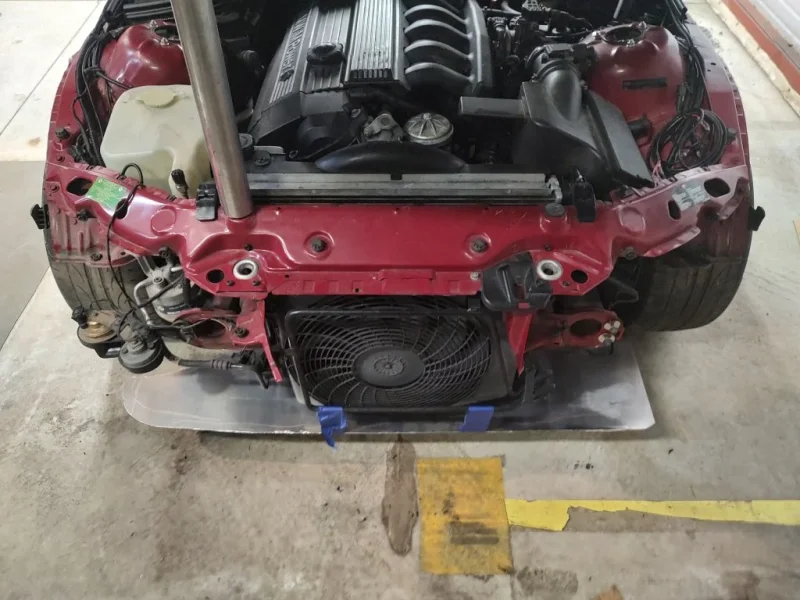
Here I started fitting an aluminum under tray. Made some brackets up and a bit more CAD work to do. That's cardboard aided design for those that were curious. I still have a ways to go for that yet.
Alright, that's it for now!

I am definitely planning on getting uprated struts for the hood (bonnet? This is a British forum afterall...) but in the meantime I have managed to re-connect the old ones. That is at least a huge help lifting the front so often.
I decided to use hood pins as I wasn't crazy about my first choice in releasing the hood lock. I gutted the locking mechanisms but retained the secondary hook. The idea is that I will release the hood pins (yet to be installed) then reach under the front end and push up on the knob.
Maybe I'll come up with something more ...elegant? in the future. For now it works and I'm happy with it.
The license plate plate and light have been mounted. I unfortunately forgot to take a pictures of what I did. The license plate light stuck out a bit too far and a bit too angled down originally. It sort of had a drooping look I didn't like too much. I cut out the fiberglass and added in a recessed metal plate to mount the light to. I couldn't go too far in but that little bit corrected some of the angle and I think makes a big difference.
Once the exhaust is extended out I think I'll be over the moon for the look back here. I also started playing with the trunk lock ideas. I think I will go with hood pins on the trunk as well. Possibly on top, BUT, here's an interesting idea. What if I install a single hood pin upside down? Mount the pin to the trunk lid and put the release button under the vehicle out of view. I won't address that seriously until I get the rear end permanently fitted.
Here I started fitting an aluminum under tray. Made some brackets up and a bit more CAD work to do. That's cardboard aided design for those that were curious. I still have a ways to go for that yet.
Alright, that's it for now!
Attachments
- Joined
- Dec 8, 2011
- Points
- 165
View attachment 276227
Here I started fitting an aluminum under tray. Made some brackets up and a bit more CAD work to do. That's cardboard aided design for those that were curious. I still have a ways to go for that yet.
Looking good, I used ABS sheet, a wall paper stipper heat gun, some Milliput, painted steel strips, rivets and bolts.
It's definitely required.
You can see my efforts from around 11:30 on my snagging video
Thank you Pingu! I've definitely watched that video before and have been using it to draw ideas from. I really like the 'cat whisker' idea and have ordered some plastic sheets to start making my own wheel arches.
Thank you again!
Thank you again!
I took a brief break from the under tray to fit the new wheels!
The OEM car had 7.5jx17" with 225/45r17 up front and 9jx17" with 245/40r17 in the rear.
The new wheels are Apex FL-5. 9jx18" with 235/40r18 up front and 10.5jx18" with 275/35r18 in the rear")


After looking at it for a while the front wheels are going to require probably 25mm spacers. This was becaause of the 9" wheel. I had originally wanted 8.5" but due to the wheels being discontinued I had to pick what was left in stock. I decided I could make this work. So here it is! I think it looks great. Very excited.

Another reason spacers are required up front!
I also started playing with hood pins. I think they will be positioned here:


That's all for now. The mosquitos have organized their attacks and I can't take much more of it. I'll be back soon with a big push to get things done!
The OEM car had 7.5jx17" with 225/45r17 up front and 9jx17" with 245/40r17 in the rear.
The new wheels are Apex FL-5. 9jx18" with 235/40r18 up front and 10.5jx18" with 275/35r18 in the rear
After looking at it for a while the front wheels are going to require probably 25mm spacers. This was becaause of the 9" wheel. I had originally wanted 8.5" but due to the wheels being discontinued I had to pick what was left in stock. I decided I could make this work. So here it is! I think it looks great. Very excited.
Another reason spacers are required up front!
I also started playing with hood pins. I think they will be positioned here:
That's all for now. The mosquitos have organized their attacks and I can't take much more of it. I'll be back soon with a big push to get things done!
Pushing hard to get things done this week.
Re-worked the under tray. I might have to change it later but this gets the job done for now.

The notch on the right side is for access to the hood release. Speaking of...hood pins are done! This was trickier than I expected. I think because of the thickness of the fiberglass the method for locating the hood pins didn't quite work. The methodis to put a bit of grease on to top of the pins, lower the hood on to them, then drill the hole where the grease touched the hood. This didn't quite work out correctly so I had to re-work the pin locations...it all worked out in the end.

I also ordered a set of 30mm wheel spacers for the front wheels. They really needed to come out more to look right. At the moment with the front wheel spacers, the track width of the front of the car is 10mm wider than the rear. This might actually help out with autocrossing. I'm debating on adding some small spacers in the rear to even things out and get the look just right too.

This is a bolt on style spacer, so longer lug bolts were not needed.
The list of mechanical bits is narrowing! Working on the fuel door tomorrow. Then it will be extending the exhaust. This might be a bit more challenging since the exhaust seems to not be even on this car. We'll see what happens when I get under there.

For the trunk weather sealing...I'd really like to see someone else's GT roadster (I think the coupe's don't use the OEM seals, where the roadster does.). I'm curious how people have addressed the transition from the OEM weather seal to the Tribute boot edge. I'm guessing I need to cut the existing weather stripping figure out a way to attach it to the new trim. I'm not totally sure yet.

In the meantime I'll work on attaching the front grill, which I've mocked up. I might attach this tomorrrow morning.

More updates coming!
Re-worked the under tray. I might have to change it later but this gets the job done for now.
The notch on the right side is for access to the hood release. Speaking of...hood pins are done! This was trickier than I expected. I think because of the thickness of the fiberglass the method for locating the hood pins didn't quite work. The methodis to put a bit of grease on to top of the pins, lower the hood on to them, then drill the hole where the grease touched the hood. This didn't quite work out correctly so I had to re-work the pin locations...it all worked out in the end.
I also ordered a set of 30mm wheel spacers for the front wheels. They really needed to come out more to look right. At the moment with the front wheel spacers, the track width of the front of the car is 10mm wider than the rear. This might actually help out with autocrossing. I'm debating on adding some small spacers in the rear to even things out and get the look just right too.
This is a bolt on style spacer, so longer lug bolts were not needed.
The list of mechanical bits is narrowing! Working on the fuel door tomorrow. Then it will be extending the exhaust. This might be a bit more challenging since the exhaust seems to not be even on this car. We'll see what happens when I get under there.
For the trunk weather sealing...I'd really like to see someone else's GT roadster (I think the coupe's don't use the OEM seals, where the roadster does.). I'm curious how people have addressed the transition from the OEM weather seal to the Tribute boot edge. I'm guessing I need to cut the existing weather stripping figure out a way to attach it to the new trim. I'm not totally sure yet.
In the meantime I'll work on attaching the front grill, which I've mocked up. I might attach this tomorrrow morning.
More updates coming!
- Joined
- Dec 8, 2011
- Points
- 165
I found that a bit of trim around the undertray and the wheel arch liners adds a "professional touch". It also hides the rough edges ") .
.
You have the same problem as me. Your body looks straight and the chassis is straight, but things still don't line up. You will need to adjust the exhausts to make it look right - only you will know that there is a 20mm spacer on one side and a 5mm spacer on the other .
Looking good
.You have the same problem as me. Your body looks straight and the chassis is straight, but things still don't line up. You will need to adjust the exhausts to make it look right - only you will know that there is a 20mm spacer on one side and a 5mm spacer on the other
.Looking good
Been a busy week! I am very thankful for a friend who is going to weld up a really nice adapter for the fuel filler, but that will be coming hopefully in the near future.
This week I got the exhaust put on! Wow what difference.


Ignore the wonky trunk...still working on that guy.
Next up was adding the front grill in. Getting there!

This week I got the exhaust put on! Wow what difference.
Ignore the wonky trunk...still working on that guy.
Next up was adding the front grill in. Getting there!
I'm having to go back and re-work the fuel filler. Attempt 1 did not pan out so back to the drawing board. I'll probably have to patch and re-drill the fuel filler door so that it lines up with the existing pipe better. The offset was too great on what I have now. Live and learn!
I decided to do a shake down on the car and see how things hold up, so I took it to an autocross for some motivation. What. a. blast.
Had a great time. Car was wonderful and performed amazing.

Some things I've learned from driving it around. I definitely need to get some ABS plastic and make myself some wheel liners. In combination with the sticky tires the sand/rock noise pelting the wheel wells is very loud at low speed.
I'm also working on a solution for aligning my headlights, which is a great time to get side tracked figuring out the lens and bezel... I would really like to come up with a solution where you can't see any hardware, but so far I haven't come up with a viable option.
The idea is that the bezel sandwhiches the clear lens onto the body. The body does have a lip that gives me something to work with, however it's at a very different angle to the bezels. I think I might have to do external hardware. This is what I've come up with. (It's just a mach up.)


Other than glueing them on, if anybody has some ideas to throw my way I'll gladly consider them.
Thanks!
I decided to do a shake down on the car and see how things hold up, so I took it to an autocross for some motivation. What. a. blast.
Had a great time. Car was wonderful and performed amazing.
Some things I've learned from driving it around. I definitely need to get some ABS plastic and make myself some wheel liners. In combination with the sticky tires the sand/rock noise pelting the wheel wells is very loud at low speed.
I'm also working on a solution for aligning my headlights, which is a great time to get side tracked figuring out the lens and bezel... I would really like to come up with a solution where you can't see any hardware, but so far I haven't come up with a viable option.
The idea is that the bezel sandwhiches the clear lens onto the body. The body does have a lip that gives me something to work with, however it's at a very different angle to the bezels. I think I might have to do external hardware. This is what I've come up with. (It's just a mach up.)
Other than glueing them on, if anybody has some ideas to throw my way I'll gladly consider them.
Thanks!
A quick update just to keep the thread alive and my motivation up...
I've gotten new headlight brackets from a different vehicle that will allow easier headlight leveling. The hardware won't show much, especially once the front bezel and lens are on.


Once mounted I took them off. Mounting the bezel and lens will be next on my list. There is a lot of sanding and getting things shaped right before I commit to mounting something. It's time consuming.
I've begun removing all of the hardware off of the car. Lights, mirrors, and rubber trim for preparation to starting adding material and focusing on getting the body gaps right. This will also aid in fitting the gas cap since I can take the rear of the car off easier.
Adding the extra width to the tires not only looks great, but the car handles very good now...and I haven't even aligned it yet! These are also a vast improvement over the previous rubber. A 10 year old ok-ish summer tire (Something like 400treadwear?) with some Azenis RT660 (200 treadwear). A summer car deserves summer shoes.

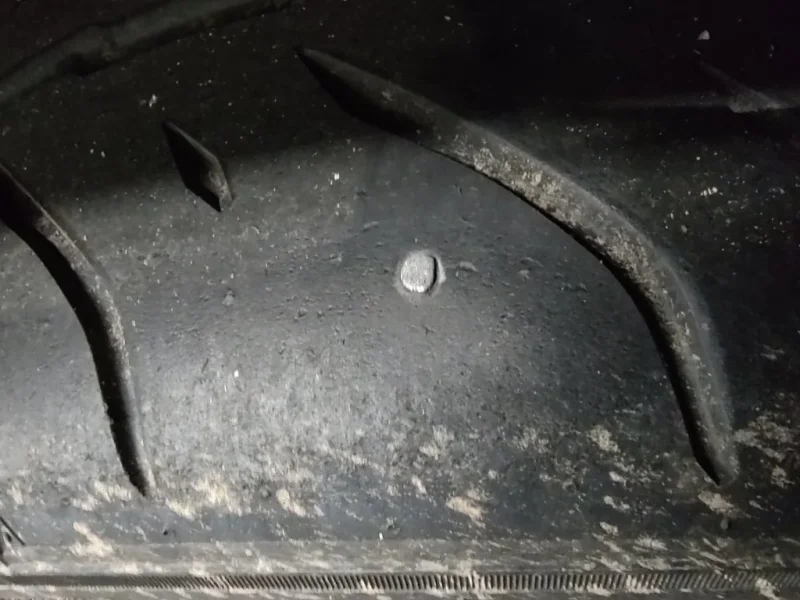
Annnd of course I picked up a nail within 200 miles. I'll plug it and hope for the best.
I've begun playing with wheel arches as well. Still playing with repurposing the original wheel arches and adding cats whiskers (the brushes you see on the side of large trucks to keep rain spray down) to help bridge the gap between the body and the wheel arch. The idea behind the whiskers is to keep road crud out of the car without having to worry about squeeking and rubbing between the body and wheel arch. Worst case I'll use some plastic sheets to heat/bend into the wheel arches and still use the whiskers.
I have been traveling for a while over the past few weeks so I decided to play with some photo editing to play with colors So I'll leave you with some fun colors.


I've gotten new headlight brackets from a different vehicle that will allow easier headlight leveling. The hardware won't show much, especially once the front bezel and lens are on.
Once mounted I took them off. Mounting the bezel and lens will be next on my list. There is a lot of sanding and getting things shaped right before I commit to mounting something. It's time consuming.
I've begun removing all of the hardware off of the car. Lights, mirrors, and rubber trim for preparation to starting adding material and focusing on getting the body gaps right. This will also aid in fitting the gas cap since I can take the rear of the car off easier.
Adding the extra width to the tires not only looks great, but the car handles very good now...and I haven't even aligned it yet! These are also a vast improvement over the previous rubber. A 10 year old ok-ish summer tire (Something like 400treadwear?) with some Azenis RT660 (200 treadwear). A summer car deserves summer shoes.
Annnd of course I picked up a nail within 200 miles.
I'll plug it and hope for the best.I've begun playing with wheel arches as well. Still playing with repurposing the original wheel arches and adding cats whiskers (the brushes you see on the side of large trucks to keep rain spray down) to help bridge the gap between the body and the wheel arch. The idea behind the whiskers is to keep road crud out of the car without having to worry about squeeking and rubbing between the body and wheel arch. Worst case I'll use some plastic sheets to heat/bend into the wheel arches and still use the whiskers.
I have been traveling for a while over the past few weeks so I decided to play with some photo editing to play with colors
So I'll leave you with some fun colors.Attachments

FYI I have the same lights and mountings on my Z300S. Work a treat, though I am going to get them stripped and powder coated. They are not holding up well to the British weather!
Oh sorry to hear that! The ones I have are supposedly stainless steel, but time will tell. Your car is coming along! Keep it up, seeing other people makes progress gives me motivation to keep working.FYI I have the same lights and mountings on my Z300S. Work a treat, though I am going to get them stripped and powder coated. They are not holding up well to the British weather!
Some more progress made!
I started hacking up the original plastic wheel arches in the front of the car. Nearly done! They connect up to the under tray. I'm pleased with how they are coming along.

A fun thing about re-using these pieces is that I still have an opening to cool the brakes. I'm thinking I might add some ducting to align with the front grill at some point.

Now back to the headlights. I've made some decisions about how I'm going to install the lens and bezel. Typically the lens would be sandwiched between the car and the bezel. I think I will bond the bezel to the car and mount the lens to the outside of the bezel. This does a few things to make my life easier. For one, it'll be a bit easier to smooth out the lines. It also gives me a nice surface to run hardware through the lens and bezel so I can remove the lens if I need to. Here's a mock up...


I'm liking this idea and I think I'll stick with it.
I've been looking at the hoodscoop for a while now. I like it and yet something seemed off about it to me. I decided to rake the hood scoop back to match the angle of the headlights. I think it will complement the car and it's a bit of a personal flair, so I went for it.
Here's the before:


...and her's the after. This is the initial cut, no fine cutting has been done yet.


More updates to come! Thank you for all of the help and tips so far!
I started hacking up the original plastic wheel arches in the front of the car. Nearly done! They connect up to the under tray. I'm pleased with how they are coming along.
A fun thing about re-using these pieces is that I still have an opening to cool the brakes. I'm thinking I might add some ducting to align with the front grill at some point.
Now back to the headlights. I've made some decisions about how I'm going to install the lens and bezel. Typically the lens would be sandwiched between the car and the bezel. I think I will bond the bezel to the car and mount the lens to the outside of the bezel. This does a few things to make my life easier. For one, it'll be a bit easier to smooth out the lines. It also gives me a nice surface to run hardware through the lens and bezel so I can remove the lens if I need to. Here's a mock up...
I'm liking this idea and I think I'll stick with it.
I've been looking at the hoodscoop for a while now. I like it and yet something seemed off about it to me. I decided to rake the hood scoop back to match the angle of the headlights. I think it will complement the car and it's a bit of a personal flair, so I went for it.
Here's the before:
...and her's the after. This is the initial cut, no fine cutting has been done yet.
More updates to come! Thank you for all of the help and tips so far!
Some more progress made!
I started hacking up the original plastic wheel arches in the front of the car. Nearly done! They connect up to the under tray. I'm pleased with how they are coming along.
View attachment 289145
A fun thing about re-using these pieces is that I still have an opening to cool the brakes. I'm thinking I might add some ducting to align with the front grill at some point.
View attachment 289147
Now back to the headlights. I've made some decisions about how I'm going to install the lens and bezel. Typically the lens would be sandwiched between the car and the bezel. I think I will bond the bezel to the car and mount the lens to the outside of the bezel. This does a few things to make my life easier. For one, it'll be a bit easier to smooth out the lines. It also gives me a nice surface to run hardware through the lens and bezel so I can remove the lens if I need to. Here's a mock up...
View attachment 289149View attachment 289151
I'm liking this idea and I think I'll stick with it.
I've been looking at the hoodscoop for a while now. I like it and yet something seemed off about it to me. I decided to rake the hood scoop back to match the angle of the headlights. I think it will complement the car and it's a bit of a personal flair, so I went for it.
Here's the before:
View attachment 289153View attachment 289155
...and her's the after. This is the initial cut, no fine cutting has been done yet.
View attachment 289157
View attachment 289159View attachment 289161
More updates to come! Thank you for all of the help and tips so far!
The rake-back looks much better than standard. Great idea.
Quick update for now. I've decided on a path for the headlights. I'm mounting the bezels first and building the body up to the lens. So the lens to body will be a smooth transition. It's been pretty cold so I haven't been able to heat the space enough to apply filler or anything.
First things first, I got the bezel merged to the body. Then attached the hardware to the lens.

Next thing I did was cover the lenses up to protect them and started building the he body out with short strand filler.

I waited for it to set a bit then removed the lens so it wouldn't get locked in place forever

I'll repeat this process one more time, then add some regular filler to smooth things out. I think this will work out ok.
Next was to seal up the trunk(boot). The original tail lights are gone so I'm left with these open holes.

I cut out some plastic sheeting and added a pass through for the electrical connectors. This will get glued up soon.

Hopefully I can heat the garage up more and finish more body work. I have a pretty big panel gap I have to correct as well so that is coming. I tried lifting the hood up to correct this gap but it makes the horizontal gap really bad. As far as I can tell I won't have much choice but to build this out. I'll lay proper fiberglass down for this one. So many things to learn...

Hood scoop is coming along nicely. A bit more shaping and sanding to go, pretty happy with it.

Ok, that's all for now. Hopefully some bigger progress on the next update!
First things first, I got the bezel merged to the body. Then attached the hardware to the lens.
Next thing I did was cover the lenses up to protect them and started building the he body out with short strand filler.
I waited for it to set a bit then removed the lens so it wouldn't get locked in place forever
I'll repeat this process one more time, then add some regular filler to smooth things out. I think this will work out ok.
Next was to seal up the trunk(boot). The original tail lights are gone so I'm left with these open holes.
I cut out some plastic sheeting and added a pass through for the electrical connectors. This will get glued up soon.
Hopefully I can heat the garage up more and finish more body work. I have a pretty big panel gap I have to correct as well so that is coming. I tried lifting the hood up to correct this gap but it makes the horizontal gap really bad. As far as I can tell I won't have much choice but to build this out. I'll lay proper fiberglass down for this one. So many things to learn...
Hood scoop is coming along nicely. A bit more shaping and sanding to go, pretty happy with it.
Ok, that's all for now. Hopefully some bigger progress on the next update!
I'm realizing bodywork is going to take a lot more time. That's ok! Spent a lot of time roughing in the headlight lenses, smoothing out the grill and scoop. It's coming along nicely.


Learning a lot of things as I go. This is one of those things where I'm just going to have to screw up a few times to get it right. This was a fun step though! I put some sandable primer on everything so I could see what all I had done. Definitely a big help.
More to come!
Learning a lot of things as I go. This is one of those things where I'm just going to have to screw up a few times to get it right. This was a fun step though! I put some sandable primer on everything so I could see what all I had done. Definitely a big help.
More to come!
Everyday a school day. Nothing like gaining new experiences even if it’s a pain in the arse at the time.
Time for a mini-update. I've been bouncing around the car knocking out what I can. I've been trying to avoid doing any fiberglass or body filler work while it's so cold out. Let's get to it...
More headlight work! Since I bonded the bezel to the body, it was time to get rid of the original bezel inside the headlight bucket. I needed to clean it up in there. Created a LOT of dust in the process. I was still wearing all of my PPE, but I'm really glad I installed a ceiling mounted air filter. A HUGE difference. I took before and after pictures but you can't really see it.

This bezel has been obliterated. Now it's just the bonded bezel...

As you can see above, I've also started gluing in hardware for the clear lenses to mount to. I used longer bolts here in case some of the glue got into the threads. I cleaned off any glue that did get on the bolts. Once the glue set a bit, I took the bolts out and called it good!
Spent some serious time on the rear of the car trying to get it to fit right. What a juggling act. I decided to try and reduce variables by removing the trunk. I put a jack behind the car to lift it a bit which helped the door jams to straighten out. Then a game of "how many washers can I stuff here and there for this to look right".


There are also 3 more bolts on each side holding the rear on right where the trunk hinges are. I think I got the door jams decent:


The gap is bigger than I would like, but there is no play left in the body to move it forward anymore. I'm thinking about welding some material onto the doors to extend them and fill the gap, but it may not be worth it. The lesson here is "good enough for me" and tell anybody that critiques it to go pound sand.
Now that the rear is pretty close I can finally tackle the fuel filler! I had to re-cut the fuel hole (4 tries later...) and got them lined up enough for flex piping. Here's what I'm working with:

OEM fuel filler on the left with a pipe welded on (or at least will be), flex hose and modified motorcycle fuel filler. Check it out...not bad.

Terrible picture, but I was excited to see this part show real progress. When the weather gets nicer I'll fille the hole and bond the filler to the body.
Another thing I started looking at was the very rear of the car. If I modify the trunk hinges (which I might have to do anyway) I might be able to get the trunk flush mounted to the rear rather than having a lip. Here, let me show you...


Kind of nice looking. Especially if it didn't require my knee to hold it there.
Last thing was to start playing with the rear wheel wells. I stuffed the OEM ones in there and started marking where I'll trim them down to get a nice fit.

Small steps here and there but progress is progress.
More headlight work! Since I bonded the bezel to the body, it was time to get rid of the original bezel inside the headlight bucket. I needed to clean it up in there. Created a LOT of dust in the process. I was still wearing all of my PPE, but I'm really glad I installed a ceiling mounted air filter. A HUGE difference. I took before and after pictures but you can't really see it.
This bezel has been obliterated. Now it's just the bonded bezel...
As you can see above, I've also started gluing in hardware for the clear lenses to mount to. I used longer bolts here in case some of the glue got into the threads. I cleaned off any glue that did get on the bolts. Once the glue set a bit, I took the bolts out and called it good!
Spent some serious time on the rear of the car trying to get it to fit right. What a juggling act. I decided to try and reduce variables by removing the trunk. I put a jack behind the car to lift it a bit which helped the door jams to straighten out. Then a game of "how many washers can I stuff here and there for this to look right".
There are also 3 more bolts on each side holding the rear on right where the trunk hinges are. I think I got the door jams decent:
The gap is bigger than I would like, but there is no play left in the body to move it forward anymore. I'm thinking about welding some material onto the doors to extend them and fill the gap, but it may not be worth it. The lesson here is "good enough for me" and tell anybody that critiques it to go pound sand.
Now that the rear is pretty close I can finally tackle the fuel filler! I had to re-cut the fuel hole (4 tries later...) and got them lined up enough for flex piping. Here's what I'm working with:
OEM fuel filler on the left with a pipe welded on (or at least will be), flex hose and modified motorcycle fuel filler. Check it out...not bad.
Terrible picture, but I was excited to see this part show real progress. When the weather gets nicer I'll fille the hole and bond the filler to the body.
Another thing I started looking at was the very rear of the car. If I modify the trunk hinges (which I might have to do anyway) I might be able to get the trunk flush mounted to the rear rather than having a lip. Here, let me show you...
Kind of nice looking. Especially if it didn't require my knee to hold it there.
Last thing was to start playing with the rear wheel wells. I stuffed the OEM ones in there and started marking where I'll trim them down to get a nice fit.
Small steps here and there but progress is progress.