Rebody Z3 Tribute GT project

Foglem

Dedicated Member
American Zeds
Joined
Nov 14, 2022
Points
29
Location
Ann Arbor, Michigan
Model of Z
M Roadster
Hello everyone,
This will be the first of hopefully many posts following the path of my Z3 build. I have a 1999 Z3 M Roadster (S52 engine).
IMG_20220521_154535170_HDR.jpg

The idea is to turn the above into a resto/retromod version of the Tribute Automotive GT kit.
1.jpg
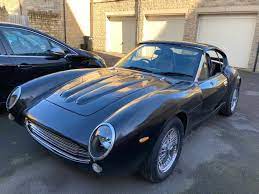
(Someone else's build. Mine will retain the soft top.)

So far I have gone through and refreshed ALL of the underbody bushings as well as completed the Randy Forbes rear differential reinforcement kit.
IMG_20220507_151117777.jpg

The suspension was pretty tired and I want to be able to adjust the ride height once the new body is on to get the right look. I installed TC-KLINE single adjustable coilovers with camber plates. This will also be an added benefit because I enjoy autocrossing and intend to have fun driving this car.
IMG_20221203_190124529_HDR.jpg

Next, I did a tune up on the engine and currently have no plans for modification there. The soft top was in rough shape, so that has been replaced. Currently I am waiting for the body to arrive. While I wait. I will start with the interior!

I would appreciate any pointers as I do this build. I have never done body work before and have always dreamed of doing something like this. For those that follow, thank you for tagging along!
 

Foglem

Dedicated Member
American Zeds
Joined
Nov 14, 2022
Points
29
Location
Ann Arbor, Michigan
Model of Z
M Roadster
The interior, as you can see, was really rough. The seats were torn/beaten. The plastic trim has literally been baked.
IMG_20220522_160757102_HDR.jpg
IMG_20220313_222100698_HDR.jpg

For the trim, I have a few plans. I attempted to rescue the fake carbon fiber by sanding/polishing, but sections were just too far gone to rescue. I decided to remove it.
IMG_20220522_201900919.jpg

A little bit of elbow grease and patience. I had it all off. Some things to notice here. The stereo doesn't fit the car at all. The glove box is sagging badly. Also chrome, some people like chrome, I am not particularly fond of it. I prefer the aluminum look. I decided to wrap all of the chrome in vinyl. So far I like it. I have a bit to do yet but I am not completely sold on the color yet. Time will tell! The good news is that if I don't like it...just take it off!
IMG_20220603_230112143_HDR.jpg
IMG_20220807_200902971_HDR.jpg

I replaced the head unit with a Continental stereo. It's bluetooth, which is real nice, but more importantly it fits the look of the dash. I will address the speakers and amplifier in the future. Most likely creating a new subwoofer box of my own design. Also, tought to see in the picture, but I put a reinforcement plate into the glove box and tightened it right up!
IMG_20230123_192819243_HDR.jpg

As for the seats, stay tuned! They are out being re-upholstered!
This is everything I've done up to date for the most part. I'm looking forward to getting into it.
My next update will be the start of the body removal in preparation for the new body arrival!
 

Mus Musculus

Zorg Guru (II)
Supporter
British Zeds
The M44 Massive
Joined
Nov 27, 2022
Points
114
Location
Ramsey, Huntingdonshire
Model of Z
1.9 M44
Loads to go, but a very good start. I must confess that I don't see a lot of difference between the chrome/vinyl wrapped bits, but that might be an artefact of the photographs.

So, your plan of attack will be to keep the internals pretty much the same, but with a new body?
 
Last edited:

Foglem

Dedicated Member
American Zeds
Joined
Nov 14, 2022
Points
29
Location
Ann Arbor, Michigan
Model of Z
M Roadster
Loads to go, but a very goos start. I must confess that I don't see a lot of difference between the chrome/vinyl wrapped bits, but that might be an artefact of the photographs.

So, your plan of attack will be to keep the internals pretty much the same, but with a new body?
Correct! It is a rebody only. My pictures aren't great,but if you compare the shifter surrounds before and after the fake carbon fiber removal you can see the chrome vs vinyl wrap.
 

Mus Musculus

Zorg Guru (II)
Supporter
British Zeds
The M44 Massive
Joined
Nov 27, 2022
Points
114
Location
Ramsey, Huntingdonshire
Model of Z
1.9 M44
Ah, I got it now! Didn't notice the shifter surround before, and I agree the vinyl wrap looks much better. :thumbsup:
 

DaveP

Zorg Guru (III)
British Zeds
Joined
Mar 26, 2016
Points
128
Location
Reading
Model of Z
Z3 2.2 Kobra rebody (see pic)
Look forward to this build. Did you buy the grp kit direct from Chris at Tribute ? I prefer the cabrio version of this kit so think it a good choice. Good luck !
 

IanA

Zorg Legend
British Zeds
Joined
Oct 4, 2014
Points
74
Location
Oxon
... I prefer the cabrio version of this kit so think it a good choice. Good luck !
+1 from me!!!. I wouldn't want to convert a roadster into a coupe with a roof.

Personal opinion- I don't like the GT front end's appearance which is why I used a modified 250 front on my TFS.
Good luck again.
 

DaveP

Zorg Guru (III)
British Zeds
Joined
Mar 26, 2016
Points
128
Location
Reading
Model of Z
Z3 2.2 Kobra rebody (see pic)
+1 from me!!!. I wouldn't want to convert a roadster into a coupe with a roof.

Personal opinion- I don't like the GT front end's appearance which is why I used a modified 250 front on my TFS.
Good luck again.
Ian

I really like yours actually. The one-off 250 front (from Nick?) made it very unique and a flipping good looking car.

Dave
 

IanA

Zorg Legend
British Zeds
Joined
Oct 4, 2014
Points
74
Location
Oxon
...The one-off 250 front (from Nick?) made it very unique and a flipping good looking car
Thanks- it is the one-off front that makes it unique. That was the only way to get the 250SWB side profile to match the original Z3 doors and hence the GT cabrio rear end. I didn't want the hassle of additional door skins and door handle mechanisms. I think that's why Barber kept the Z3 door profile in his design of the GT.
 

DaveP

Zorg Guru (III)
British Zeds
Joined
Mar 26, 2016
Points
128
Location
Reading
Model of Z
Z3 2.2 Kobra rebody (see pic)
Thanks- it is the one-off front that makes it unique. That was the only way to get the 250SWB side profile to match the original Z3 doors and hence the GT cabrio rear end. I didn't want the hassle of additional door skins and door handle mechanisms. I think that's why Barber kept the Z3 door profile in his design of the GT.
Just had another read of the TFS thread on Madabout. Bloody nice motor and hope to see it sometime this year.

I don’t use my Kobra as often as I should but hopefully a house move will help me get out in it more this year.

Dave
 

Foglem

Dedicated Member
American Zeds
Joined
Nov 14, 2022
Points
29
Location
Ann Arbor, Michigan
Model of Z
M Roadster
Small update this time around. The heater can't quite deal with 7degF (-14degC for you UK people)!

Tail lights removed. Decided to do some speaker investigation while the seats are out. Removed the really funky subwoofer enclosure and the door & kick panel speakers. Hopefully my buddy can help me find some good replacements!
IMG_20230131_184215854_HDR.jpg

IMG_20230131_185305828_HDR.jpg

IMG_20230131_185314925_HDR.jpg

What a weird subwoofer!
IMG_20230131_190445470_HDR.jpg

Kind of interesting that the tweeter and midrange speakers are soldered in. They were cut off and removed.
IMG_20230131_191542203_HDR.jpg

Looks like the kick panel speakers are a thin 5". Next update will be more body panel removal.
 

Foglem

Dedicated Member
American Zeds
Joined
Nov 14, 2022
Points
29
Location
Ann Arbor, Michigan
Model of Z
M Roadster
Body removal has begun!
Starting with the rear bumper moved all the way up to everything but the hood and front bumper. I'm planning on leaving those on until the rear half of the new body is installed. That will save me some space.
IMG_20230207_180527187_HDR.jpg

Some tricky trim removal followed by a. lot. of 8mm bolts. No magic here, just looking around the car and finding fasteners to remove. This was a lot more fun than expected.
IMG_20230207_193325206_HDR.jpg

Things really started to come off quick after this.
IMG_20230207_193742087_HDR.jpg

Had to remove the crash structure of the bumper as a whole first, then reinstalled once the aesthetic stuff was removed.
IMG_20230207_193749068_HDR.jpg
IMG_20230207_205639620_MF_PORTRAIT.jpg

Crash structure reinstalled! Now to remove the side skirts and the front quarter panel.
IMG_20230207_205652741_MF_PORTRAIT.jpg

That's it! Hit a stopping point until I actually (finally) recieve the new body. In the meantime I'll clean up all the dusty bits. Thankfully not a sign of any rust at all! (whew!)

The seats are almost done! A little bit of heat+time and they should tighten up some. I'm pretty excited for them.
received_806753464460251.jpeg

Hopefully next update will be some installation!
 

Foglem

Dedicated Member
American Zeds
Joined
Nov 14, 2022
Points
29
Location
Ann Arbor, Michigan
Model of Z
M Roadster
OK, it has been a while! The car body is due to arrive hopefully this month!

In the meantime I decided to finish up wrapping all of the chrome bits while I stress out about paying a lot of money to ship a car body over seas. The center console, shifter and shifter surround are done. So that leaves the door handles and gauge cluster.
IMG_20230215_142759269_HDR.jpg
IMG_20230215_141515258_HDR.jpg

The doors are real easy. Pry up the "thumb" section of the door pull with a trim removal tool. The driver's side has the power mirror control. Removing it is basically the same as the passenger, there is just a connector behind it. Then remove the entire door car by running the same trim removal tool around the outside of the door. The speakers near the top of the door will be removed as well. Again, not a big deal.
IMG_20230215_143503563_HDR.jpg

Viola! Not too hard at all.
IMG_20230215_143607917_HDR.jpg

Now it's just a matter of removing the chrome lever. We made it. The unit is all in one and you can't really separate them so this might be a bit tricky.
IMG_20230216_190330_01.jpg

Vinyl wrap on the right, original chrome on the left. I found it much easier to work with after removing the small spring that allows the handle to snap back into position. Now it's time for the gauge cluster. This should be hard right? No. No it was not. Remove two small screws under the sun shade and pull on those tabs. There are 3 connectors behind it. It came out so fast I forgot to take pictures.
IMG_20230215_145611601_HDR.jpg

IMG_20230215_200601141_HDR.jpg
IMG_20230215_200921697_HDR.jpg

So here it is. This part was slightly more involved, but not too bad! Flip it over and remove all the screws. Then rotate the 3 barrels 180 degrees. You can see them in the right pictures. Top center and the bottom left and right sides. Black with a white plastic surround. Once those are rotated the entire assembly, including the gauges faces, comes off.
IMG_20230215_202302979_HDR.jpg
received_715181846730070.jpeg

There you have it, before on the left, wrapped on the right. This is such a tiny thing, but if I'm going to swap the body might as well make everything the way I want it right? A few more weeks and we can really get this thing going!
 

Foglem

Dedicated Member
American Zeds
Joined
Nov 14, 2022
Points
29
Location
Ann Arbor, Michigan
Model of Z
M Roadster
Hazaa! The body finally made it in. A little scary at first. The crate had some damage and wouldn't fit in the box truck I got. Luckily there was no damage to the body and with the help of a few friends the crate was dissassembled and the body transported to the shop without issue.
IMG_20230317_141810352.jpg

IMG_20230317_164139958_HDR.jpg


OK, so finally time to start problem solving! The goal now is to test fit all of the pieces and figure out what type of task is ahead.
IMG_20230321_173309915.jpg
IMG_20230321_173919917_HDR.jpg

Lets start with the easier bits and do the side sills. I had to bend the bracket protruding into the wheel well back for the side sill to fit. That's not such a big deal because that bracket is no longer used.
IMG_20230321_174638106.jpg

There is a lip here that doesn't look all that great. Hopefully some adjusting of the new body bits will mitigate this. Otherwise I might have to build the door up? I'm not totally sure yet. TBD!
IMG_20230323_192906136_HDR.jpg

Driver's side fitted on. Similar fitmet, so far so good.
IMG_20230321_173934433_HDR.jpg

Whoa! OK. I'm going to have to re-think my wheel selection. The OEM wheel and tire size that is on there is a 17" 225 wide setup. I wanted to fill the wheel well up a bit so an 18" would be nice. I thought I'd do a 235 wide, but looking at this... I don't know. The hood isn't on yet and you can already see that the wheel will be WAY inside the body. I might have to put a set of steam rollers on here or something...TBD(again!). Exciting stuff. I do really like deep dish wheels...
IMG_20230321_174407184_HDR.jpg

Moving around the back it's time to get serious about relocating the filler cap. There are a few options here. One is to transplant the filler door off of the orginal body, which might not follow the body lines right. The other is a flip-top style, which I really like the idea of, but I'm not totally sure how to implement it. Some other kits cut a pocket and recess the flip top which does look nice. Other cars have the flip top sitting proud on the body. Then of course the location....tbd.
IMG_20230323_185827393_HDR.jpg

Moving around to the rear now. The car will actually grow in length in both the front and rear. The rear requires the trunk to grow. In order to do this the kit requires I flip the bumper upside down. I have to cut a small section off for clearance reasons. Unfortunately I couldn't find something to cut it with so I'm taking it home to take care of later.
IMG_20230323_191424100_HDR.jpg

Test fitting the trunk extension to see fit. Once I get the bumper re-installed (it sits under this piece) I'll have to glue this thing on. Looks like there are two screw holes. I'm guessing that is for a self tapping screw or maybe a nut/bolt combo? hmm.
IMG_20230321_175936025.jpg
IMG_20230323_192642727.jpg

I'm kind of running around the car here doing odds and ends. Moving to the hood, which is still on the car, I have to transfer the hood catch/latch to the new one. This is a pretty nice feature to keep these on the new hood. Saves me a great deal of work. The OEM hinges will be used as well. This will have to wait until I have some help.
IMG_20230321_174549885_HDR.jpg

OK the last things to think about here. Lights! The kit came with headlight buckets. Very nice.
-7" diameter headlights - I can find these everywhere.
-~3.5" diameter lights - These would be turn signals below the headlights, but I'm thinking I'll make the headlights have integrated turn signals. This means this 3.5" hold will be unused. I'll have to decide if I want running lights, fog lights, or maybe make a cool brake cooling duct! Who knows. T. B. D.
-3.25" diameter lights in the rear. Two on each side of the car. So brake lights and turn signals. I could go with the standard lucas light, which does look really good. Perhaps there are other options out there. Time to search the world wide web.
-Lets not forget about the side markers! I have wiring there. I could just close them up and not bother, or maybe put a cool side marker on. We'll see what I find.

Other things I'm considering now...
-Windshield washer sprayers. I don't want them visible. My plan at the moment is to mount them on the underside of the new hood. The spray pattern won't be quite right but as long as the wipers can push the fluid around it's good right?...right?!
-License plate light & reverse light. This one I don't have a lot of choice on. I'll make the purchase and share a picture soon.
-License plate mounting.
-Rear view mirrors. I think I'm removing the ones on the doors and replacing with some more classic rear view mirrors. I haven't picked a set yet.

It's such a nice feeling to be able to actually work on it now.
 

DaveP

Zorg Guru (III)
British Zeds
Joined
Mar 26, 2016
Points
128
Location
Reading
Model of Z
Z3 2.2 Kobra rebody (see pic)
Thank so for posting. I love a build thread and they are few and far between these days. You have started the grp fettling now. It goes on for some time 😀

Thanks again and keep them coming
 

Piran

Dedicated Member
Joined
Oct 21, 2022
Points
39
Other things I'm considering now...
-Windshield washer sprayers. I don't want them visible. My plan at the moment is to mount them on the underside of the new hood. The spray pattern won't be quite right but as long as the wipers can push the fluid around it's good right?...right?!
-License plate light & reverse light. This one I don't have a lot of choice on. I'll make the purchase and share a picture soon.
-License plate mounting.
-Rear view mirrors. I think I'm removing the ones on the doors and replacing with some more classic rear view mirrors. I haven't picked a set yet.

It's such a nice feeling to be able to actually work on it now.
For the washers, could you mount them on the wiper arms with something like this:
 
Top