Time for an overhaul of my 1.9 '98 BMW Z3 Individual

ok so it's Saturday.... couldn't devote the entire day to it, as there was the garden to sort and patios and paths to jet wash !.....

so..... where are we

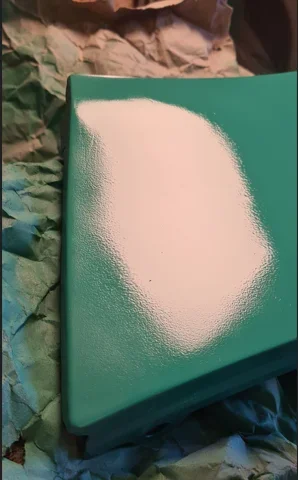
Laid down top coat over my repaired repair.... and I've finally gotten rid of the lump that was bugging me....

1743863357269.webp


as before, it looks orange peely but dries dead smooth

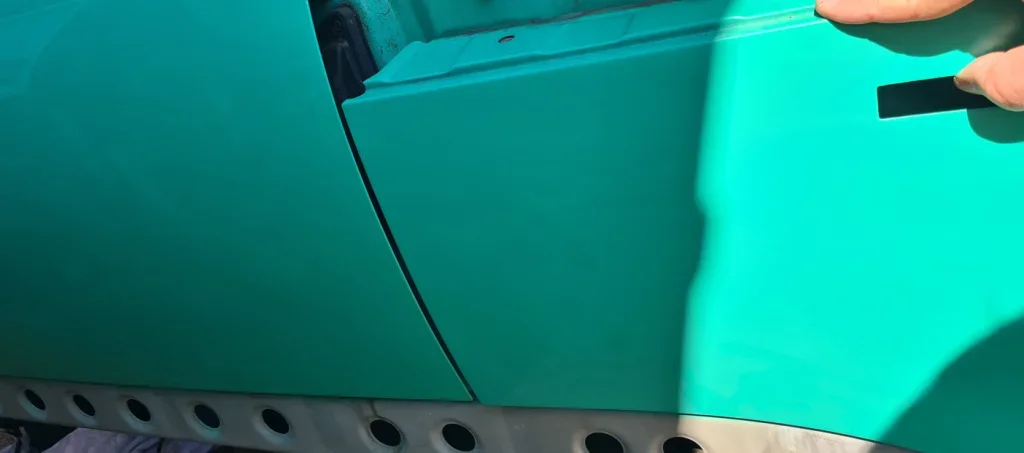
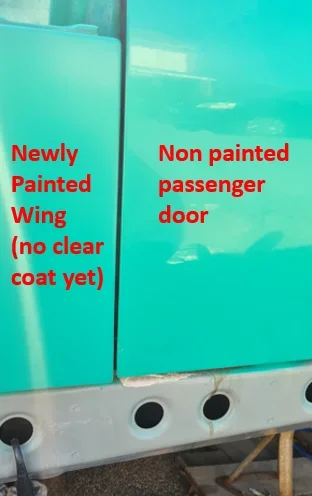
Uncovered the poor car to let it have some sun and Vitamin D =)) =)) ..... offered up the freshly painted wings and the colour match is superb !!..

1743863780352.webp


1743863701711.webp


the next stage is to tidy up the passenger rear quarter, paint that fully..... then 2k Clear Coat on the lot...
 

Attachments

  • 1743863349488.webp
    1743863349488.webp
    18.9 KB · Views: 433
  • 1743863456467.webp
    1743863456467.webp
    17.4 KB · Views: 474
  • 1743863622438.webp
    1743863622438.webp
    16.8 KB · Views: 422
You should open up your garage at the weekend for paying spectators who want to learn .. just stick a few deck chairs out on the drive 😁
 
You should open up your garage at the weekend for paying spectators who want to learn .. just stick a few deck chairs out on the drive 😁
mate..... when you eventually see my garage, it's the size of a shoebox. I need to re arrange everything in order to build up the subframe !
 
well there's be a couple of weeks delay on the Z3, and forgive me for posting pics of a non Zed, but while I had got my painting technique as good as I could get, I paused a bit so that I could paint the rear end of my Peugeot Estate...

1745075866441.png
1745075934953.png

1745075978060.png

1745076014209.png


it's sort of relevant in terms of prep and getting the preparation right is absolutely key.... getting the right grade of sandpaper, then flatten with wet and dry around 2000 grit. I then went over the whole area in Meths (as I didn't have panel cleanser). Then a nice even spraying technique from a rattle can. Leave 15 minutes between coats. I did three decent coats for the rear quarter and then blended in the door, finishing about halfway along the door. Let that dry overnight (luckily it was decent weather!).. then another light wipe over, then three even coats of rattle can clear coat... let that cure for a week before any cutting or polishing.

RIGHT.. back to the Z3 !!

I bought a 15 quid siphon off Amazon, in order to suck the old fuel out the tank..... this particular model connects to a car battery. Car Battery v Fuel Tank.... what could POSSIBLY go wrong ! =)) =))

1745076385287.png


Then today I decided to give the garage a MASSIVE overhaul, somehow I managed to gain about three times as much floor space and I can now FINALLY turn my hands to rebuilding that subframe !!

1745076490495.png


Now the garage looks like a Z3 Butchers... =))..... "ooooh I'll have that lovely cut of spare wheel carrier please!"

1745076977542.png


so... we're onto the rebuild !!!
 
Last edited:
Good job on the Pug..don’t see 206 SWs very often nowdays ..great little cars those
cheers mate....bought it in 2008 ! 😃
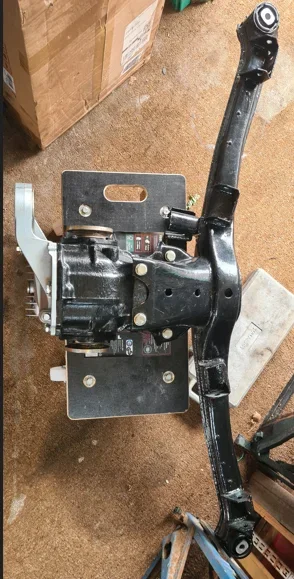
...and it still starts on the first turn of the key...need to replace the inner and.outer tie rods but apart from the usual "light corrosion" on suspension parts, it's still a great car....only a 1.4 8V but hey it's still a go er!
 
SPOILER ALERT !!... there is no painting in this episode !!!! =)) =))

Time to focus on the petrol tank

Somehow and I don't know how... I FINALLY managed to pull apart the "quick" release connector !!

1745678764959.png


Had this great idea of siphoning with a battery operated siphon... but when a Chinese manufacturer specifically forbids use on or near gasoline devices then you do think twice!

So I pulled the fuel pump and dug out my trusty 100mL Syringe.....

First...the fuel pump, absolutely spotless on the inside and not a spec on the filter

1745678906166.png
1745678943555.png


Started draining with a small dish but was taking forever.. the fuel felt a little like jelly..... that must be all the absorbed water...

1745679044048.png
1745679063478.png


Then my trusty syringe came to the rescue with a tube on the end...

1745679121561.png


ended up drawing out 13 Litres of dirty Unleaded with a 100mL syringe.... delightful.. and that's a 25L drum

1745679196356.png


Inside was nice and clean and the fuel pump seal was perfect

1745679279990.png


Being 13Kg lighter, the tank is SO much easier to move around... noticing it was REALLY grubby though..... I sprayed it in WD40 and ragged it down but I'm not sure how long that will last...

1745679377718.png
1745679393386.png


This is why you have fuel compatible rubber.... look at what siphoning the fuel did to the syringe seal.....that was all smooth beforehand...

1745679458371.png


Thought I'd tart up the wheel arch liners with the WD40 trick.... came up quite well !!

1745679525304.png
1745679543332.png


I also repaired the Filler neck gaiter as I didn't realise how pricey they are !!

all the splits repaired with Gorilla Superglue which is really good...

remove the drain carefully by prying open the clip

1745679977066.png
1745679991541.png


stitching it back together was like a jigsaw... one bit was missing so I trimmed an old bit of EPDM rubber to fill in

1745680065564.png
1745680082957.png


clean up with brake cleaner and looking much better !

1745680126995.png
1745680143116.png
 
Last edited:
I think ‘overhaul’ in your title is probably doing you an injustice…I love your determination to repair stuff rather than just bin it and replace. What’s the plan for the fuel ..up to Portsdown Hill and try sell it to the Vauxhall Corsa boyz. 🤣.
 
today I thought I've have an easy session putting the new rear handbrake and new shoes and fittings.....:whistle: :whistle: :whistle:

handbrake mechanism went on fine and one shoe.... fine.... bottom spring.... oookkkaaaay.... top spring !... aaaaarggh !!!... half an hour wrestling with it...

1745765202437.png
1745765219838.png


I tried levering with a screwdriver.... nope.... pulling with a bit of garden twine.... nearly !!

1745765288260.png


I could get it over the hole... but not enough leverage to clip in....so for now I've given up as my hands are hurting.....and I'm in danger of not being able to hold my glass of Gin....

STOP PRESS !.
.... right... I wasn't going to let it beat me.... so tried a different screwdriver levering technique and..... SUCCESS

1745766460855.webp


Took an "after the fact" photo, to remind me in the future !!.... use the hub for leverage and just enough of the screwdriver tip to hold the hook

1745766505206.webp
 
Last edited:
you would think doing the other side would be easier wouldn't you ?..... no...it wasn't ..it fought me all the way.....but.... both Rear Trailing Arms now complete.... I was at my whit's end yesterday after trying for hours trying to get it all assembled.

Slept on it..... that hurt my back so then slept in the bed =)) =))

a new day and I tried the method of fixing the shoes first with the hand brake mechanism, and put the springs on last... it was still tough and still caused me to create new words for the Oxford Dictionary but.......... we're done

1746269293932.webp
1746269318044.webp

1746269347307.webp


so I think I'm now at the stage where I can reassemble the subframe....... !!
 
ok so it's been a while !....had to do some work on the Peugeot, fitted a new DPF, repaired a hole in the boot floor and as the seat belt brackets and bolts were rusted...you know what I did didn't you..... yep, clean, prepped and hammerited the brackets, and... zinc plated the bolts ! =))

1750515867655.webp


After that, was a two week break in The Maldives 🌴🌴🍹🍹🥃🥃🥃...... oh so very nice, which also made me a tad lazy... so this weekend it was back on the zed !... today was rebuild day !! and you will see many trials and tribulations and a liberal dose of profanity...

right.... first ....gather all the big bits !

1750514768028.webp


and start bolting them together !.......... and no I haven't added the Diff gasket yet... ( this is me lying on social media... ssssshh)

1750514871129.webp
1750514890057.webp


so far so good....... then..... I'm about to hit my first snag..... those who have done this on a trolley might guess what it is.....no scrolling for the answer and don't copy your friends answer !

1750514966195.webp


ok so here is comes........ adding a Trailing Arm.... you quickly realise.... idiot... the hint centres around the washing up bowl

1750515228622.webp


That's right kids !.... now I can't move it !.... yay !!! or move it under the car ! yaaaay !!!

decided on Trolley 2.0 which employed some handy planks (actually it's pallets that I broke up)

1750515326320.webp


now for round 12........ on with the subframe and Trailing arms.... and ???..... yep the whole thing collapsed including the wheels..... OH how I laughed.

1750516119062.webp

1750515421189.webp


It actually trapped my foot, so after much swearing and pulling... I thought... "it's either my foot or the croc.... one of us has to go".....so I sacrificed my trusty croc....

I sensed another modification..... bracing !.... Trolley 3.0

1750515574248.webp

now we're cooking with gas !!... so flipped it over and away we go...

1750515630909.webp


so for now.... we have a rear subframe !!.....

1750516182153.webp
1750516201141.webp
1750516228980.webp


Next steps, apart from putting on the driveshafts is to tighten and torque everything. I might wait to put the rear discs on after I've put the subframe back on the car....
 

Attachments

  • 1750515037517.webp
    1750515037517.webp
    34.7 KB · Views: 338
  • 1750515071825.webp
    1750515071825.webp
    51.8 KB · Views: 376
  • 1750515788903.webp
    1750515788903.webp
    20.8 KB · Views: 373
Hi Matt
Just been reading the thread …. if you need a tank I have two … you are welcome to one if you want it …
Malc
 
Hi Matt
Just been reading the thread …. if you need a tank I have two … you are welcome to one if you want it …
Malc
thank you as ever mate. My tank has cleaned up very well using tyre restorer of all things, so hopefully it'll be ok. Your straps fit great so once I lower the car it'll all go back on...
 
Back
Top