Time for an overhaul of my 1.9 '98 BMW Z3 Individual

Lee

Zorg Guru (V)
British Zeds
M Power
#ZedShed
Joined
Mar 26, 2014
Points
193
Location
Basingstoke
Model of Z
Z4 Coupe 3.0si
To be honest I don't use any grease, I go in dry like a savage.

But I do clean both surfaces.

I use a really big Record vice and the bush does sometimes move/twist so I just release the pressure and adjust to press on the high spot.
 

Matt Barnes

Zorg Guru (II)
Supporter
British Zeds
Joined
Jul 18, 2020
Points
123
Location
Portchester, Fareham
Model of Z
1998 BMW Z3 Individual 1.9 M44 B19
To be honest I don't use any grease, I go in dry like a savage.

But I do clean both surfaces.

I use a really big Record vice and the bush does sometimes move/twist so I just release the pressure and adjust to press on the high spot.
cheers Lee..it's really weird it seems to stick at the same point each time. I can see the bush casing is not fouling, and when I release the vice it just falls out...I might have to go hard or go home...and have a Diff rear plate in my Ebay basket just in case =))
 
  • Agree
Reactions: Lee

Matt Barnes

Zorg Guru (II)
Supporter
British Zeds
Joined
Jul 18, 2020
Points
123
Location
Portchester, Fareham
Model of Z
1998 BMW Z3 Individual 1.9 M44 B19
ok. so today is Diff Bush Day No.2

Not sketchy at all to prop a big vice on the bench with blocks of wood.

1739621964659.png
1739621988373.png


I noticed there were a couple of nicks on the front face which may have prevented the bush from seating properly, so I flipped it round and put it in from the rear of the case, which was actually better because it's a flatter surface.

1739622146146.png
1739622170324.png


I didn't have a long lever as all my jack stands are under the car !.... so resorted to bashing the vice handle with a wood mallet !

1739622269072.png


I kept going until I felt it bottom out....it looks like it could do with a couple of more millimetres though...

1739622341729.png


However, look how much is left out from the back... hopefully the bush is supposed to be deeper than the Diff case

1739622446428.png


but.... we're in !

1739622484512.png
 

Matt Barnes

Zorg Guru (II)
Supporter
British Zeds
Joined
Jul 18, 2020
Points
123
Location
Portchester, Fareham
Model of Z
1998 BMW Z3 Individual 1.9 M44 B19
well.... with the Bush now in... something has actually been finished and ready to go back in !.... only taken 1.5 years.... good job I don't charge myself labour !! ... =)) .. everything original and refreshed apart from the Bush and the gasket of course !

August 23...

1739713029949.png

1739713050808.png

1739713069454.png


February 25...

1739713119404.png

1739713137398.png

1739713161899.png


That speed sensor will get swapped out as it's letting the side down.....

guess the next stage is to start building up the rear end ready to get everything back on the car....
 

Matt Barnes

Zorg Guru (II)
Supporter
British Zeds
Joined
Jul 18, 2020
Points
123
Location
Portchester, Fareham
Model of Z
1998 BMW Z3 Individual 1.9 M44 B19
Slight change of tack today..... bodywork !... I'd been putting off attacking the rear quarter panels until there was decent weather... which was today

unbolted the hinges for the boot lid in order to release the last four panel screws. hinge screws are 10mm, panel screws are 8mm

1740839049090.png


et voila !... really impressed with the e-coat.... this is it just dusty and dried mud

1740839088823.png


and look how well it cleans up

1740839170690.png
1740839192324.png


now onto the order of business..... panel rust... in the favourite spots

1740839238299.png
1740839265024.png

1740839297879.png


I don't know what the black stuff is that was sprayed over the e-coat. It was the same on the inner sills, but about as useful as an ash try on a motorbike.

so it was out with the angle grinder and flap wheel to reveal a nice hole

1740839423607.png
1740839483614.png


it looks very tricky to weld.. especially with my skills.... so I'm thinking.... gulp... don't hate me here... JB weld ?.. it's not a huge hole.. maybe an inch in diameter... dunno at the moment...

in the meantime I've ground back and treated with Kurust

1740839780439.png
1740839798203.png


I can't get the nearside panel off because of the aerial and I need to remove the boot lid loom, to remove the boot lid.. I can't see at the mo if it just plugs in inside the boot lid?
 

t-tony

Zorg Expert (II)
Supporter
British Zeds
#ZedShed
Joined
Dec 31, 2013
Points
226
Location
Torksey Lock,Lincoln, England
Model of Z
E89 Z4 23i Auto
All separate plugs to each individual items. Just tie a string to each and label where it came from. Pull the loom (and strings out) then use the strings to pull them back in. Dead easy.

Tony.
 

Matt Barnes

Zorg Guru (II)
Supporter
British Zeds
Joined
Jul 18, 2020
Points
123
Location
Portchester, Fareham
Model of Z
1998 BMW Z3 Individual 1.9 M44 B19
All separate plugs to each individual items. Just tie a string to each and label where it came from. Pull the loom (and strings out) then use the strings to pull them back in. Dead easy.

Tony.
thanks mate....like an idiot I took the boot hinges off hoping to make getting stuff off easier...it's not and it doesn't, so I need to put them back to deal with the loom and antenna...well..loom definitely !
 

Matt Barnes

Zorg Guru (II)
Supporter
British Zeds
Joined
Jul 18, 2020
Points
123
Location
Portchester, Fareham
Model of Z
1998 BMW Z3 Individual 1.9 M44 B19
well today was bodywork day.... I invested in a fibrelass repair kit, some Isopon P40 (which I didn't use in the end), Isopon P38 and Dolphin Glaze.

1741443497993.png


So this is my area of focus.... and it's the same on the nearside, so I get to do it twice !!... the black is rust treatment by the way

1741443595593.png


incidentally, I also tracked down some body panel clips that were direct replacements for the ones of the car

1741443672865.png


anyway back to the panel repair !

1741443724408.png

1741443748227.png
1741443841937.png


once dried it was on with the P38...plus little reminders of the prepping process !! .... =)) =))

1741443956065.png


used 80 grit to get level, then 180 grit to feather the edges so you can't feel the ridges

1741444079086.png


Then it was on with the dolphin glaze, which is self levelling and fills any imperfections

1741444970819.png


So all that needs now (as the panel reminds me !) is a light going over of 80 grit... then 180 grit... and then 320 grit... prime and paint... which wont be today !
 

Attachments

Matt Barnes

Zorg Guru (II)
Supporter
British Zeds
Joined
Jul 18, 2020
Points
123
Location
Portchester, Fareham
Model of Z
1998 BMW Z3 Individual 1.9 M44 B19
well today was the turn of the nearside rear quarter to come off..... hardest part was pulling the antenna amplifier out the grommet !... but got there in the end.....so it was off the panel......again although a little muddy and dusty, the e-coat had certainly done it's job !!

1741532920830.png


bit of brake cleaner and all was good

1741532965497.png


must say she's looking a bit sorry for herself at the moment...boot lid unhinged but not unplugged yet

1741533040811.png


usual suspects on the bottom corner of the wheel, arch, but surprisingly not as bad as the offside

1741533109552.png
1741533131561.png


As I now have new panel clips, I'll be ditching these as there's no way you can completely clean these up

so a lot of grinding with the flap wheel on the angle grinder, revealed it's past... like an episode on Time Team ! =)) =))

someone had gone to the trouble of making a perfectly fitting patch.... then..... glued it in with body filler ! I mean, the fabrication is quite impressive, it even settles on a little ledge on a screw tab.

1741533326279.png
1741533347367.png


But... picking away with a pick and it managed to fall off..

1741533466069.png
1741533486559.png


now that the area is all cleaned up... I have considered re using the patch, but trying to tack it in...

1741533563301.png


but for now it's just rust treatment all round

1741533608240.png
1741533624670.png
 

Matt Barnes

Zorg Guru (II)
Supporter
British Zeds
Joined
Jul 18, 2020
Points
123
Location
Portchester, Fareham
Model of Z
1998 BMW Z3 Individual 1.9 M44 B19
well at the moment it's eyes down on the bodywork..... firstly I always told myself that one day I'd be able to get the car in the garage... and now I have !! =)) =))

1742129713491.png


so let's get cracking on those wings !!

1742129751144.png

1742129768067.png

1742129787609.png


bit a bit more Time Team and dug away at what was causing all the rust on the inside.... turns out the stiffening U channel is "sealed" with some body seam sealer. So the any water just sits on this and rots through....I picked some of it out with a screwdriver and it was all surface rust underneath which bled through to the outside paintwork

1742130716943.png


I used a finger sander, dremel wheels and even a milling bit to get into all the nook and crannies

You can see the holes made my standing water as it can't drain out

1742130896870.png

1742130919250.png


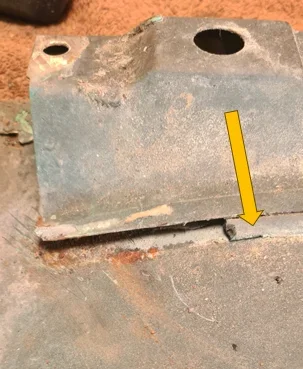
More seam sealer picking out... rinse and repeat on the other wing.... and the same symptoms... rusted along this stiffener... I've arrowed what left of the sealer which didn't have rust behind it

1742131195822.png


Tell tale signs on the front

1742131142409.png
1742131225967.png


so I set to with the flap wheel and the Dremel with various grit of Dremel sanding wheels.... then I dug out my old friend POR15 and got a thin wide brush and liberally dosed both wings..... and this is POR 15 dry !... dries rock hard and shiny. I'm actually NOT going to replace that sealer, so there's now a gap between this stiffener and the wing and that's got to help drainage.

1742131329709.png
1742131397819.png


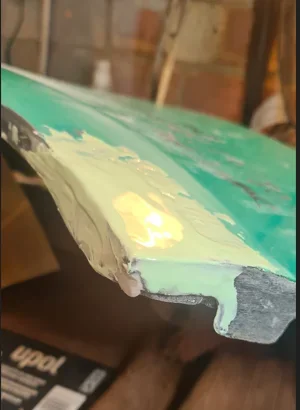
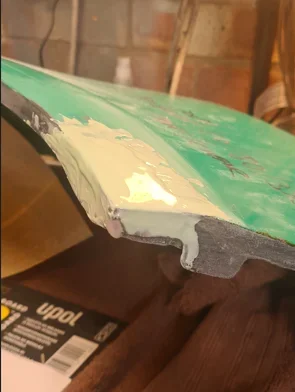
Now... onto the rear quarters..... I've always admitted any of my shortcomings , and given this bit would have been too hard for me to weld..... I cheated.... yes... I cheated.... that little patch I managed to dig out? that was put in with body filler?.. I re used it....:rolleyes::whistle::whistle:

but.. this time I fibre glassed it in... made sure the sheets were criss crossed with plenty of resin.... and I have to say, it's now absolutely rock hard. The black is the Kurust I used after grinding off all the rust inside the panel

1742131703977.png
1742132282102.png


Then it's on with the Isopon 38 and I'll let that cure before I start the sanding process....

1742131776971.png

1742131803785.png


back to the wings.... and I hit those with 80 grit in a criss cross pattern (apparently, you never sand in circles) to remove most of the POR15 residue....then I used 
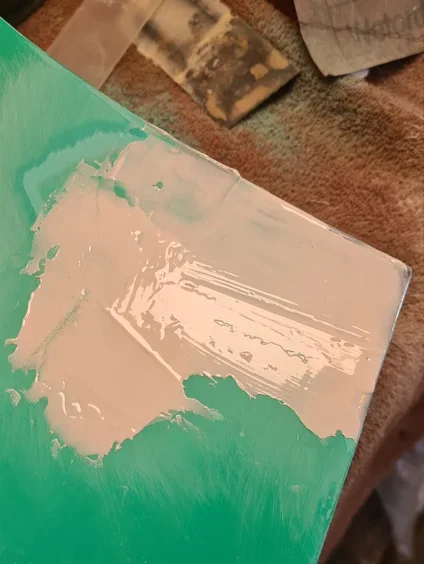
knifing putty to fill the small craters caused by the rust

1742132030254.png
1742132080916.png


so now I wait for that to all fully cure, before I start the sanding process again...

Isopon set and rubbed down ready for the dolphin glaze stage

1742136533549.png
 

Attachments

Last edited:

Matt Barnes

Zorg Guru (II)
Supporter
British Zeds
Joined
Jul 18, 2020
Points
123
Location
Portchester, Fareham
Model of Z
1998 BMW Z3 Individual 1.9 M44 B19
I wanted to complete this session by at least getting the panels primed.... and we nearly got there..

right let's start with the offside rear quarter..... the idea being, get the filler nice and flat and also key the surrounding area (here up to a natural curve) as although I'll be painting that bottom corner, i also need to blend in the 2K clear coat. This will then be polished and in theory won't be a line in the clear coat... I did the same process for the nearside rear quarter, roughing the clear coat to a natural curve.

1742655277127.png
1742655345260.png


Same theory with both front wings, however, as they are small I keyed the whole panel making sure there's no reflection

1742655415278.png


once all the panels are prepped, a quick wipe over with meths (I don't have panel wipe) and it was on with the filler primer

1742655490953.png


I heated each panel in order to help the primer flow a bit better....

1742655547468.png


Results turned out ok...

1742655596801.png

1742655620739.png
1742655642451.png


wasn't entirely happy with the offside rear quarter, you see a little raised edge and a little bulge which I didn't pick up running my fingers over the repair

1742655866586.png
.

so I rubbed it down again when it was dry, tried again

1742655924508.png


looks better, but we'll see how it dries overnight...... needs 24 hours to fully harden so I'll update then ! worst comes to the worst, you just sand it down and try again......

1742656012692.png
 
Last edited:

Matt Barnes

Zorg Guru (II)
Supporter
British Zeds
Joined
Jul 18, 2020
Points
123
Location
Portchester, Fareham
Model of Z
1998 BMW Z3 Individual 1.9 M44 B19
well today was laying down some paint day......... all went surprisingly well..... and then.... I had to have a visit to the confessional.... :whistle:

let me explain..... so

started with wiping down the panel... ready for paint...... that little dark area arrowed in yellow becomes important later........

1742740129474.png


anyway... let's get some colour down


started off with two coats of fiji green and I must say I am really impressed with Tristar colour paint.... went down SO evenly

1742740232738.png

1742740257695.png


and this is how it dried......very impressed

1742740308123.png


I then did the other wing but it was very clear that what I thought was flat... was very clearly not.... so although the paint finish was fantastic... that's going to have to come off and be resanded

1742740450850.png


next up was the offside rear quarter and I have to say the colour match is excellent !!!

1742740537763.png


I actually finished just below the filler cap, even in person once the paint had flashed off you can't see the join

1742740612507.png

1742740644107.png


now..... about that yellow arrow....... time for confession........

once it had dried I noticed the dark area was actually a little clump, it didn't show when the paint was wet, but when it dried it looked like a relief map of Peru.........

1742741005344.png


so like an idiot.......I tried sanding it back......and of course because the paint hadn't fully cured, it just all balled up in lumps

1742741051007.png


in the end I had to go to extreme and get the angle grinder out and going back to bare metal.......


1742741115233.png


I've now refilled that hole with stopper.... and I'm now going to LEAVE IT !!!.... until next weekend when the paint would have fully hardened and I can try it again....

taking the positives.. if you ignore where I've been a complete cretin......look how even that paint is..... I'm also going to order Tristar 2k clear coat to finish it off with....

so next steps.... redo that front wing... then take the scotchbrite lightly to all the panels so I can then do the clear coat
 
Top