Time for an overhaul of my 1.9 '98 BMW Z3 Individual

Great work mate, looks amazing under there!

What did you end up doing about the bracket for the fuel/brake line, where the clip had sheared off leaving the screw in the threaded post? I can see you managed to get it sorted!

1754749432058.png
 
Lovely job that mate. Those rear drop link lower brackets are sided and have a very slight twist to them, Best way to get them right is when its all back on the car and the arms are raised.
 
Great work mate, looks amazing under there!

What did you end up doing about the bracket for the fuel/brake line, where the clip had sheared off leaving the screw in the threaded post? I can see you managed to get it sorted!
erm....er...um...I haven't...it's what they call "youtube ready"...because the pipes slightly splay out the clip, I was able to clip on the metal cap as it has a little metal tang. I could just pull it off again. I do need to sort that.
 
Lovely job that mate. Those rear drop link lower brackets are sided and have a very slight twist to them, Best way to get them right is when its all back on the car and the arms are raised.
thank you mate..that's interesting as they're the same part number..unless I just flip them round in situ?
 
  • Agree
Reactions: Lee
erm....er...um...I haven't...it's what they call "youtube ready"...because the pipes slightly splay out the clip, I was able to clip on the metal cap as it has a little metal tang. I could just pull it off again. I do need to sort that.
one thing I did think of was cutting the shank off a bolt, JB Welding it to the stud that's left and securing with a nut
 
After last weekend's big push, not much this Saturday..... I did end up fettling the Sill ends and putting top coat on finally....

1755355185112.webp


Tried to blend it in with the original (hence the deliberate bit of overspray that pokes out from under the outer sill when they go back on)

1755355283771.webp


so that really ends the excuses of having it on four jack stands....... however.... I didn't joke when I said I hadn't addressed the front yet.....

1755355380467.webp
1755355408797.webp
1755355600188.webp


I have new tie rods and and wishbones, so that's not an issue as these ones are going.... I did take an angle grinder to the front shock and disc and it's all clean metal under that grot.... in fact the discs look nearly new, not even a hint of a lipped edge. So hopefully i take take all that off and clean it all up.

The front anti roll bar was "dusted" with surface rust but came up fine but the bush looks a bit cracked. You can see in the background how far gone the tie rod is... but that's going....

1755355693481.webp
 
Sunday was supposed to be nice and relaxing... but nooooooo... like a fool I decided to attack the front suspension.... as I suggested yesterday... very crusty down there !!... but managed to get a shot of the front shock label...

1755441131174.webp
1755441192627.webp
1755441219425.webp


First challenge was trying to get the caliper off... don't think the offside one has been off in decades.... couldn't get the hose out so had to sacrifice the pipe and the spring clip...

1755441331182.webp


These were all my instruments of torture to try and get the caliper bolts off !!... :whistle: :whistle:

1755441396520.webp


but..... we got there !!.... the brake union was solid in the hose, so ended up putting it in the vice and using a flat spanner on the flats on the hose end to get it off.... looks like I'm making new front brake lines as well !

1755441492696.webp
1755441578931.webp


Then it was a case of attacking the shock and the tie rod...these bolts were ABSOLUTELY solid... it took a big breaker bar to get them moving.

1755441714154.webp
1755441752236.webp


Got the two bottom ones done, then I attacked the Tie Rod ....again needed brute force to even budge it...even though I'm replacing it, I still make sure to smack the nut and not the thread...... and the thing flops around like a floppy thing, so the inners need replacing as well...

1755441960412.webp


The last bolt for the day was the top one on the shock. I just about managed to get the nut off, but that bolt is in there !!... I managed to turn it with a breaker bar and whacked the end (via a block of wood) but it's not budging...

1755442095795.webp


So after hours thrashing like John Cleese with a branch on an Austin 1100... this was the total haul for my efforts... and I've got to do the nearside as well yet ! :whistle::whistle:... I know I should use the nugga gun... but after my nightmare with that driveshaft nut two years ago, I'm mentally scarred

1755442171124.webp
 
ok Bank Holiday weekend, and I'm not going to try and spend every day under the car...... however... while I'm here......

dug out my box of front suspension parts that I've been building up over the past two years.

1755962747115.png
1755962771004.png


compared to what's on the car it was a sound investment !

1755962822544.png
1755962870293.png


First thing to come out was the Shock Absorber..... which was relatively painless in the end

1755962939861.png


that's when the easy bit finished..... tried getting the tapered ball joint off the knuckle.... :whistle: ..nut came off easy and the bolt didn't swivel on me...

but could I knock it off ?..... no..... I do have a ball joint splitter but as it has a web each side it won't sit flush... so I'll have to get a different design.... in fact it's just dawned on me posting this, that I have a hub puller !!!!

1755963168976.png
1755963187476.png
1755963213907.png


so I abandoned that for now and went for the drop link.... had that horrible moment when the socket just slipped on the nut... probably from the rust eating the edges...... so.... out came the Erbauer helical extractors and took it off like a champ :party:

1755963531815.png
1755963551734.png


loosened the lollipop bolts but then looked at the wishbone middle nut with a "how the hell do you get that off !!"... watched a YouTube video where one guy used a two foot extension and a wobble adaptor from up top..

I took the front undertray off...... oh... and guess which one was the last screw I needed to get off..... ? :whistle:

1755964344267.png


and yes I had a long term oil leak.... I'm hoping it's the rocker cover

1755963757399.png

1755963776628.png


Now with that lot all out the way, I reckon I can get onto that top nut when I remove the inner tie rod. Has anyone successfully removed the wishbone with everything in place ?

So I wrapped it up for today.... once I have the knuckle off I can rinse and repeat on the nearside...

1755964148844.png

1755964174315.png

1755964195650.png

1755964216173.png
 

Attachments

  • 1755963136700.webp
    1755963136700.webp
    35.1 KB · Views: 443
  • 1755963732337.webp
    1755963732337.webp
    72.4 KB · Views: 523
  • 1755963809193.webp
    1755963809193.webp
    47.1 KB · Views: 476
Last edited:
ok it's Monday and after managing to get the nearside off in less than half the time it took for the offside, I'm calling it a day..... but to recap

This is what welcomed me this morning, so let's get cracking

1756127513838.png


Caliper I fitted a few years back still really good !.. and at the same time I fitted a new brake pipe which unscrewed easily !!... and plenty of meat on those shoes, so they're going back on...

1756127601053.png

1756127625126.png
1756127770473.png
1756127677010.png


Got the nearside off in what felt like 20 minutes !!.... tried my hub puller (which I found !) but alas to no avail, just kept sliding off as it was going off at an angle...

1756127853182.png
1756127874714.png
1756127920770.png


So this time a tried a different approach.... get the wishbone (lower control arm) off and take the bits off in the garage..... first was getting onto the 22mm nut... and with the undertray off it was easy to get to ... but had to use the "double spanner" method to get any leverage....

1756128099092.png
1756128119600.png


As you've probably experienced, you get about 10 degrees of turn and have to keep repeating it until it's off....so with that nut off, the lollipops off and drop link off we get to this....

1756128247331.png


undid the offside one as well...

1756128522635.png


and that left me a bit stuck as I can't get that centre ball joint off. Tried crow bar, tried banging... so if you have any tips I'd appreciate it

so while I was mulling the meaning of life... I got the anti roll bar off...

1756128466505.png


So the car now is the lightest it's going to be :party:.... actually no, as there's the tie rods to come off.... caught out on a technicality

1756128595464.png


Thinking of pimping my ride...=))=))

1756128640259.png


so this is my weekend haul !... the car got lighter... and the garage got heavier !!

1756128685691.png


so now it's time for ☀☀🥃🍸
 

Attachments

  • 1756127724927.webp
    1756127724927.webp
    20 KB · Views: 446
  • 1756128217068.webp
    1756128217068.webp
    35.6 KB · Views: 396
  • 1756128411728.webp
    1756128411728.webp
    45.7 KB · Views: 439
  • 1756128570881.webp
    1756128570881.webp
    56.2 KB · Views: 480
Last edited:
maybe some blue lights under the sills and a massive sub woofer ?.... luckily I was in shade for the nearside :party:

I think the blue lights will be on the car following you if you dont extend the wheel arches :whistle: :whistle: =))=))
 
I had the same problem separating the center wishbone ball joint from my front subframe. I purchased this kit DAYUAN 5 pcs Ball Joint Separator... https://www.amazon.co.uk/dp/B08M611VRD?ref=ppx_pop_mob_ap_share It took some hammering and the tool held up well. I don’t know how far you are from Banbury but your welcome to pop over and borrow it or just bring your subframe over and sort it, give it a clean up and epoxy paint it while your here?
 
I had the same problem separating the center wishbone ball joint from my front subframe. I purchased this kit DAYUAN 5 pcs Ball Joint Separator... https://www.amazon.co.uk/dp/B08M611VRD?ref=ppx_pop_mob_ap_share It took some hammering and the tool held up well. I don’t know how far you are from Banbury but your welcome to pop over and borrow it or just bring your subframe over and sort it, give it a clean up and epoxy paint it while your here?
thank you so much mate, I really appreciate it..ironically that's exactly what I've just ordered off Amazon!..I'm in Portchester which is about as South as you can get without getting wet..when I'm on four wheels I'll come up and visit !
 
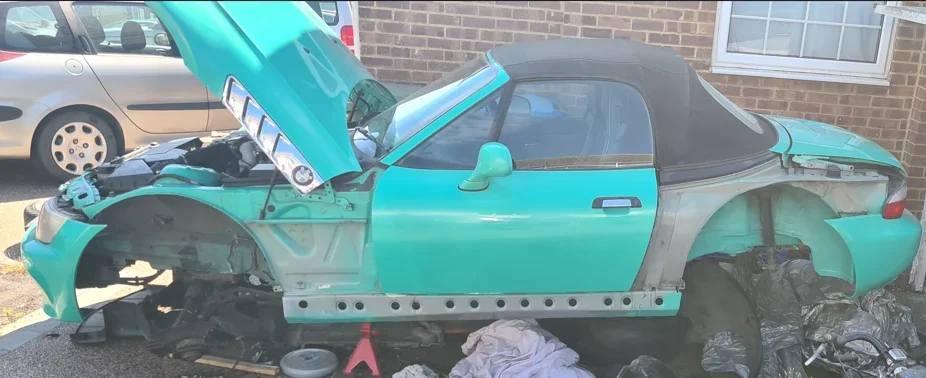
ok, so it's Saturday, and another day on the car....firstly.... "new" shocks turned up on Tuesday courtesy of eBay. well.... better than the ones I took off !.... they'll get rubbed down and sprayed gloss black.... :party:

1756559853199.png


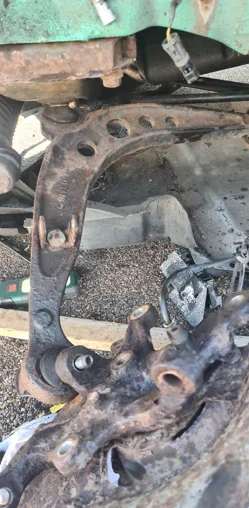
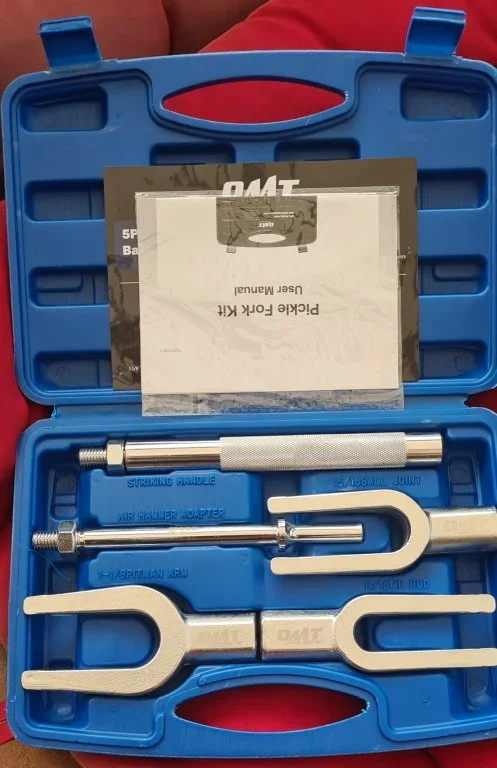
Then I attacked that lower control arm with the pickle fork and OH MY GAAAAAAAAAD.... both came off in about 10 minutes !! ..used it as well to separate the lower ball joint from the knuckle... so as @Althulas suggested, these are DEFINITELY the way to go if you're not planning on putting those ball joints back on.

1756559938313.png
1756559973581.png


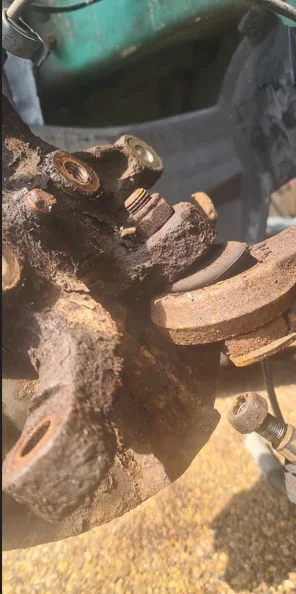
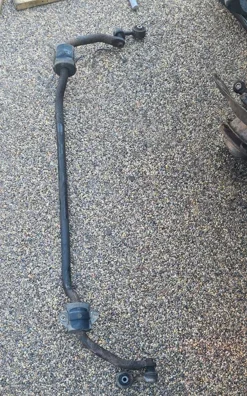
so for posterity when I look back, this is the state of the hubs...

1756560179277.png
1756560205071.png

1756562600632.webp

1756562623073.webp
1756562643080.webp

1756562668134.webp


and i had a little chuckle to myself when I saw the brake pad wear sensor was tucked into the clip :whistle:

1756560273218.png


"While I'm here" I thought.. I'll get the bearings out.....

1756560336714.png
1756560357168.png


knocked the tabs back ......... DUG OUT THE NUGGAAA !!!!....

1756560408564.png
1756560431221.png


The nut didn't round off on me like it did with the driveshaft nut a couple of years ago, so I think I've finally overcome my fear of Impact Wrenches.

used the old trick of dropping an extension bar down the hole...

1756560562335.png


Then failed to take a photo of my hub puller setup..... :whistle::whistle:

hang on let me recreate for educational purposes..........................................................right... I'm back....

there you go....

1756560886749.png


both Hubs came off really easily and did I get away with it ??

...... no

1756560967058.png
1756561036765.png
1756561084317.png


Tried getting the hub puller on the bearing shell that was left over and... no dice chicago....

So I tried the angle grinder approach, but getting in there with the back plate on was tricky, so thought I'd cut it off as I have new shiny ones !!

what is this race doing ?... marked with the yellow arrow... it's not part of the bearing and I don't want to destroy it, but it's stopping me getting the backplate off and hence the bearing shell

1756561350177.png
1756561385238.png


so that should be the last of the big parts off..... definitely onto the front end rebuild !!!
 
Last edited:
Back
Top