You are using an out of date browser. It may not display this or other websites correctly.
You should upgrade or use an alternative browser.
You should upgrade or use an alternative browser.
Dino D's Z3 2.8 Custom build. '98 Montreal Blue
- Thread starter Dino D
- Start date
Great colour
I couldn't agree more!Great colour

I couldn't agree more!
Great yes, but not fantastic for German sports cars, like Titan Silver is.
")
Great yes, but not fantastic for German sports cars, like Titan Silver is.
Careful, be very very careful!!
 .....
.....Titan silver is a great colour as background for the sign-writing any decent breadvan would haveGreat yes, but not fantastic for German sports cars, like Titan Silver is.
")
I actually wanted a silver one. It works well on a Z3.
Managed to update the first post with the full list (I think!) of improvements and a bit about the day I collected it in 2011... list is longer than thought..
Still need to add updates from Feb 2015 onwards after when she went for surgery at the Zed shed and some ups and downs with a re-wire and some great runs out.
Still need to add updates from Feb 2015 onwards after when she went for surgery at the Zed shed and some ups and downs with a re-wire and some great runs out.
Raid 340mm airbag steering wheel fitted
Been wanting to do this for years but a new 340mm Raid with airbag and hub adaptor has become a bit silly price wise.
So when @Brian H had his one going spare I decided to bite the bullet (despite the Dakar yellow accents on the wheel, these Dakar owners really like their yellow )
Removing the old wheel should have been a 5mins job but I managed to strip the head of the torx bolt behind the wheel so that took time and lots of wasted fancy easy out type bits (drilled it out in the end).
After getting it off I realized what a plonker I've been - if I'd removed the bottoms half of the steering cowl (one Philips screw only) I would have had more room to engage the torx bolt straight on instead of at an angle and most likely avoided the hassle..so top tip is to remove the cowl before loosening the airbag bolts.
Fitting the Riad was easy using this guide https://zroadster.org/articles/bmw-z3-fitting-a-smaller-steering-wheel-by-mike-fishwick.42/
and advice from Brian. It was a straight forward fitment as mine is single stage airbag car (for a dual stage car which is facelift only I belive there is extra wiring as the Raid is single stage only).
Now the Raid is popular fitment for Porsche and other track day drivers, especially in Germany where they seem more plentiful.
I've seen the wheels in some older Astons and low series number cars like Weismann etc. In the pics I've never been convinced by the looks but I wanted a smaller diameter but now it's fitted I have to say it looks great from the drivers seat.
I nearly bought a 320mm once as those are more plentiful (340mm seems very rare used) but after chatting with Z owners everyone said 340mm is small enough. It doesn't seem like much difference (standard is 370mm) but it's very noticeable. Not just the size but the placement for hands, it's a wheel your can only really hold in the 'driving' position so encourages good habits.
Have only managed a short drive but I'm very happy. It looks lovely in the flesh (and feels great being alcantara).
I'm leaving the Dakar stitching for now as reminder of the track day heritage this wheel comes with at the hands of Z3 track day guru @Brian H (I reckon that alone is improving my steering skills )
The oversteer indicator will take some getting used to, the yellow line draws the eye!


Been wanting to do this for years but a new 340mm Raid with airbag and hub adaptor has become a bit silly price wise.
So when @Brian H had his one going spare I decided to bite the bullet (despite the Dakar yellow accents on the wheel, these Dakar owners really like their yellow
)Removing the old wheel should have been a 5mins job but I managed to strip the head of the torx bolt behind the wheel so that took time and lots of wasted fancy easy out type bits (drilled it out in the end).
After getting it off I realized what a plonker I've been - if I'd removed the bottoms half of the steering cowl (one Philips screw only) I would have had more room to engage the torx bolt straight on instead of at an angle and most likely avoided the hassle..so top tip is to remove the cowl before loosening the airbag bolts.
Fitting the Riad was easy using this guide https://zroadster.org/articles/bmw-z3-fitting-a-smaller-steering-wheel-by-mike-fishwick.42/
and advice from Brian. It was a straight forward fitment as mine is single stage airbag car (for a dual stage car which is facelift only I belive there is extra wiring as the Raid is single stage only).
Now the Raid is popular fitment for Porsche and other track day drivers, especially in Germany where they seem more plentiful.
I've seen the wheels in some older Astons and low series number cars like Weismann etc. In the pics I've never been convinced by the looks but I wanted a smaller diameter but now it's fitted I have to say it looks great from the drivers seat.
I nearly bought a 320mm once as those are more plentiful (340mm seems very rare used) but after chatting with Z owners everyone said 340mm is small enough. It doesn't seem like much difference (standard is 370mm) but it's very noticeable. Not just the size but the placement for hands, it's a wheel your can only really hold in the 'driving' position so encourages good habits.
Have only managed a short drive but I'm very happy. It looks lovely in the flesh (and feels great being alcantara).
I'm leaving the Dakar stitching for now as reminder of the track day heritage this wheel comes with at the hands of Z3 track day guru @Brian H (I reckon that alone is improving my steering skills
)The oversteer indicator will take some getting used to, the yellow line draws the eye!
Last edited:
- Joined
- Dec 20, 2016
- Points
- 94
Looks brilliant Dino! Nice to read a little into the story behind buying the car as well 
I've had a pair of front wings and side grilles in a half smoothed state for a while now, so when I saw your pictures was like dammit! . Didn't notice the bonnet badge and aerial being gone at first, looks great as a whole
Bet it's difficult to leave it dirty for more than a day now isn't it?
I've had a pair of front wings and side grilles in a half smoothed state for a while now, so when I saw your pictures was like dammit!
. Didn't notice the bonnet badge and aerial being gone at first, looks great as a whole Bet it's difficult to leave it dirty for more than a day now isn't it?
Dino, you mentioned way back that you removed the fog lights and replaced with mesh. May I see a pix of them? I also want to do that but also add some mesh to my front bumper. I have the 3.0i and leaves can blow right in on the radiator. Previous car had the ///M front bumper which came with plastic mesh. What's involved in replacing the fogs? Cheers buddy.
Do it, your car will look awesome smoothed, especially as it sits so low.Looks brilliant Dino! Nice to read a little into the story behind buying the car as well
I've had a pair of front wings and side grilles in a half smoothed state for a while now, so when I saw your pictures was like dammit!
Bet it's difficult to leave it dirty for more than a day now isn't it?
It's subtle but you know it's done when you look at it. It's just suck a sleek shape.
It's been more than a just a car this one, had many cars and this is the longest and by far the most fun, a good 'scene' like we have here has helped, there were a few times when I was ready to let it go rather than tackle jobs but having helping hands and patience paid off. My boys have made me vow never to sell it, they've had as much fun as me! Even the Mrs says I can't sell it (but I'm not allowed to buy any bits for it for a few years at least...)
Well I had 2 goes at this, first go was a bit 'homemade' and second go is perfect..Dino, you mentioned way back that you removed the fog lights and replaced with mesh. May I see a pix of them? I also want to do that but also add some mesh to my front bumper. I have the 3.0i and leaves can blow right in on the radiator. Previous car had the ///M front bumper which came with plastic mesh. What's involved in replacing the fogs? Cheers buddy.
Sure.
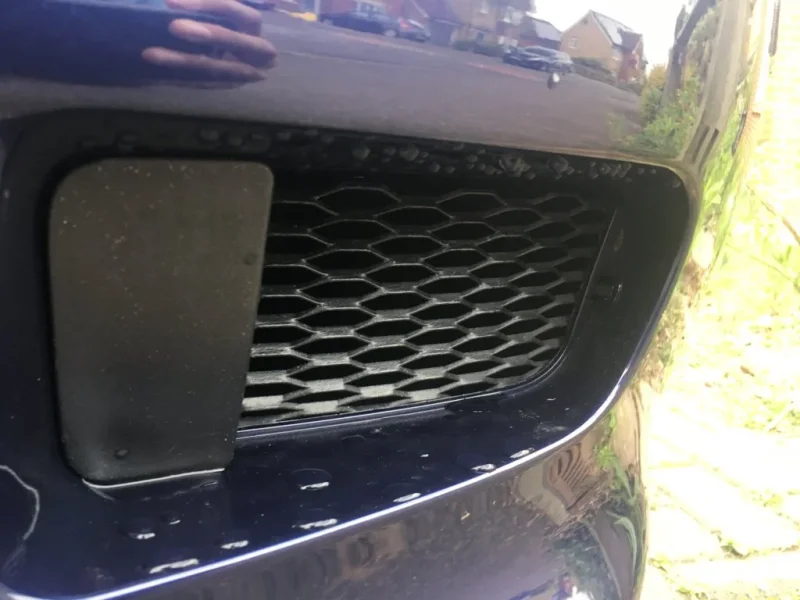
I didn't like the plastic mesh that comes with the bumper a. Because mesh should not be plastic which will crack on impact (my cooling fan sits beind there) and b. The diamond shape doesn't fit with the style of the car.
I looked around and found that on eBay there are plenty of mesh suppliers. I went for 'Kamei' style as it's got a nice wide shape to the holes which is keeping with the low wide look of the car:
The finish it comes with is a shiny gloss and the paint is a bit thin. I wanted a bit more matte look and more resistance to stone ships so coated it with a whole can of plastic dip then satin black paint (plasti dip has a weird finish on the mesh, might be my spraying skills but the satin black finished it nicely).
Ps I only painted after I cut and shaped everything.
For the grille I wanted an OEM look and the little holder for the outside temp sensor as well as keep the lower bumper reinforement bit that slides into the lower section (helps keep the bumpers shape).
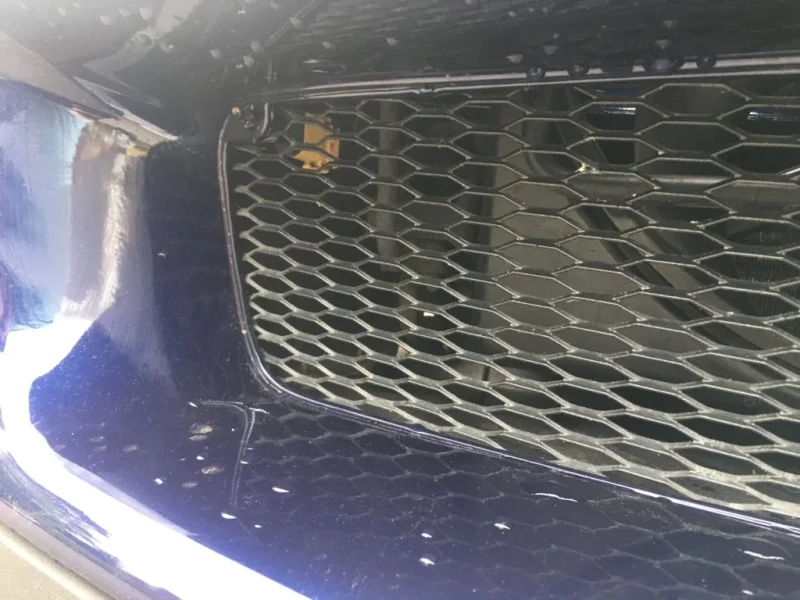
So I cut out the mesh and left frame intact.
A pic of the standard plastic mesh with the mount for the temp sensor and the lower reinforcement section showing.
I just cut out around the frame and smoothed it with a Dremel. Then I fixed the metal mesh to this frame. To do this I used some new metal circlips from BMW - the same ones they use to hold the plastic mesh to the bumper. They were cheap from BMW and appear to be stainless. They are impossible to remove once on it seems!
I also used cable ties for extra reinforcement (I want it to withstand a small bird etc from hitting the fan). @Tim beard laughed at my cable ties
(along with a few other on here @GazHyde @Lee - my first attempt was seriously cr@p to be fair!). Given I did this on the lounge floor I was impressed with the versatility of cable ties but @Tim beard , having a full body shop at his disposal has since done a 'proper job' with some special bonding agent.The fog lights involved removing the fogs and shaping the mesh to the aperture leaving enough excess to 'wrap around' the back of the cut out. I tried making the mesh fit from the front of the bumper and pushing them inwards but that was fiddly and would scratch the paint. Cable ties were used to secure them
The little plastic blank plate was refitted to cover the mountings for the fogs ( I did think about cutting them out but left it in case I want to fit fogs again):
Close up of fog with the blanking plate
Temp sensor in place
Together with the lip spoiler it gives the bumper a more exotic and agressive look. A lot of people think it totally different bumper.
I will eventually fit ducting from the fog blanks to run through the splash shields for brake cooling. Given it's had new paint job I don't see track days happening anytime soon (!) so that can wait!
Attachments
Last edited:
Thanks for the detailed explanation. I did use this exact mesh on my other ///M bumper however my bumper is completely different and hasn't got any mesh at all as standard. Below is a pix of it. I think I will remove it and just line it with the mesh and see what it looks like. I find it really hard to believe that this design has no protection from road debris. Hmmm. Your bumper and mesh looks great

Thanks for the detailed explanation. I did use this exact mesh on my other ///M bumper however my bumper is completely different and hasn't got any mesh at all as standard. Below is a pix of it. I think I will remove it and just line it with the mesh and see what it looks like. I find it really hard to believe that this design has no protection from road debris. Hmmm. Your bumper and mesh looks great
View attachment 53826
Ive had that grille too. Actually I think I cut that is the one I cut up and not the mesh one, same applies as you want the frame, lower reinforcement and temp sensor holder.
You can just use mesh and take the grille out of you doesn't want to cut it.
Or put mesh behind the grille (but I relay don't like the look of that grille).
pangsterM135i
Regular Member
- Joined
- Jun 27, 2017
- Points
- 18
WOW - what a great read Dino!! - great to read up on it's progress under you and you've definitely improved it and made it your own since you've had it!! - this is still the *ONLY* car I've ever regretted selling and as difficult a decision as it was at the time - I'm glad to see that it did indeed end up going to a good owner who would cherish it every bit as much (if not more!) than I did!!..
For what it's worth - the sellers thread is located here (thought it would be nice to join both ends/perspectives of the story up!):
https://www.pistonheads.com/gassing/topic.asp?h=0&f=47&t=987081&i=60
If anyone is a member on PH as well as here - you'll probably notice that they (in the majority) are not exactly fans of the Z3 (for whatever reason) - so not all of the posts are positive/constructive and I took the bait and reacted to some of the comments - (probably because I was a little over protective of the car at the time!!) - in saying that though, there was also some positive comments as well!
Here's hoping for many years and miles more enjoyable motoring for you Dino!
Jesus @pangsterM135i where the hell did you pop up from?
Good to see you on here though, welcome......
Good to see you on here though, welcome......
WOW - what a great read Dino!! - great to read up on it's progress under you and you've definitely improved it and made it your own since you've had it!! - this is still the *ONLY* car I've ever regretted selling and as difficult a decision as it was at the time - I'm glad to see that it did indeed end up going to a good owner who would cherish it every bit as much (if not more!) than I did!!..
For what it's worth - the sellers thread is located here (thought it would be nice to join both ends/perspectives of the story up!):
https://www.pistonheads.com/gassing/topic.asp?h=0&f=47&t=987081&i=60
If anyone is a member on PH as well as here - you'll probably notice that they (in the majority) are not exactly fans of the Z3 (for whatever reason) - so not all of the posts are positive/constructive and I took the bait and reacted to some of the comments - (probably because I was a little over protective of the car at the time!!) - in saying that though, there was also some positive comments as well!
Here's hoping for many years and miles more enjoyable motoring for you Dino!
There's also another huge chunk of work done on the mechanicals of this car in the zedshed section.
This reminds me that I have a LOT of updates to add on this thread..Some real highs and lows and made some great friends on the wayThere's also another huge chunk of work done on the mechanicals of this car in the zedshed section.
Full interior switchover
Sounds system
Full suspension and rear end rebuild
Partial rewire of loom
And some great trips out with great fellow Zedders