You are using an out of date browser. It may not display this or other websites correctly.
You should upgrade or use an alternative browser.
You should upgrade or use an alternative browser.
Bognor Lean-to Project
- Thread starter Mazza
- Start date

Finally did some work today…..
Fitted in the heatshield and took ages trying to work out where the clips for the front sensor wires went , Eventually trolled through some early photos and found one showing them.

and then sorted out the connections on the top of the engine. I had put idents on them so knew where each one went.
Also put the loom tray back

so then on to the exhaust. Re hung the back box onto the rubber mounts
Then put the after cat sensors in. Easier to do it on the floor ( and got them round the right way … one has a longer lead on it.

Bloody awkward doing it but eventually got it in position.

The bracket I had welded on lined up ok and the whole system fits well.


I still have two of the flange nuts to do up but it is really awkward getting to the last two and I was getting bloody cold as had to have the door open, so will go back and tighten up
But did do a bit more…
Put the new rear wings on…


All seemed to line up ok
and even remembered to put the aerial boot into position first)") …. Got a new grommet to fit as well, but need to read the ‘ How To ‘ thread first.
…. Got a new grommet to fit as well, but need to read the ‘ How To ‘ thread first. 
Fitted in the heatshield and took ages trying to work out where the clips for the front sensor wires went , Eventually trolled through some early photos and found one showing them.
and then sorted out the connections on the top of the engine. I had put idents on them so knew where each one went.
Also put the loom tray back
so then on to the exhaust. Re hung the back box onto the rubber mounts
Then put the after cat sensors in. Easier to do it on the floor ( and got them round the right way … one has a longer lead on it.
Bloody awkward doing it but eventually got it in position.
The bracket I had welded on lined up ok and the whole system fits well.
I still have two of the flange nuts to do up but it is really awkward getting to the last two and I was getting bloody cold as had to have the door open, so will go back and tighten up
But did do a bit more…
Put the new rear wings on…
All seemed to line up ok
and even remembered to put the aerial boot into position first
…. Got a new grommet to fit as well, but need to read the ‘ How To ‘ thread first. definitely on the home straight now
You would think but everytime I go up to Zedshed …. @Lee gives me more things to do on it….mmmm!!!! I think I might be building him a track car
There’s hopefully nothing major now… just lots of little time consuming jobs that need to be done.
Last edited:
Looking like a car again Malc. Was that the plan?")
Tony.
Tony.
Back underneath this morning and managed to get all the flange nuts tightened. BMW probably have one tool that does the lot…It took all these with me

but onwards and did the rear box connection with a bit of gooey paste.
Then sorted out the cables from the after cat sensors.
Apparently I dont know my right from my left, as I had two swap them over as one of the leads was too short to reach the mating connector.
Turns out the shorter lead goes on the drivers side and the one with the longer lead goes on the passenger side
Anyway not a problem swapping them over in situ, but missing a few clips.
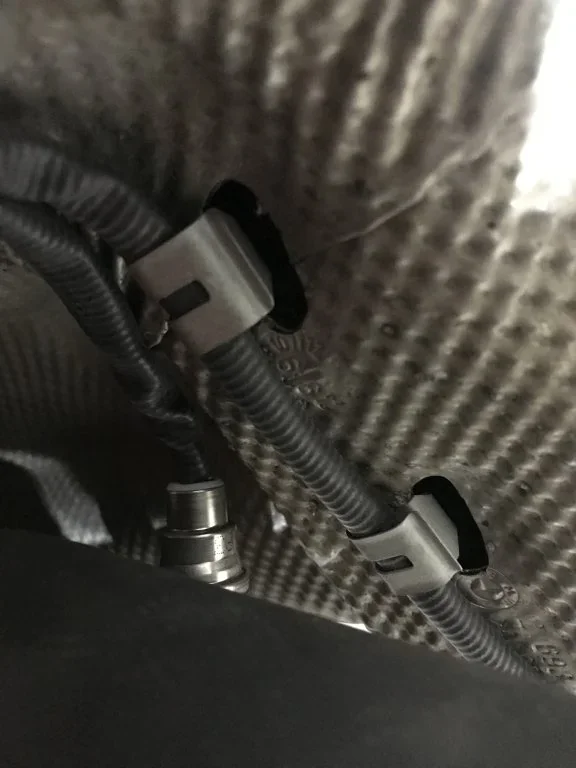
Four of these…

They clip onto the heatshield
I had 1 good one, 1 broken one and two missing

They keep the cable from dropping down on to the exhaust so reasonably important

Sorted through the bits and found this….
Correct part number for the sill body nut but the new ones nothing like the original parts….

So tried one…

and they do fit …. So put them all in. It looks like they expand as the screw is tightened.
But found another job to do……
These need a refurb..

And yes…. Spiders were killed in the making of this Z3


Thats it……Its a nice day so going out in the one that does work
but onwards and did the rear box connection with a bit of gooey paste.
Then sorted out the cables from the after cat sensors.
Apparently I dont know my right from my left, as I had two swap them over as one of the leads was too short to reach the mating connector.
Turns out the shorter lead goes on the drivers side and the one with the longer lead goes on the passenger side
Anyway not a problem swapping them over in situ, but missing a few clips.
Four of these…
They clip onto the heatshield
I had 1 good one, 1 broken one and two missing
They keep the cable from dropping down on to the exhaust so reasonably important
Sorted through the bits and found this….
Correct part number for the sill body nut but the new ones nothing like the original parts….
So tried one…
and they do fit …. So put them all in. It looks like they expand as the screw is tightened.
But found another job to do……
These need a refurb..
And yes…. Spiders were killed in the making of this Z3
Thats it……Its a nice day so going out in the one that does work
Cleaning ….
used various wire brushes then a coat of anti rust


Hate cleaning
Hammerite tomorrow!!
used various wire brushes then a coat of anti rust
Hate cleaning
Hammerite tomorrow!!
That's the hard bit done Malc. When I cleaned the callipers on my Z3 to paint them it took ages and I could taste rust for ages.
Tony.
Tony.
Haven’t done much today as had a gig last night and absolutely knackered this morning
But a bit of cleaning and painting!!! ( where are @Oldguysrule and @pgunter when you need them….probably at Zedshed HQ !!!)
The seat base had bits of rust on the inside and a large area at the front… so a bit of wire brushing and rust treatment sorted the inside bits

the front edge looked really shabby

but a bit of clean , treated and painted…

looking a bit better!
Reconnected the back of the seat… and remembered to slot the foam support rods in

Hog rings straightened out to refit

And not as tidy as originally but Its holding it ok

a bit of painting ( black hammerite)

one final job……

Grommet in …. Bit of silicon spray and not to bad to insert
Parts for another little job turned up….

£35.00 ea and dont even get the nuts !!!!
Just one thing to say on this job…….
Aaaaaaaghhhhh!!!!!!!!!
But a bit of cleaning and painting!!! ( where are @Oldguysrule and @pgunter when you need them
….probably at Zedshed HQ !!!)The seat base had bits of rust on the inside and a large area at the front… so a bit of wire brushing and rust treatment sorted the inside bits
the front edge looked really shabby
but a bit of clean , treated and painted…
looking a bit better!
Reconnected the back of the seat… and remembered to slot the foam support rods in
Hog rings straightened out to refit
And not as tidy as originally but Its holding it ok
a bit of painting ( black hammerite)
one final job……
Grommet in …. Bit of silicon spray and not to bad to insert
Parts for another little job turned up….
£35.00 ea and dont even get the nuts !!!!
Just one thing to say on this job…….
Aaaaaaaghhhhh!!!!!!!!!
Working on a Sunday
but finished of the painting this morning… then repaired the foam attached to the seat covers. A bit of contact spray adhesive and all the damage repaired.


It gets a bit ripped when separating it from the seat
So just have to do the recolour repair on the drivers leather seat cover and the seats can then be assembled again.
Also need to get an engine support to do the engine mounts. @Lee did say I could borrow the one from Zedshed HQ…. But Better not, ….they will need it sometime in the next 6 months
But ….If I drop the front subframe out, I can get it shot blasted and powder coated and that will take a while, unless someone has one already done ??
but finished of the painting this morning… then repaired the foam attached to the seat covers. A bit of contact spray adhesive and all the damage repaired.
It gets a bit ripped when separating it from the seat
So just have to do the recolour repair on the drivers leather seat cover and the seats can then be assembled again.
Also need to get an engine support to do the engine mounts. @Lee did say I could borrow the one from Zedshed HQ…. But Better not, ….they will need it sometime in the next 6 months
But ….If I drop the front subframe out, I can get it shot blasted and powder coated and that will take a while, unless someone has one already done ??
Seat rebuild started today...... Got bits all over the house so it will be nice to get them reassembled
First job is to re-colour the damaged/worn parts of the leather covers.
This is the kit

And this is the repair needed.... drivers seat bolster

And where the belt guide had broken and the broken part had been rubbing

So read the instructions and the first job was to clean the leather......
Apparently there is someone on the forum that reckons this stuff is ok ....

Well it did clean the cover so then it was let it dry , mix up the colour and apply to the seat.... it took about 2 hours to build up the colour ...following the instructions.....but in the end not a bad result.


I managed to colour match my fingers as well
Have to leave it now for 24 hours then I can buff it with a bit of polish, and it hardens completely over the next 7 days.
Overall pretty happy with the result.
The heat pads fit ok ( or will do) after a trim....

So only the electrical parts to sort....this is what you get....

The only bits used are on the left. The middle bits are worth keeping ( might be useful sometime) an the pile on the right is going in the bin

I removed the two way housings from both heat pad cables, did the same for the 4 way switch connector. The 4 heat pad crimps can now be assembled into the 4 way housing. The mating half has 4 wires (red, black, green and yellow). Which will be soldered to the wires in the car once I cut off the existing connector and work out a colour code ( and then match it on the other seat.
The only reason for doing this is to keep it tidy by only having one 4 way connector.
That was it for today.......
First job is to re-colour the damaged/worn parts of the leather covers.
This is the kit
And this is the repair needed.... drivers seat bolster
And where the belt guide had broken and the broken part had been rubbing
So read the instructions and the first job was to clean the leather......
Apparently there is someone on the forum that reckons this stuff is ok ....
Well it did clean the cover so then it was let it dry , mix up the colour and apply to the seat.... it took about 2 hours to build up the colour ...following the instructions.....but in the end not a bad result.
I managed to colour match my fingers as well
Have to leave it now for 24 hours then I can buff it with a bit of polish, and it hardens completely over the next 7 days.
Overall pretty happy with the result.
The heat pads fit ok ( or will do
) after a trim....So only the electrical parts to sort....this is what you get....
The only bits used are on the left. The middle bits are worth keeping ( might be useful sometime) an the pile on the right is going in the bin
I removed the two way housings from both heat pad cables, did the same for the 4 way switch connector. The 4 heat pad crimps can now be assembled into the 4 way housing. The mating half has 4 wires (red, black, green and yellow). Which will be soldered to the wires in the car once I cut off the existing connector and work out a colour code ( and then match it on the other seat.
The only reason for doing this is to keep it tidy by only having one 4 way connector.
That was it for today.......
Over to Rustington to collect a few bits

Nuts for the engine mounts and cable clips for the exhaust sensors.
Saw this at the dealer….

Sorry … but bloody horrible!!!
Anyway back home and on with seat rebuild..

heat pads trimmed and fitted
New seat belt guides

No I didnt try to screw them in… Just used a socket to push on the star washer

worked out the wiring connections…

Then covers replaced


It will get put back into shape when its sat on ….my 1.9 was the same but is fine now
… and a jigsaw to sort out tomorrow…
Hopefully I have some photos to help work out where everything goes

all this effort just to have two wires sticking out the back and hopefully a warm bum!!!

Nuts for the engine mounts and cable clips for the exhaust sensors.
Saw this at the dealer….
Sorry … but bloody horrible!!!
Anyway back home and on with seat rebuild..
heat pads trimmed and fitted
New seat belt guides
No I didnt try to screw them in
… Just used a socket to push on the star washerworked out the wiring connections…
Then covers replaced
It will get put back into shape when its sat on ….my 1.9 was the same but is fine now
… and a jigsaw to sort out tomorrow…
Hopefully I have some photos to help work out where everything goes
all this effort just to have two wires sticking out the back and hopefully a warm bum!!!
I bet those heating pads work much better than the older network of warm wires Malc. The seat looks really good.
Tony.
Tony.
I'm in Bognor Regis Friday attending a dyno day. Let me know if you want me to bring the beam down.
Thats really nice of you Lee… but I have ordered one should be here tomorrow. Welcome to call in and give the project the once over if you have time !!!
Today …. Bloody freezing but at least no snow !!
So first job was to fit the 4 cable holders to the underside of the car and hook up the sensor wires.


Thats the exhaust done except for the rear tips.
so back indoors for the seat rebuild.
Fitted the heat pads and seat covers to the passenger seat so now both ready for the subframe and control panel


Put the side panel on ….. and after trying to fit the motor frame removed it as the frame needs to go on first

Having fitted it , added the side panel and fed all the wires and cables found that the wires wouldn’t reach
So checked back on a few early photos and found when I stripped the base apart to fix the adjuster box ( the Ali casting) I had put the two motors back incorrectly

The plug should be where my finger is…
And again

Easy enough to correct, just unbolted the torx screws and turned the motors round.


The passenger seat was a lot faster as motors the right way round…. The only problem was that the seat was in a lowered position… which made it a pain to get the wiring in….
So brought the battery in and hooked up a wire direct to the motor and raised the seat.
And remembered to put the occupancy gizmo back on .

And a cable tie to tidy the dummy load.

So both now done and just need to revise the wiring in the car and they can go back in .

And had a delivery today")
An Engine support beam…. So I can get the front subframe out and the engine mounts replaced. Really looking forward to that…….. but not today

I’ll get a bit more info on how its done before I start on it …. Like where to place the beam to support the engine
So first job was to fit the 4 cable holders to the underside of the car and hook up the sensor wires.
Thats the exhaust done except for the rear tips.
so back indoors for the seat rebuild.
Fitted the heat pads and seat covers to the passenger seat so now both ready for the subframe and control panel
Put the side panel on ….. and after trying to fit the motor frame removed it as the frame needs to go on first
Having fitted it , added the side panel and fed all the wires and cables found that the wires wouldn’t reach
So checked back on a few early photos and found when I stripped the base apart to fix the adjuster box ( the Ali casting) I had put the two motors back incorrectly
The plug should be where my finger is…
And again
Easy enough to correct, just unbolted the torx screws and turned the motors round.
The passenger seat was a lot faster as motors the right way round…. The only problem was that the seat was in a lowered position… which made it a pain to get the wiring in….
So brought the battery in and hooked up a wire direct to the motor and raised the seat.
And remembered to put the occupancy gizmo back on .
And a cable tie to tidy the dummy load.
So both now done and just need to revise the wiring in the car and they can go back in .
And had a delivery today
An Engine support beam…. So I can get the front subframe out and the engine mounts replaced. Really looking forward to that…
….. but not today I’ll get a bit more info on how its done before I start on it …. Like where to place the beam to support the engine
Attachments
Those seats look really nice mate, the covers are losing the stretch already.
Tony.
Tony.