Time for an overhaul of my 1.9 '98 BMW Z3 Individual

Matt Barnes

Zorg Guru (II)
Supporter
British Zeds
Joined
Jul 18, 2020
Points
123
Location
Portchester, Fareham
Model of Z
1998 BMW Z3 Individual 1.9 M44 B19
Another weekend means another week of buying parts !.... over the past couple of weeks I'v been ordering some more booty .... Going to try this Underseal on a couple of parts before committing to the mechanicals. Got some new Driveshaft lock washers and a new locknut. I still have nightmares of those weeks and weeks I spent drilling off that rounded locknut !...

1719053083348.png


also going to give these a go, another solution to the "bolts of doom".... these are M8 x 22 grade 10.9

1719053255833.png
 

Matt Barnes

Zorg Guru (II)
Supporter
British Zeds
Joined
Jul 18, 2020
Points
123
Location
Portchester, Fareham
Model of Z
1998 BMW Z3 Individual 1.9 M44 B19
well today was back on the sills.....focussing on the nearside this time, which although crusty, doesn't have any holes that aren't designed to be there !!

standard fair... cupped knotted wheel on the angle grinder, and the carbide "sponge" type wheels, my new belt file worked a treat for tight corners and when either of those couldn't reach, I used the sanding wheels on the Dremel. That red is the pink bedsheet I have under the car ! =))

1719070778558.png

1719070840283.png


The Dremel is ideal for getting right into the jack pad holes

1719070881882.png


Rear done as much as I can
1719070914907.png

1719070934506.png


Then it was a liberal coat of POR15 Metal Prep. You have to keep it wet for 20 minutes, then wash off, then dry thoroughly for which I used a heat gun.

1719071027637.png


Then it was a good coating of POR15 Direct To Metal on the front and rear of the sill

1719071313294.png


1719071277006.png


and yes I did get rid of that drip bottom left... :whistle::whistle:... this will dry shiny and rock hard. After that you can key it with a scotch pad and then apply Epoxy Primer and top coat.
 

Attachments

Matt Barnes

Zorg Guru (II)
Supporter
British Zeds
Joined
Jul 18, 2020
Points
123
Location
Portchester, Fareham
Model of Z
1998 BMW Z3 Individual 1.9 M44 B19
Excellent job..I know where I am coming when I need mine doing 😁
thanks mate, I've had mixed experiences with POR15. I had to take it off the offside sill as surface rust came back. My only theory is that I didn't stir it enough, as I remember it being really watery. This time I made sure it was thoroughly stirred and all one uniform colour. It did feel thicker this time and went on much smoother. Hopefully that'll do the trick
 

Duncodin

Zorg Guru (III)
Supporter
Joined
Sep 8, 2021
Points
139
Location
Pontrhydyrun
Model of Z
Z3 M44
Good to see that you're not trying to grind out the rust pitted areas. I see too mamy people.going at it with an angle grinder till it's super smooth where it looks good but hardly any thickness left.

You're doing a good job. Better than I would. I'm too lazy. I just brush off the loose rust and treat with oily stuff. 🤷‍♂️
 

Matt Barnes

Zorg Guru (II)
Supporter
British Zeds
Joined
Jul 18, 2020
Points
123
Location
Portchester, Fareham
Model of Z
1998 BMW Z3 Individual 1.9 M44 B19
Good to see that you're not trying to grind out the rust pitted areas. I see too mamy people.going at it with an angle grinder till it's super smooth where it looks good but hardly any thickness left.

You're doing a good job. Better than I would. I'm too lazy. I just brush off the loose rust and treat with oily stuff. 🤷‍♂️
thanks mate...yeah this is as far as I'm going with the rust treatment. Then it's epoxy primer and paint. Need to get the car off the jacks soon as come next month it's been on jacks for a (gulp) year !
 

Matt Barnes

Zorg Guru (II)
Supporter
British Zeds
Joined
Jul 18, 2020
Points
123
Location
Portchester, Fareham
Model of Z
1998 BMW Z3 Individual 1.9 M44 B19
Groundhog Day..... as yesterday's use of POR15 went far better than my previous experience, I decided to go back to the offside, grind it all off and start again. Pretty confident there's now no rust in my inner sills !!..

1719151799134.png


made sure I ground down and treated the prestal fittings as well.

1719151850755.png


Definitely had enough of sills for one weekend ... time for .. ☀☀🍸🍸
 

Mazza

Zorg Guru (V)
Supporter
British Zeds
The M44 Massive
Joined
Nov 1, 2017
Points
175
Location
Bognor Regis
Model of Z
Z3 1.9 M44 Roadster Z3 2.8 Project
Matt … hate to say this but you keep referring to the car as ‘mine’ and ‘my inner sills’ etc even though we both know that you are just the slave who has to do the work so your wife can have her car back to drive… =))=))=))
I always thought the 1.9 that I have, that I bought, was in my name , and with me insured as the only driver… was mine…. but apparently was not … I was merely the keeper and chauffeur =))=))=))=))=))=))
 

Matt Barnes

Zorg Guru (II)
Supporter
British Zeds
Joined
Jul 18, 2020
Points
123
Location
Portchester, Fareham
Model of Z
1998 BMW Z3 Individual 1.9 M44 B19
Matt … hate to say this but you keep referring to the car as ‘mine’ and ‘my inner sills’ etc even though we both know that you are just the slave who has to do the work so your wife can have her car back to drive… =))=))=))
I always thought the 1.9 that I have, that I bought, was in my name , and with me insured as the only driver… was mine…. but apparently was not … I was merely the keeper and chauffeur =))=))=))=))=))=))
Don't tell everyone Malc !!!!!........ oh..... you have...... =)) =))
 

Mazza

Zorg Guru (V)
Supporter
British Zeds
The M44 Massive
Joined
Nov 1, 2017
Points
175
Location
Bognor Regis
Model of Z
Z3 1.9 M44 Roadster Z3 2.8 Project
but … the amount of effort and love you have put into that car has got to have earned you bucket loads of brownie points …..

so the rewards might be quite exhausting :whistle::whistle:=))=))
 

Matt Barnes

Zorg Guru (II)
Supporter
British Zeds
Joined
Jul 18, 2020
Points
123
Location
Portchester, Fareham
Model of Z
1998 BMW Z3 Individual 1.9 M44 B19
but … the amount of effort and love you have put into that car has got to have earned you bucket loads of brownie points …..

so the rewards might be quite exhausting :whistle::whistle:=))=))
I would like to say I'm into the rebuild phase..... but... I still need to clean, derust and paint above the subframe; tank and wheel arches. Not even looked at the front yet. I know I need to take the cross beam off, grind and repaint that, and of course replace the power steering hoop. But that can all be done when everything's back on. There's a little repair needed on the offside outer sill but not much

PLUS !!... I need to sort out the chipped Hammerite on the springs and check the Trailing arms in case I need to paint those again. Then... install all the new bushes
 

Matt Barnes

Zorg Guru (II)
Supporter
British Zeds
Joined
Jul 18, 2020
Points
123
Location
Portchester, Fareham
Model of Z
1998 BMW Z3 Individual 1.9 M44 B19
Well today I took the day off primarily for a long weekend and an excuse to work on the car... the MoT for the Peugeot had just lightened my wallet by 380 quid so I needed some solace... :whistle:

Thought I'd remove the front to rear brake lines, which went more straightforward than I thought !

I'd already disconnected the lines from the ASC pump last week, as it took ages for the pump to stop squeezing out fluid.

1719578030736.png


then took the precaution of marking up the left from right before removing ! =))

1719578125090.png


such a shame that 80% of the pipes are fine... just when they enter the rear wheel arch they'd gone...

1719578211790.png


but I had always planned on replacing them with shiny kunifer anyway....

1719578395367.png


so it was a case of gently unclipping all the way from the rear, up to the ASC pump and once hanging down, giving them a wiggle to pull down from the engine bay.

1719578543318.png

1719578569158.png


I will then do what others have done and tape the new kunifer pipe to these to get the right shape...


This is the pipe and hose in the left rear..

1719579782854.png


and coming up AN IMPORTANT SAFETY ANNOUNCEMENT !! o_Oo_Oo_O

I decided to angle grind the hose off at the ferrule, which naturally generated a lot of heat.... whilst I was grinding off the right side and because there was still brake fluid in the hose.. THE HOSE EXPLODED...

I can laugh now but it was a huge bang, loud enough for my wife to come out to see if I was still in one piece....

1719578873525.png

1719578887935.png


luckily the ferrule shot to the ground but it could have gone anywhere.... lesson, make sure any brake pipe is empty before using a grinder or anything that produces a lot of heat....


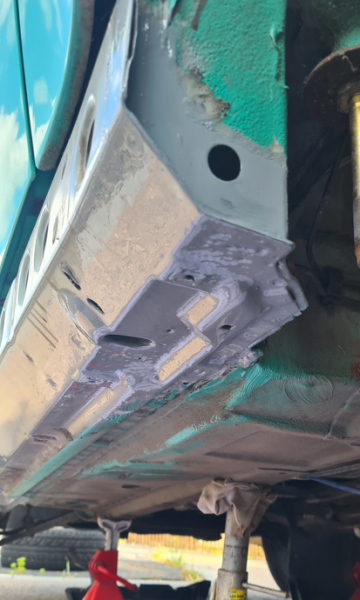
so with that over, it was back to pulling loose seam sealer and grinding back as many areas as possible that had cracked sealer or paint..

1719579024924.png

1719579047837.png


once ground down to shiny metal in all the loose places, it was time for the Red oxide primer... if your wallet allows and you don't already have one, I can thoroughly recommend a belt file sander..... gets into all the nooks and crannies and you can swap different grades of belt

1719579473864.png


so more red oxide primer !!.... and yes I am replacing the shocks =)):whistle:

1719579505900.png

1719579525991.png
 

Matt Barnes

Zorg Guru (II)
Supporter
British Zeds
Joined
Jul 18, 2020
Points
123
Location
Portchester, Fareham
Model of Z
1998 BMW Z3 Individual 1.9 M44 B19
I'm going to keep a close eye on the POR15 given it's dubious reputation... so a week later I took some more shots to see if there is a hint of peeling or degradation and not a peep.... I know you can't judge on a week but the car is sat outside with only a tarpaulin for company most days, and I literally face Portsmouth Harbour for some nice salty air.

1719842550664.png

1719842589984.png


next step (if you follow Redish Motorsport) is the rough up the surface, use epoxy primer (I've got MIPA two part epoxy primer), then stone chip paint; then top coat...

talking of stone chip paint, I took delivery of some Hammerite Stone Chip aerosol, so had a little spray to check the finish. Got a bit carried away by grinding down, cleaning up and spraying the brake hose support brackets :whistle: :whistle:

1719842814293.png
 

Matt Barnes

Zorg Guru (II)
Supporter
British Zeds
Joined
Jul 18, 2020
Points
123
Location
Portchester, Fareham
Model of Z
1998 BMW Z3 Individual 1.9 M44 B19
Something a little... ahem.....diff...erent..... =)) decided to take the backplate off, drain the old Diff oil, remove all the bolts, clean up the driveshaft flanges..... and then..... zinc plate the lot....

Diff looking a little sorry for itself, even though it's been cleaned up and painted...but ultimately left on the bench

1720359799363.png


Took the backplate off and drained the oil

1720359851902.png


Took the driveshaft flanges off, making sure to note which one goes where !

1720359899981.png


Nothing wrong inside there..no metal filings or swarf

1720359945460.png


Flanges out, just a gentle flick with a crow bar

1720359993288.png


Group shot ..everyone huddle up..... Socket? do you mind getting out of the picture please ? =))

1720360065568.png


Then I spent an inordinate amount of hours, grinding off all the surface rust from the flanges and fasteners for plating... this is using the carbide milling bit on the Dremel

1720360143635.png


more grinding for hours....

1720360175396.png


and eventually you get clean metal.... you HAVE to get the parts this clean to zinc plate decently.... a combination of wire wheel on the pillar drill, various sanding drums on the Dremel and finally wire wool

1720360265789.png

1720360282427.png
:whistle:

Net result, this is one of the backplate bolts now fully zinc plated..... other stuff is cooking away as I type !
=))=))

1720360334647.png
 

Mint

Zorg Expert (I)
Supporter
British Zeds
East Anglian Crew
Joined
Sep 23, 2012
Points
222
Location
Stafford
Model of Z
2.2 & 3.0 Sport
Brilliant read Matt, love these sort of threads. You're doing a superb job, keep it up:thumbsup:
 

Matt Barnes

Zorg Guru (II)
Supporter
British Zeds
Joined
Jul 18, 2020
Points
123
Location
Portchester, Fareham
Model of Z
1998 BMW Z3 Individual 1.9 M44 B19
Brilliant read Matt, love these sort of threads. You're doing a superb job, keep it up:thumbsup:
Thanks for that.... more than happy to go through the zinc plating process... might do an article on it... trick is mainly the cleaner and blemish free the part, the brighter the zinc finish...
 

Matt Barnes

Zorg Guru (II)
Supporter
British Zeds
Joined
Jul 18, 2020
Points
123
Location
Portchester, Fareham
Model of Z
1998 BMW Z3 Individual 1.9 M44 B19
right...today was one of the jobs I'd been dreading and putting off but went for it... getting the Diff bush out without breaking the casting

Tried the standard method of drilling holes through the rubber and then using a jigsaw to get the rubber out of the casing

1720881199155.png
1720881214672.png


et voila

1720881262278.png


Then I just went into a daydream, grabbed myself a hacksaw and started cutting the steel band like I've seen countless times before..

1720881326701.png


I was doing this for AGES .. checking make sure it wouldn't go all the way through and damage the surface of the casting

then got a small chisel and start on the outer edge....

1720881422786.png


Now...about this daydreaming thing... I was sawing away, actually looking at my Dremel... thinking it must be easier using that.... but kept on sawing !! :whistle: :whistle:

Then looked at the Dremel again........ and...


1720881519308.png


Cut a groove with a milling bit which is SO much easier !!!

1720881578339.png


chiselled away at the ring again and got some minor damage to the edge..


1720881625107.png


Then it was a case of putting various grades of sanding drums on the Dremel... and ...clean....clean....clean...

took a high grit sanding drum and went round the inside of the bush casting, getting it nice and smooth and the rear...

1720881752925.png

1720881789495.png


Then it was a dousing of Gunk degreaser using a paint brush and washing off with brake cleaner

1720881843130.png


Fill an Drain plugs, cleaned up with a rotary wire wheel on the pillar drill and Dremel sanding drums...these will get zinc plated (of course !)

1720881924317.png


Then finally onto paint.... the Hammerite spray went on REALLY well, two coats of that

1720881981492.png

1720881998801.png

1720882018102.png


My expensive spray booth !! =))=))

1720882052988.png
 

AntStark

Zorg Guru (III)
Supporter
British Zeds
Joined
May 15, 2021
Points
139
Location
Hampshire
Model of Z
2002 3.0 Sport
Good job Matt..having watched Lee do mine last week it’s not a job I would have looked forward to either. 👍
 
Top