
You are using an out of date browser. It may not display this or other websites correctly.
You should upgrade or use an alternative browser.
You should upgrade or use an alternative browser.
2.2 engine replacement project
- Thread starter mrscalex
- Start date


Iirc
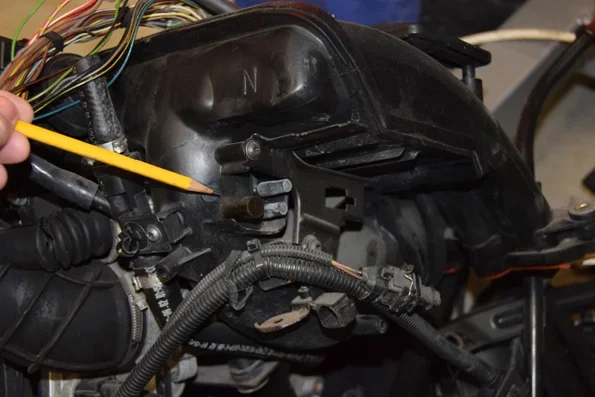
- The M52TU engines use the small 3.5 mm tube from the CCV separator middle connection (6 on the E39 picture in the above post) to the rear of the inlet manifold 3.5 mm port. (see below photo of a M54 inlet manifold, bungs fitted but this is where the 3.5 mm hose connects on the M52TU engine))
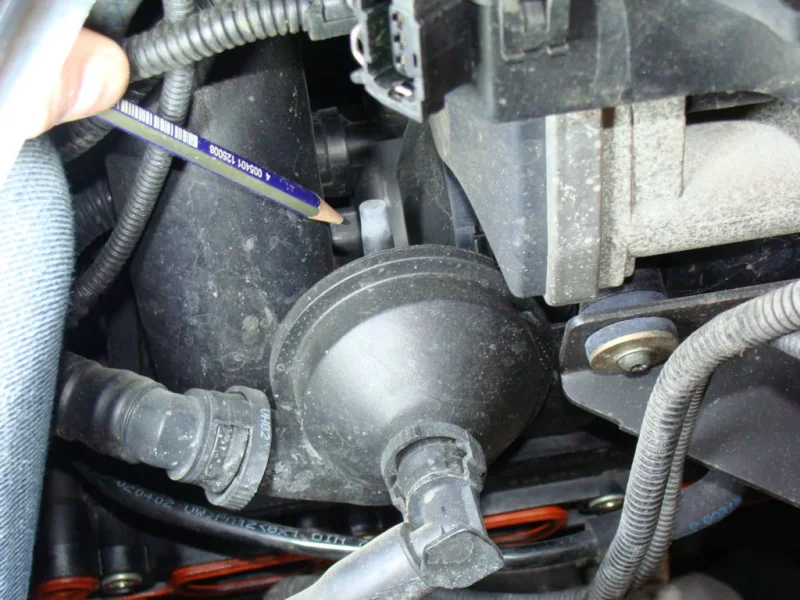
- The M54 engines do not use the 3.5 mm hose and have a bung on both the separator and inlet manifold (see below photo of a M54 CCV separator with bung fitted)
- The M52TU engines use the small 3.5 mm tube from the CCV separator middle connection (6 on the E39 picture in the above post) to the rear of the inlet manifold 3.5 mm port. (see below photo of a M54 inlet manifold, bungs fitted but this is where the 3.5 mm hose connects on the M52TU engine))
- The M54 engines do not use the 3.5 mm hose and have a bung on both the separator and inlet manifold (see below photo of a M54 CCV separator with bung fitted)
Attachments

Subframe, sway bar and front panel all going off for shotblast and powder coat. So hopefully next time you see them they will look a little different  Note bolts used to blank off threads (couple more to add) and machined surfaces of sleeves for control arm and chassis bolts. This will help to protect from damage during shotblasting (and powder coat).


Note bolts used to blank off threads (couple more to add) and machined surfaces of sleeves for control arm and chassis bolts. This will help to protect from damage during shotblasting (and powder coat).
- Joined
- Oct 19, 2014
- Points
- 174
- Model of Z
- 2.2i Sport
Iirc
- The M52TU engines use the small 3.5 mm tube from the CCV separator middle connection (6 on the E39 picture in the above post) to the rear of the inlet manifold 3.5 mm port. (see below photo of a M54 inlet manifold, bungs fitted but this is where the 3.5 mm hose connects on the M52TU engine))
- The M54 engines do not use the 3.5 mm hose and have a bung on both the separator and inlet manifold (see below photo of a M54 CCV separator with bung fitted)
Notice the subtle thread hijack? Thank you for that, it had me wondering for a long time where the port was supposed to be connected to. May get hold of some hose and try joining the two ports together, can't make things worse, and may improve the oil-guzzling. Strange that RealOEM show it, but hey.

Hijack forgiven  But back to the main activity
This week we've been concentrating on getting the borders weeded and bedding plants in for my old Mum and Dad.
So with the bit of time we had we concentrated on getting the bulkhead area cleaned up ready to received the engine.
I say we, the usual cleaning expert was employed. You'll notice at nearly 14 he's somewhat larger than when I first started posting photos.


Fusebox side cleaned and dressed. Still some rust spots to touch in as I didn't want to spray that far back.

This is where I sprayed to. Can you see the blend? It was a good colour match mixed for me.

Brake servo/reservoir side. Existing paint beyond spray is good here.

And the finished job. We Cif'd the bulkhead insulation too. It's wet here. So interested to see how it drys.

But back to the main activity This week we've been concentrating on getting the borders weeded and bedding plants in for my old Mum and Dad.
So with the bit of time we had we concentrated on getting the bulkhead area cleaned up ready to received the engine.
I say we, the usual cleaning expert was employed. You'll notice at nearly 14 he's somewhat larger than when I first started posting photos.
Fusebox side cleaned and dressed. Still some rust spots to touch in as I didn't want to spray that far back.
This is where I sprayed to. Can you see the blend? It was a good colour match mixed for me.
Brake servo/reservoir side. Existing paint beyond spray is good here.
And the finished job. We Cif'd the bulkhead insulation too. It's wet here. So interested to see how it drys.

Will look good with the motor back in Rob, have you given it the once over while its out?
Tony.
Tony.
It's not actually out yet. But yes, I started to clean it in the donor vehicle yesterday. It will get a thorough clean once it's out and (H&S look away) while it's hanging in the air waiting to be installed. Unfortunately I didn't have my fan spanner handy otherwise that would have been taken off to give better access.Will look good with the motor back in Rob, have you given it the once over while its out?
Tony.
Before.
Just starting to look better after first pass.
Once de-greased the alloy will get a chemical clean and dressing with these two.


I've not used them before but the reviews are good.
Lots of progress since I last posted. We've been working all spare time available to get the engine in and the project progressed - still going at midnight some evenings!
The donor engine received a quick clean while it was still in situ and connected. I figured this would protect it best from water ingress but access was limited. Even a very quick pass made things a lot better.
All these areas were encrusted with dirt before we started. They aren't 100% at this stage but this was just 10 mins work with a can of Cif and a hose!


Washer bottle done with Milton Sterilising fluid. Great result here!
Before.


After


More to come in further posts...
The donor engine received a quick clean while it was still in situ and connected. I figured this would protect it best from water ingress but access was limited. Even a very quick pass made things a lot better.
All these areas were encrusted with dirt before we started. They aren't 100% at this stage but this was just 10 mins work with a can of Cif and a hose!
Washer bottle done with Milton Sterilising fluid. Great result here!
Before.
After
More to come in further posts...
The donor engine coming out. Nice and easy with the front panel and subframe out.

Well it is if you remember to disconnect everything!

Nearly there...

...and out

Leaving a big hole.

Time for an ice cream

Well it is if you remember to disconnect everything!
Nearly there...
...and out
Leaving a big hole.
Time for an ice cream
One of the main challenges now was to clean up the flanges on the exhaust manifold. Usual wasted bolts problem. The system was cut through just the other side of the flange.
In this photo you can see the left hand system stub still in place. The right hand stub has been carefully cut to remove it without damaging the flange on the manifold side. The right hand bolt only is cut through in the hope the stub will swing down on the left hand bolt and fall off.

Which it did leaving it looking like this.

The four bolt remnants were then removed by creating a relief slot in the hole that allowed some movement and drifting out with a punch and hammer.

I'm hoping when it all goes back the joint will still be strong enough. It doesn't look great in the photo but there's a lot more metal there than the photo suggests. If not/anyway I have a cunning plan to strengthen it.
In this photo you can see the left hand system stub still in place. The right hand stub has been carefully cut to remove it without damaging the flange on the manifold side. The right hand bolt only is cut through in the hope the stub will swing down on the left hand bolt and fall off.
Which it did leaving it looking like this.
The four bolt remnants were then removed by creating a relief slot in the hole that allowed some movement and drifting out with a punch and hammer.
I'm hoping when it all goes back the joint will still be strong enough. It doesn't look great in the photo but there's a lot more metal there than the photo suggests. If not/anyway I have a cunning plan to strengthen it.
Engine going in now Protective sheets on the new engine pay paintwork. Engine mount brackets removed for maximum access. Inlet and exhaust manifolds still attached - this is an exercise in disturbing as few parts as possible.

Edging further in. The engine crane was a real struggle to move as it was on tarmac with a bumpy finish outside and it had to get over a raised edge on the garage floor slab to get inside. The leading left hand wheel kept wanting to go sideways which made things really difficult as this is a very heavy weight swinging from the arm.

We're navigating our way well in now.

Nearly there.

We then had a long fight aligning the engine to the subframe as it was offered up from underneath. It literally required dozens of fractional movements to get it right. Up and down. Left to right. Nice when it finally all lines up though
Here it is with the shotblasted and zinc primer powder coated front panel. The front panel is just on loosely and will get painted in the engine bay colour of course.

It's just starting to look like a Z3 again!

Protective sheets on the new engine pay paintwork. Engine mount brackets removed for maximum access. Inlet and exhaust manifolds still attached - this is an exercise in disturbing as few parts as possible.Edging further in. The engine crane was a real struggle to move as it was on tarmac with a bumpy finish outside and it had to get over a raised edge on the garage floor slab to get inside. The leading left hand wheel kept wanting to go sideways which made things really difficult as this is a very heavy weight swinging from the arm.
We're navigating our way well in now.
Nearly there.
We then had a long fight aligning the engine to the subframe as it was offered up from underneath. It literally required dozens of fractional movements to get it right. Up and down. Left to right. Nice when it finally all lines up though
Here it is with the shotblasted and zinc primer powder coated front panel. The front panel is just on loosely and will get painted in the engine bay colour of course.
It's just starting to look like a Z3 again!

Some great work has gone in to this it's going to look fantastic when done a credit to all your hard work
Things are now going on hold for a couple of weeks. It's time to take a break to catch up with the many other things that have fallen by the wayside over the last few weeks. And I'm also off with the missus to Lanzarote during this time.
But first I brought in JCS (Jimmy Cleaning Services) to see how the interior scrubbed up and to leave things nicely poised for the next phase.
Pretty happy with it actually. There's a few damp patches left in the photos where it's still drying.


Another fine job delivered by JCS

The damaged Sport seats I previously advertised have now been withdrawn from sale. They are both in Swansea. The passenger side getting a new base cover and underfoam - it turns out the rotted seams were caused by someone placing a leaking car battery on it! it had puzzled me but the guy knew instantly. The driver side is actually pretty good and has gone to a separate leather restorer to sort out the seat belt abrasion on the upper bolster.
https://zroadster.org/threads/black-sport-seats-in-classic-leather-r7sw.16935/
We'll see how good they turn out in 2-3 weeks when I pick them up after our holiday. I have high hopes but modest expectations for one reason or another. I don't expect them to look like new but will judge on the overall effect.
But first I brought in JCS (Jimmy Cleaning Services) to see how the interior scrubbed up and to leave things nicely poised for the next phase.
Pretty happy with it actually. There's a few damp patches left in the photos where it's still drying.
Another fine job delivered by JCS
The damaged Sport seats I previously advertised have now been withdrawn from sale. They are both in Swansea. The passenger side getting a new base cover and underfoam - it turns out the rotted seams were caused by someone placing a leaking car battery on it! it had puzzled me but the guy knew instantly. The driver side is actually pretty good and has gone to a separate leather restorer to sort out the seat belt abrasion on the upper bolster.
https://zroadster.org/threads/black-sport-seats-in-classic-leather-r7sw.16935/
We'll see how good they turn out in 2-3 weeks when I pick them up after our holiday. I have high hopes but modest expectations for one reason or another. I don't expect them to look like new but will judge on the overall effect.
I have to say I find silver amongst the more boring Z3 colours. But I think correctly accented with the right colours it could look pretty good.
So I've got the blue individual roof from the breaker lined-up (which also has a good rear window unlike this one). And we'll try the gunmetal newly refurbed 108s on it.
I'm getting quite excited now The aim is to try and have it ready to take to the Santa Pod BMW Show on Sunday, 2 July. In convoy with my brother in his 1.9.
http://www.bmwshow.co.uk/index.php
But there's a lot of work to be done to achieve that as I'm not back on it until 22 Jun. And it needs an MOT. We'll give it a go but might be too early. We'll probably still go to Santa Pod if we don't make it but I will be in Trudy my Topaz Blue 2.2 keeper.
My other half is having a major op the next day and I'll be nursing her for 2 weeks in Swansea. So there will be another lay off if it's not mobile by then.
So I've got the blue individual roof from the breaker lined-up (which also has a good rear window unlike this one). And we'll try the gunmetal newly refurbed 108s on it.
I'm getting quite excited now
The aim is to try and have it ready to take to the Santa Pod BMW Show on Sunday, 2 July. In convoy with my brother in his 1.9.http://www.bmwshow.co.uk/index.php
But there's a lot of work to be done to achieve that as I'm not back on it until 22 Jun. And it needs an MOT. We'll give it a go but might be too early. We'll probably still go to Santa Pod if we don't make it but I will be in Trudy my Topaz Blue 2.2 keeper.
My other half is having a major op the next day and I'll be nursing her for 2 weeks in Swansea. So there will be another lay off if it's not mobile by then.

Another enjoyable update, can't wait to see the car at Santa Pod. Excellent work.
Interestingly enough that bung was perished on my donor engine. I just got a new one from the dealer. I think it was about £1.50.Iirc
- The M52TU engines use the small 3.5 mm tube from the CCV separator middle connection (6 on the E39 picture in the above post) to the rear of the inlet manifold 3.5 mm port. (see below photo of a M54 inlet manifold, bungs fitted but this is where the 3.5 mm hose connects on the M52TU engine))
- The M54 engines do not use the 3.5 mm hose and have a bung on both the separator and inlet manifold (see below photo of a M54 CCV separator with bung fitted)
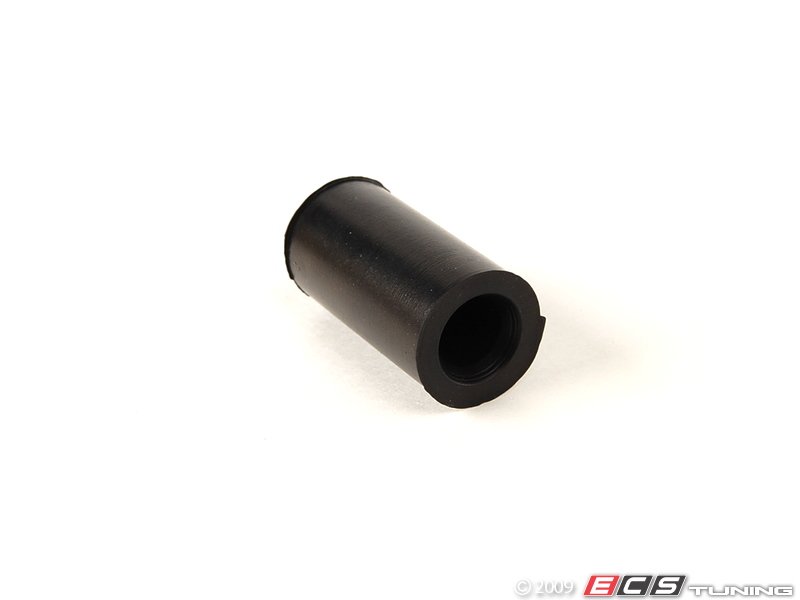
The only other vacuum connection I found perished was to the fuel line (I think that's what it was) where it comes up from the chassis on a blue pipe (again, I think). Which was very well rotted. It was rotted on both the project and donor car. So well worth checking yours. I'll post a photo later.

Good work and an interesting read. Are you taking any small components on holiday with you to fettle by the pool?
You'll probably get some better weather out there for spraying, shame to waste it laying around!
Cheers,
Jonno
You'll probably get some better weather out there for spraying, shame to waste it laying around!
Cheers,
Jonno
I reckon for every hour I spend working on the car I can typically spend an hour researching what I'm doing on here/rest of the internet. Sometimes it can be more like a ratio of 1:4-5 hours. So there will be plenty of poolside reading up on the iPadGood work and an interesting read. Are you taking any small components on holiday with you to fettle by the pool?
You'll probably get some better weather out there for spraying, shame to waste it laying around!
Cheers,
Jonno

Really enjoying this thread!! Enjoy the holiday and the research!! JIM