g8jka - 2.8 Roadster Progress Journal

What she doesn't have a zed, thought it's mandatory around here these days to have 1 Z per licensed driver in a house!

No and she isn't even allowed anywhere near the drivers seat of mine :whistle:

Originally she had 18" alloys on her Mini, they now look more like 14" alloys she has taken that much metal off them 'kissing' kerbs. She would make a great job of removing the lacquer quickly on mine though :D
 
I don't actually need to polish around the little bolts as that area is painted so there is a little rim where the paint meets the polished lip which would need to be polished upto. Once the lacquer is off then its pretty straight forward, its just getting them to that stage! Shouldn't take too long to do the jobs on the list, just got to find some motivation from somewhere been too busy fixing the fiances Mini :mad:
Are you going to split the rims, if so paint stripper will make life a lot easier as you won't be using abrasives.
 
Errrr, think again...

Thanks for offering your services :thumbsup:

Are you going to split the rims, if so paint stripper will make life a lot easier as you won't be using abrasives.

No mate, they are not split rims, only reps so they need to be done as they are so I can't use paint stripper on them as I don't want to have the hassle of doing the centres as well.
 
Thanks for offering your services :thumbsup:


No mate, they are not split rims, only reps so they need to be done as they are so I can't use paint stripper on them as I don't want to have the hassle of doing the centres as well.
:thumbsup::thumbsup:
 
Managed to get a couple of jobs done of my list, hopefully have them all done in a month or two.

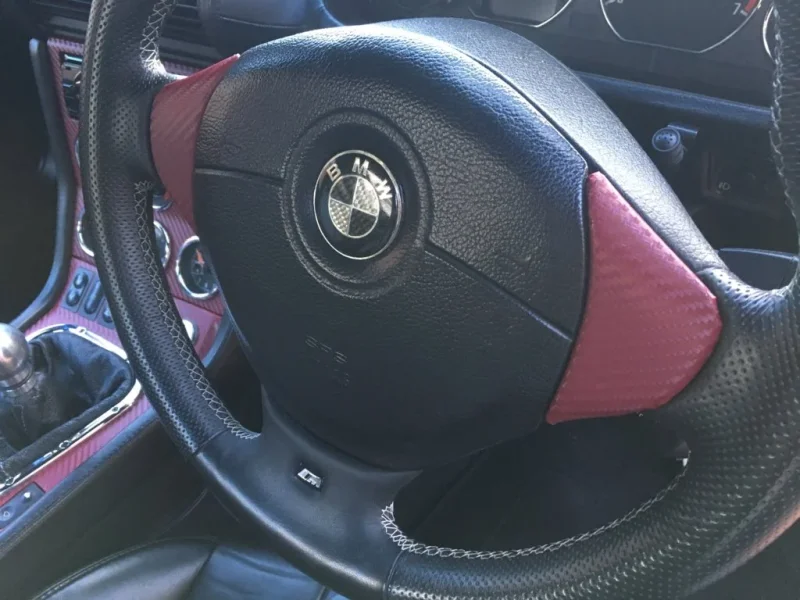
Firstly I have re-wrapped the centre console, steering wheel tabs and door card plastic trims with burgundy carbon fibre, as I never liked the brushed steel I used last time and this stuff matches the new roof near enough spot on.

IMG_3991.webp


IMG_3984.webp


I wasn't sure on how it would look and wasn't that keen whilst I was doing it, but once it was all back together I changed my mind and love the way it looks now.

As the console was out I decided on fitting a push button engine start which is something I have thought of in the past but never found one I like the look off. I spotted this brushed steel one which is engraved and looks pretty smart and matches the handbrake and gear knob so I bought one and got it fitted. The back light comes on with the ignition and you hit the button to start the engine.

Without ignition

IMG_3992.webp


With ignition

IMG_3993.webp


Installed a couple of new charging points at the rear of the console, normal cigarette lighter socket and dual USB connections

IMG_3980.webp


IMG_3981.webp


New 1440p dash cam hardwired in which works via WiFi and connects upto my phone so you can view and save all files without removing the memory card and can be rotated for rear viewing also. Hopefully this one will last longer than the previous ones I've had.

IMG_3997.webp


Also I have upgraded my 4.3" TFT monitor to a 5" one and put a new front camera in the front bumper for judging parking distances and waiting on a new one for the rear bumper as the old one has given up, again for parking. This comes on automatically with the ignition and switches to the rear camera when selecting reverse.

And finally I decided to do a stud conversion with some neo chrome nuts. This should make wheel changes a lot easier and I don't need to use different sized bolts anymore when I changed from winter to summer wheels and move the spacers around.

IMG_3986.webp


IMG_3988.webp


That's it until the weekend :D
 
Last edited:
Great stuff Dave, especially like the wheel studs mate.:)

Tony.
 
Liking the wrapping, looks a really good job:thumbsup:
 
I love the start button function was it difficult to wire in?

I hope you didn't get your neo chrome nuts from the same supplier as me. Mine have totally rusted and look really bad. I need to order some new ones before I even consider taking it out in public =))
 
Great work with great touches in relation to the modifications!
 
I love the start button function was it difficult to wire in?

I hope you didn't get your neo chrome nuts from the same supplier as me. Mine have totally rusted and look really bad. I need to order some new ones before I even consider taking it out in public =))

No not difficult at all, 2 wires needed to be tapped into the ignition system and then an earth wire. Then one wire is cut so it does't go back to the ignition so it can't be started with the key, turn it to position 2 and then hit the button.

Got the nuts from eBay, not the place you had yours from but what I have seen most of them rust I will just have to see how long they last. Would have maybe been worth putting some wax on them before putting them on.

Some nice mods, do you have a link for the rear power supply looks custom made for oddments tray nice and neat.

Thanks, link to the power supply is here. You will need to modify the surround so it is small enough to sit in the original switch panel and cut out the inner of the switch panel itself so you can get the barrels through. I then glued the power supply to the switch panel at the rear and took a feed from the original cigarette lighter wiring.
 
Some good mods!
I like the wrap, bet it was nervy doing stuff like that but when it all comes together it looks great!
Still wouldnt mind a red roof :whistle:
 
Back
Top