Euro cruise disaster

Sorry to hear the job didn't go well Garry. I hope the heli coils and the rest of the threads hold up mate. Best of luck.

Tony.

ps. If you buy one of those cameras I got a while ago you could look down the bolt holes before fitting maybe.
 
Sorry to hear the job didn't go well Garry. I hope the heli coils and the rest of the threads hold up mate. Best of luck.

Tony.

ps. If you buy one of those cameras I got a while ago you could look down the bolt holes before fitting maybe.


I've got an endoscope but didn't use it as the bolts screwed in nicely. I will double check them before I proceed further though. I think the camera I have has a 7mm head so will go down the hole ok, but I'm not sure what the focus is like being as it's only going to be a millimetre or so from the target
 
I've got an endoscope but didn't use it as the bolts screwed in nicely. I will double check them before I proceed further though. I think the camera I have has a 7mm head so will go down the hole ok, but I'm not sure what the focus is like being as it's only going to be a millimetre or so from the target

That would be the only issue mate. Maybe worth a try, mine is 6mm lens.

Tony.
 
Just for peace of mind it might be worth get your torque wrench checked. Its very rare to strip a head bolt thread but to have two go..
I would make sure your torque wrench is tightening to what you have set. It may read 40Nm but is it.
 
That is a valid point Andy, I'm guessing the @Jack Ratt is in the right industry to be able to get that calibration checked? We have a mobile service who call at work to do just this. They check even our own personal wrenches (I have 3) because we use them at work.

Tony.
 
Just for peace of mind it might be worth get your torque wrench checked. Its very rare to strip a head bolt thread but to have two go..
I would make sure your torque wrench is tightening to what you have set. It may read 40Nm but is it.

That is a good point I bought a new torque wrench a few years ago and when I put it on the tester at work it was quite a bit out. I made an acurate chart and taped it to the wrench. I re-checked it periodically and it stayed about the same.
 
I've never used helicoils on an engine block before so this is a first time for me. I've used then on other jobs and they've been ok.

To be honest I half expected to find a damaged thread, but I screwed all the bolts into the head before I started and they all went in pretty easily. Sods law I suppose. I'll make sure I use plenty of lube when I refit the head after this experience.

All the damaged threads were around pot 4 which is the area the most contamination was, so I suppose it was a bit of a clue. As I said, I checked each hole by screwing the head bolt in all the way, but you can't see into a 10mm dia hole, so I don't feel too bad about it.

I remember once while screwing a bolt into a hole when replacine a part, that the bolt snapped in the hole. I couldn't understand why this had happened since the bolt had come out ot the hole to begin with. The bolt wasn't yet seated and had a few more turns to be fully seated. A friend who lived on the next block was a retired mechanic. I asked him how this could have happened. He said that I must have gotten some oil in the hole and it was trapped in the bottom of the hole by the bolt when it was being screwed in. The oil doesn't compress and before the threads gave out, the bolt snapped. (I think I've heard some people since then call this a form of hydrolock). He said the bolt would extract very easily and so it did. Sure enough, when I cleaned out the hole, there were a few drops of oil in the bottom of the hole. I say this only that the same thing doesn't happen to you when you replace the bolts in the helicoil............Frankie
 
What a beautiful job, well done. Couple of very valid comments that have been posted is the mention of lubing the threads, after lubing the threads make sure all the bolts go down all the way, a calibrated torque wrench is a must and the last point (not sure whether this has been mentioned) is to have a degree adapter so the 90 degree turns are exact. Also most stretch bolts can only be used twice.
Having had vast experience with the horrid K series engine all theses point might help.
Good luck
H
 
Good stuff Gary hope she's back on the road soon. :thumbsup:
 
Garry, if you didn't have bad luck you'd have no luck at all! Hope the rest works out better for you mate.
 
when I used to be doing M20 engines on a regular basis, I always cleared head bolt threads with a compressed air blow gun prior to laying the head gasket on. Just normal to do it. In variably as you lift a head off their may be coolant or oil trickle out and into a thread.
 
Using bolts on a cylinder head is always a poor design compromise, especially if the material being screwed into is soft. It's usually due to making manufacture easier in the factory. Bolts tighten in a totally different way to studs and nuts.

A cylinder head to block fastener only needs to be in tension. A bolt tries to twist the thread out of the block, a stud tries to pull the thread out of the block. The force required to strip a thread by shear is significantly less than the force required to strip a thread by tension/compression.

I'd consider four things.

1. Carry on as you are with helicoils. I'd be tempted to helicoil all the holes. This company gets better reviews than Helicoil - http://www.timesert.com/
2. Replace bolts with studs, nuts and washers
3. Use larger diameter bolts
4. Test your block's hardness. The heat may have softened it.

I've never worked on your engine, so I don't know how practical any of these suggestions are.

Additionally, are you using new bolts? The originals will have stretched (as they are designed to do). It's very hard to tell if the bolts are stretched as the deformation is very slight and is unlikely to change the length of the bolt by more than 0.5mm. The stretching occurs at the weakest point (this is the region around the thread that was just above the block, and the last part of the thread going into the block). This changes the pitch of the thread and will make the thread tighter than it should be - hence the reason for using new bolts.

 
Make your own. It's not a hard thing to do.

But that doesn't give any certification required to cover one's a**e if there's a problem down the line, does it?

Tony.
 
I do. It was my post you commented one.;)

Tony.
 
Using bolts on a cylinder head is always a poor design compromise, especially if the material being screwed into is soft. It's usually due to making manufacture easier in the factory. Bolts tighten in a totally different way to studs and nuts.

A cylinder head to block fastener only needs to be in tension. A bolt tries to twist the thread out of the block, a stud tries to pull the thread out of the block. The force required to strip a thread by shear is significantly less than the force required to strip a thread by tension/compression.

I'd consider four things.

1. Carry on as you are with helicoils. I'd be tempted to helicoil all the holes. This company gets better reviews than Helicoil - http://www.timesert.com/
2. Replace bolts with studs, nuts and washers
3. Use larger diameter bolts
4. Test your block's hardness. The heat may have softened it.

I've never worked on your engine, so I don't know how practical any of these suggestions are.

Additionally, are you using new bolts? The originals will have stretched (as they are designed to do). It's very hard to tell if the bolts are stretched as the deformation is very slight and is unlikely to change the length of the bolt by more than 0.5mm. The stretching occurs at the weakest point (this is the region around the thread that was just above the block, and the last part of the thread going into the block). This changes the pitch of the thread and will make the thread tighter than it should be - hence the reason for using new bolts.
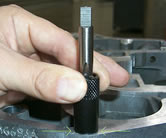
That was an interseting hyperlink. Saw this tool on that link:

TAP GUIDES INSURE THAT THREADS ARE SQUARE TO SURFACE.
image001.jpg

The lower portion of the tap guide should remain as square as possible to the engine surface.
Turn the tap slowly while making sure the guide remains flush.

Frankie
 
Back
Top