My car came with a hood cover (sometimes called 'tonneau') that's attached using four Tenax fasteners. These are spring-loaded and grip a ball on a post using three cupped 'fingers'. One of the fasteners was definitely faulty on purchase and I'm pretty sure I damaged another fitting for the first time.
The key to fitting these is to pull the button back as far as possible while pushing the base into the ball and if there's any resistance when fitted over the ball, STOP.
The design of these is such that the cupped fingers grip the ball when fitted and pulling the knob allows the fingers to expand outwards to release it. In normal fixed position, the lip on the Tenax base unit prevents the cupped fingers from expanding outwards and releasing the ball. It is very easy to damage the fasteners by the fingers being pushed back into the fastener when fitting them. I can't photograph the insides of these fasteners, so this is my attempt at a diagram (not to scale)!

I had two fasteners where 2 of the 3 fingers in each one had been pushed back at 90 degrees and collapsed into the fastener body. These don't seem to be available new from automotive/marine trimmer supplies (because the BMW ones are longer than marine versions and black) and I've heard each one can be bought from BMW for about £80! This is how I repaired mine....
The fasteners can be removed from the hood cover by using a circlip plier engaged into the two holes and the button unscrewed anticlockwise. The ball fastener is just unscrewed from the Z3 body.

I don't think there's any way to further dismantle the button unit.
I fashioned a hook using an old precision screwdriver with the flat end bent at 45 degrees and by using a thin angle grinder disc. Screwdriver shaft diameter was 1.8mm. Using this, I was able to pull the two collapsed fingers upwards. Bent wire will probably not work - you need to use something thin, made of tool steel.

It's then a matter of using precision screwdrivers and an outward-expanding circlip plier to push them back in rough position (as far outwards as you can) including the parts towards the back of the button unit. I found that although it looked right, it wouldn't fasten properly, as the fingers didn't expand enough when the fastener ball was pushed in. If there's any resistance to the ball when the button is pulled back, you risk the fingers getting bent back again.
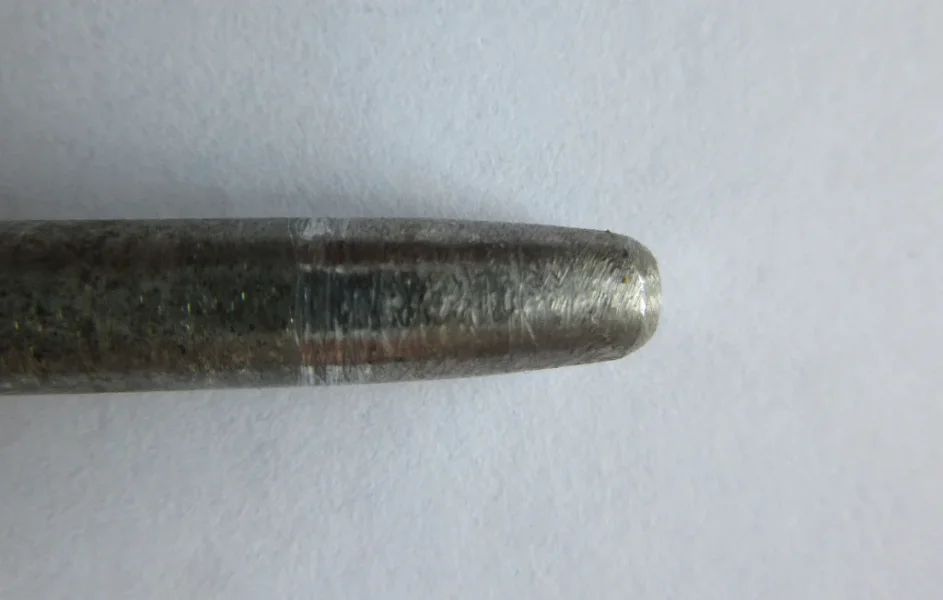
The final stage was to make a tapered shaft that was the same diameter as the ball (5.05mm). I did this using a 5mm masonry drill bit shaft, ground down to a tapered profile and the maximum diameter reduced to 5mm (the drill shaft was originally 5.3mm).

The fingers can be returned close to their original position by:

Although not as good as new in terms of smoothness of operation, mine do now work ok.
Some dimensions for the Tenax fastener if you wish to find new online:
Ball fastener:
ball diameter 5.05mm
9mm across the flats for the hex bolt
4mm diameter across screw threads
Threaded part is 10mm long
Ball is 6mm high from the top of the hex bolt
Fastener Button:
fastener button is 15mm diameter
spacer is 13mm diameter, 8.5mm deep
Fastener is 19.4mm diameter at its widest part
The key to fitting these is to pull the button back as far as possible while pushing the base into the ball and if there's any resistance when fitted over the ball, STOP.
The design of these is such that the cupped fingers grip the ball when fitted and pulling the knob allows the fingers to expand outwards to release it. In normal fixed position, the lip on the Tenax base unit prevents the cupped fingers from expanding outwards and releasing the ball. It is very easy to damage the fasteners by the fingers being pushed back into the fastener when fitting them. I can't photograph the insides of these fasteners, so this is my attempt at a diagram (not to scale)!
I had two fasteners where 2 of the 3 fingers in each one had been pushed back at 90 degrees and collapsed into the fastener body. These don't seem to be available new from automotive/marine trimmer supplies (because the BMW ones are longer than marine versions and black) and I've heard each one can be bought from BMW for about £80! This is how I repaired mine....
The fasteners can be removed from the hood cover by using a circlip plier engaged into the two holes and the button unscrewed anticlockwise. The ball fastener is just unscrewed from the Z3 body.
I don't think there's any way to further dismantle the button unit.
I fashioned a hook using an old precision screwdriver with the flat end bent at 45 degrees and by using a thin angle grinder disc. Screwdriver shaft diameter was 1.8mm. Using this, I was able to pull the two collapsed fingers upwards. Bent wire will probably not work - you need to use something thin, made of tool steel.
It's then a matter of using precision screwdrivers and an outward-expanding circlip plier to push them back in rough position (as far outwards as you can) including the parts towards the back of the button unit. I found that although it looked right, it wouldn't fasten properly, as the fingers didn't expand enough when the fastener ball was pushed in. If there's any resistance to the ball when the button is pulled back, you risk the fingers getting bent back again.
The final stage was to make a tapered shaft that was the same diameter as the ball (5.05mm). I did this using a 5mm masonry drill bit shaft, ground down to a tapered profile and the maximum diameter reduced to 5mm (the drill shaft was originally 5.3mm).
The fingers can be returned close to their original position by:
- Inserting the tapered drill bit to expand the fingers. Rotating the tapered shaft clockwise and anticlockwise helped, as did levering the shaft at a slight angle.
- Inserting the ball and when the fingers hold it in the normally locked position, gently pull the button and ball apart to pull the finger back to their original profile.
Although not as good as new in terms of smoothness of operation, mine do now work ok.
Some dimensions for the Tenax fastener if you wish to find new online:
Ball fastener:
ball diameter 5.05mm
9mm across the flats for the hex bolt
4mm diameter across screw threads
Threaded part is 10mm long
Ball is 6mm high from the top of the hex bolt
Fastener Button:
fastener button is 15mm diameter
spacer is 13mm diameter, 8.5mm deep
Fastener is 19.4mm diameter at its widest part