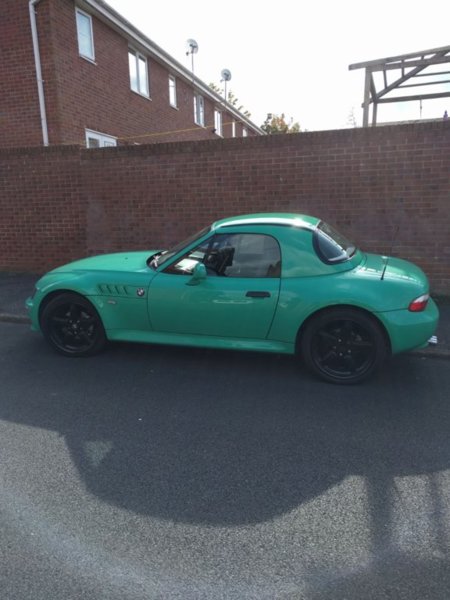
Z3 Black Hardtop £300
- Thread starter bmac109
- Start date
Look in the rear of the consel for wiring to go to the switch. You may need to source a small section of wiring to go from the switch to the NS fitting. Cap screws could be from a different model year as I don't believe I have any on mine. HTH. JIM
jakechan
Dedicated Member
- Joined
- Feb 6, 2015
- Points
- 39
I just picked up a hardtop for my 2002 roady, brackets have been installed already but I have a question about the demist cable which I'll ask here instead of another thread. I have seen the install pdf floating around the web which suggests removing the roll hoops and the rear storage, is there really no way to reach the cable without removing these parts?
I have no power top, so the cable connector is not near the bracket, at least I can't see it. Any advice would be appreciated.
Thanks
I have no power top, so the cable connector is not near the bracket, at least I can't see it. Any advice would be appreciated.
Thanks
The cable connector s usually taped up to the wiring loom, the wiring loom runs underneath/behind the nearside side trim panel by the side of the seat belt anchorage. In order to remove or lift up the side trim you have to remove the cubby centre box to access the screws holding the side trim. Plus in order to remove the centre cubby box you have to remove the hoops! Sounds difficult but actually does not take that long, you will need a T40 torx bit. If a hardtop has been previously fitted I'd be surprised they hadn't sorted the feed for the HRW
jakechan
Dedicated Member
- Joined
- Feb 6, 2015
- Points
- 39
Thanks for that, I'll have a go this week. This is the first time a hardtop has been fitted, judging by how well the foam parts were stuck in!!The cable connector s usually taped up to the wiring loom, the wiring loom runs underneath/behind the nearside side trim panel by the side of the seat belt anchorage. In order to remove or lift up the side trim you have to remove the cubby centre box to access the screws holding the side trim. Plus in order to remove the centre cubby box you have to remove the hoops! Sounds difficult but actually does not take that long, you will need a T40 torx bit. If a hardtop has been previously fitted I'd be surprised they hadn't sorted the feed for the HRW
- Joined
- Aug 4, 2016
- Points
- 77
- Model of Z
- 2.8 Individual Fiji Green
My newly painted hardtop now fitted though fitment needs fine tuning.
Attachments
-
77.8 KB Views: 85
Did they mask off the gutter rails and rear window or remove? Looks good, changes the look of the car.
Excellent 

Charles Perkins
Dedicated Member
As Boysie said, fits all but depends if you buy BMW or Weissman.
Weissman came out first with a hardtop before BMW even thought about it and I know for a fact that the fitting kits for both are different, I have a Weissman.
I would not worry about the heated rear window, as I have it on mine but have never used it, as the heated wing mirrors defrost very quickly and my wind deflector is up even under the hardtop. Cuts out head light glare at night.
- Joined
- Aug 4, 2016
- Points
- 77
- Model of Z
- 2.8 Individual Fiji Green
By the way, the HRW switch wiring on mine - October 98 build - was located under the rear part of the centre console where there is either a little storage box or a 4 hole switch blanking plate, mine had the latter. Remove the 2 screws at the rear end of the centre console, pop out the box or blanking plate then feel around for the wire - it will be folded over and taped up with other wires and possibly a bit of foam. Free the wire, attach to switch, place switch in one of the blanking holes and then have fun trying to put the blanking plate/surround into the console - stupid design!

