
You are using an out of date browser. It may not display this or other websites correctly.
You should upgrade or use an alternative browser.
You should upgrade or use an alternative browser.
Time for an overhaul of my 1.9 '98 BMW Z3 Individual
- Thread starter Matt Barnes
- Start date

Thank goodness for that. Bet you are one of the most knowledgeable on here now from hard won experience and not a little perseverance.
Very well done!
Very well done!

- Joined
- Jul 18, 2020
- Points
- 134
- Location
- Portchester, Fareham
- Model of Z
- 1998 BMW Z3 Individual 1.9 M44 B19
agreed mate..... @Duncodin did warn me to check the fuel rail pressure but as it fired when I disconnected the ICV and TPS I just thought, well there must be fuel rail pressure for it to fire ! but it got me thinking and took me back to the fuel rail diagrams and that's when I saw the supply was on the other pipe.. again I believed the internet in that "being a rail it doesn't matter which side you connect"..... oh yes it bloody does !! anyway lesson learnt albeit at a cost of weeks and cash...That’s great that it’s going now… and that’s all that matters
so now I need to put the interior back together, fit new rear shocks and get a new alternator and I think we're there.....
- Joined
- Jul 18, 2020
- Points
- 134
- Location
- Portchester, Fareham
- Model of Z
- 1998 BMW Z3 Individual 1.9 M44 B19
if anyone wants to borrow any of my diagnostic tools you're more than welcome..... I sort of know the basics of INPA now... EDIABAS is all in German so is less helpful in terms of drilling down into problems....Sounds like you have most of the kit to open the Portchester sub-branch of the Zedshed
- Joined
- Jul 18, 2020
- Points
- 134
- Location
- Portchester, Fareham
- Model of Z
- 1998 BMW Z3 Individual 1.9 M44 B19
thank you @Ianmc it just made no sense that as I never touched the engine during the restoration, for it simply not to start baffled me. Then I started believing the Internet, and it turned out one simple error on my part lead to all this .....but yes if nothing else I gained a huge amount of experience from it...Thank goodness for that. Bet you are one of the most knowledgeable on here now from hard won experience and not a little perseverance.
Very well done!

 At least you got there in the end, appreciate the frustrations, I’m sure a lot of us can hold our hand up to the occasion guff or chasing of a red herring.
Well done Matt, you certainly deserve a medal for all your hard work and perseverance  . You are now an expert with scanners, INPA, etc. We all know who to come to for help now
. You are now an expert with scanners, INPA, etc. We all know who to come to for help now
- Joined
- Jul 18, 2020
- Points
- 134
- Location
- Portchester, Fareham
- Model of Z
- 1998 BMW Z3 Individual 1.9 M44 B19
thank you @Mint ! appreciate that..... I've spend more on this (both financially and emotionally) than is remotely healthy! but as I keep telling myself I've learnt a ton in the process... ironically when I finished fitting the last body panel I said to myself "well at least I don't need to touch the engine"Well done Matt, you certainly deserve a medal for all your hard work and perseverance


- Joined
- Jul 18, 2020
- Points
- 134
- Location
- Portchester, Fareham
- Model of Z
- 1998 BMW Z3 Individual 1.9 M44 B19
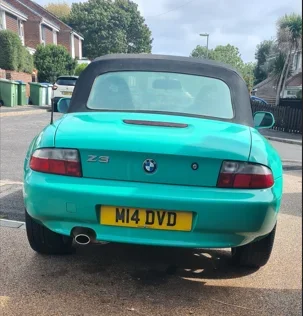
THE FIJI FLIER HAS LANDED !!!

First time on her own four wheels for over 3 years !...
running a bit rough at the moment plus as I have the alternator disconnected it's running just on the battery, so only have it running for a few minutes at a time.


Yes, the bonnet is on the catch....
I had a little delay in proceedings last week, as the Peugeot decided to lose the brake pedal. I could brake but then my foot would carry on. Checked every wheel arch and all was dry, so thought it was the master cylinder so replaced it.... and no.. it wasn't that...crawled under the car and up behind the spare wheel was this.....

and had sprayed fluid all over the spare wheel..... as luck would have it, I've just restored a car that required me to replace all the brake lines.... The brake unions were completely rusted in, so cut a length out got out my handy hand held brake flaring tool, made up a new line and we were back on the road


now back to the Z3 !!
got it onto level ground and topped off the Diff oil and torqued it up so that's all good. When running i did hear a squeaking noise and it was the exhaust rubbing on the subframe mount. Think that as the rear shocks have collapsed it's sitting a little lower than it should, but I have new rear shocks anyway to go on.
All the trim is now back in after my foolhardy journey with the immobiliser

I actually used 3M Tyre Restorer spray on the trims and it brought it up very nicely

So what's next !!?
well...
First time on her own four wheels for over 3 years !...
running a bit rough at the moment plus as I have the alternator disconnected it's running just on the battery, so only have it running for a few minutes at a time.
Yes, the bonnet is on the catch....
I had a little delay in proceedings last week, as the Peugeot decided to lose the brake pedal. I could brake but then my foot would carry on. Checked every wheel arch and all was dry, so thought it was the master cylinder so replaced it.... and no.. it wasn't that...crawled under the car and up behind the spare wheel was this.....
and had sprayed fluid all over the spare wheel..... as luck would have it, I've just restored a car that required me to replace all the brake lines.... The brake unions were completely rusted in, so cut a length out got out my handy hand held brake flaring tool, made up a new line and we were back on the road
now back to the Z3 !!
got it onto level ground and topped off the Diff oil and torqued it up so that's all good. When running i did hear a squeaking noise and it was the exhaust rubbing on the subframe mount. Think that as the rear shocks have collapsed it's sitting a little lower than it should, but I have new rear shocks anyway to go on.
All the trim is now back in after my foolhardy journey with the immobiliser
I actually used 3M Tyre Restorer spray on the trims and it brought it up very nicely
So what's next !!?
well...
- replace the shock absorbers
- refit the kick boards and new chrome strips
- Get the wheels refubished
- Get a new alternator (the current one draws 3A with the engine off so must be shorted.
- Repair the Driver's seat ( I have some leather glue so might that a go)
- Refit the undertrays
- Replace the weathered badges and gear knob
Attachments
Last edited:
- Joined
- Jul 18, 2020
- Points
- 134
- Location
- Portchester, Fareham
- Model of Z
- 1998 BMW Z3 Individual 1.9 M44 B19
could do but it came with these when we bought it...19"Are you not going to return it to stock wheels then?


That’s like putting tractor wheels on a mini

Style 18s seem to be the most popular on Fuji’s ..set for sale here in Ringwood

For sale
Set of staggered 17” Style 18 wheels, faces refurbed and painted black, barely used, then taken off for my current set… about 10 years ago . Just been sitting around since and realistically never going to use them so here we are. Tyres have protected the wheels but are useless, full set of very old Pilot Sports!
It’s been a while since knowing the specs of these but trying to read the sizes on the front I think they are:
7.5 x 17” with 225/45/17 on the front
8.5 x 17” with 245/40/17 on the rear
Someone correct me if I’m wrong with the wheel widths
£100 collected from...
Set of staggered 17” Style 18 wheels, faces refurbed and painted black, barely used, then taken off for my current set… about 10 years ago
. Just been sitting around since and realistically never going to use them so here we are. Tyres have protected the wheels but are useless, full set of very old Pilot Sports!It’s been a while since knowing the specs of these but trying to read the sizes on the front I think they are:
7.5 x 17” with 225/45/17 on the front
8.5 x 17” with 245/40/17 on the rear
Someone correct me if I’m wrong with the wheel widths
£100 collected from...
- Mor61e
- Replies: 17
- Forum: For Sale Section

I think it’s called a ‘donk’ buildThat’s like putting tractor wheels on a mini
- Joined
- Jul 18, 2020
- Points
- 134
- Location
- Portchester, Fareham
- Model of Z
- 1998 BMW Z3 Individual 1.9 M44 B19
yeah think I probably should given at least two tyres are cracked..might be worth checking the ones you linked19”
Can’t help think it may tramline and comfort be compromised
- Joined
- Jul 18, 2020
- Points
- 134
- Location
- Portchester, Fareham
- Model of Z
- 1998 BMW Z3 Individual 1.9 M44 B19
Afternoon !!... apologies for the lack of an update !...... Niece's wedding weekend beginning of October, then spent the past two weekends in Cornwall on holiday....based ourselves in Perranporth and loved it....
right.... where were we.....
firstly, battery was dead, not surprising as I'd done all the previous cranks and starts on battery alone, as the alternator was pulling 3A parasitic draw, so disconnected it, and it's now making a whirring noise. Replacement coming courtesy of Ebay.
so.. it seems I've developed a leak....well... two actually !........
Leak No1
You can't really see but I have water in my offside rear cluster, up to the level of the bulb apertures.

I checked the rubber boot seal and all good.... dry around where the looms enter the boot


but have water collecting near the front bulkhead and the battery tray. I tried removing the cluster light, undid the nuts and what I thought made it free.... but no.. it won't budge....gave it a gentle tap with a rubber mallet on the studs but no... won't budge at all
I've seen videos of people removing the cluster complete with the black shroud, but that can't be right ?

I'm just hoping someone before me hasn't bonded it in...... anyway
Leak No. 2
This one I'm confident it's the O Ring at the bottom of the filler on the radiator as the drips are coming from above the bottom hose

So I guess the question is, can this be removed with the radiator in place or do I need to remove the radiator to get it out?
Sideline job, I accessed the top of the rear struts and was relieved to see no corrosion at all, so swapping those struts out for new ones should be an easy job.... there I've cursed it now !

So when that's all done... what's left to do ?
............................................ UPDATE..................................
I think I've found one of my issues...... look at the rear quarter in relation to the rear cluster
I fitted the quarter OVER the light... that might explain why it was stuck !!

loosen the two 8mms on the rear quarter, tapped the studs and out she came.... what an idiot


Think someone has been here before though... black overspray?

There...much better.... and yes the same on the nearside as well


right.... where were we.....
firstly, battery was dead, not surprising as I'd done all the previous cranks and starts on battery alone, as the alternator was pulling 3A parasitic draw, so disconnected it, and it's now making a whirring noise. Replacement coming courtesy of Ebay.
so.. it seems I've developed a leak....well... two actually !........
Leak No1
You can't really see but I have water in my offside rear cluster, up to the level of the bulb apertures.
I checked the rubber boot seal and all good.... dry around where the looms enter the boot
but have water collecting near the front bulkhead and the battery tray. I tried removing the cluster light, undid the nuts and what I thought made it free.... but no.. it won't budge....gave it a gentle tap with a rubber mallet on the studs but no... won't budge at all
I've seen videos of people removing the cluster complete with the black shroud, but that can't be right ?
I'm just hoping someone before me hasn't bonded it in...... anyway
Leak No. 2
This one I'm confident it's the O Ring at the bottom of the filler on the radiator as the drips are coming from above the bottom hose
So I guess the question is, can this be removed with the radiator in place or do I need to remove the radiator to get it out?
Sideline job, I accessed the top of the rear struts and was relieved to see no corrosion at all, so swapping those struts out for new ones should be an easy job.... there I've cursed it now !
So when that's all done... what's left to do ?
- Fit replacement alternator
- Fit undertrays
- Fit kick plates
- Book MoT !!
............................................ UPDATE..................................
I think I've found one of my issues...... look at the rear quarter in relation to the rear cluster
I fitted the quarter OVER the light... that might explain why it was stuck !!
loosen the two 8mms on the rear quarter, tapped the studs and out she came.... what an idiot
Think someone has been here before though... black overspray?
There...much better.... and yes the same on the nearside as well
Last edited:
Hi Matt,,
You may get the filler bottle on the side of the rad off in the car, but it a pig to get the unit back in even when you take the rad out.
When I did it , I couldn't get it to seal and ended up getting a new rad.( I think the plastic has distorted over time. )
But have a go …….and just in case of problems …….I do have a spare rad that came off my donor car.
You may get the filler bottle on the side of the rad off in the car, but it a pig to get the unit back in even when you take the rad out.
When I did it , I couldn't get it to seal and ended up getting a new rad.( I think the plastic has distorted over time. )
But have a go …….and just in case of problems …….I do have a spare rad that came off my donor car.
- Joined
- Jul 18, 2020
- Points
- 134
- Location
- Portchester, Fareham
- Model of Z
- 1998 BMW Z3 Individual 1.9 M44 B19
Thanks Malc.... I've seen videos before of someone trying to replace the bottle and had the same problem. I'll jack it up to check if it is the O ring of the bottle is split..... cheers as always mate....Hi Matt,,
You may get the filler bottle on the side of the rad off in the car, but it a pig to get the unit back in even when you take the rad out.
When I did it , I couldn't get it to seal and ended up getting a new rad.( I think the plastic has distorted over time. )
But have a go …….and just in case of problems …….I do have a spare rad that came off my donor car.
- Joined
- Jul 18, 2020
- Points
- 134
- Location
- Portchester, Fareham
- Model of Z
- 1998 BMW Z3 Individual 1.9 M44 B19
I used to check brake lights were working by putting a toolbox on the brake pedal, and checking the rear...... so much easier just filming it and pumping the pedal !.... crocs are essential for this !!

as for the radiator water bottle... found the YouTube video from momentofZed... where he tried to replace the bottle...with difficulty ...and with the radiator out of the car !
View: https://www.youtube.com/watch?v=4Fb1GrLZn0E
He ended up using silicon grease liberally ... and using long G clamps to pull it into place..... seems an almighty faff ..

as for the radiator water bottle... found the YouTube video from momentofZed... where he tried to replace the bottle...with difficulty ...and with the radiator out of the car !
He ended up using silicon grease liberally ... and using long G clamps to pull it into place..... seems an almighty faff ..