Rebody Mittaws 250 SWB Coupe Build

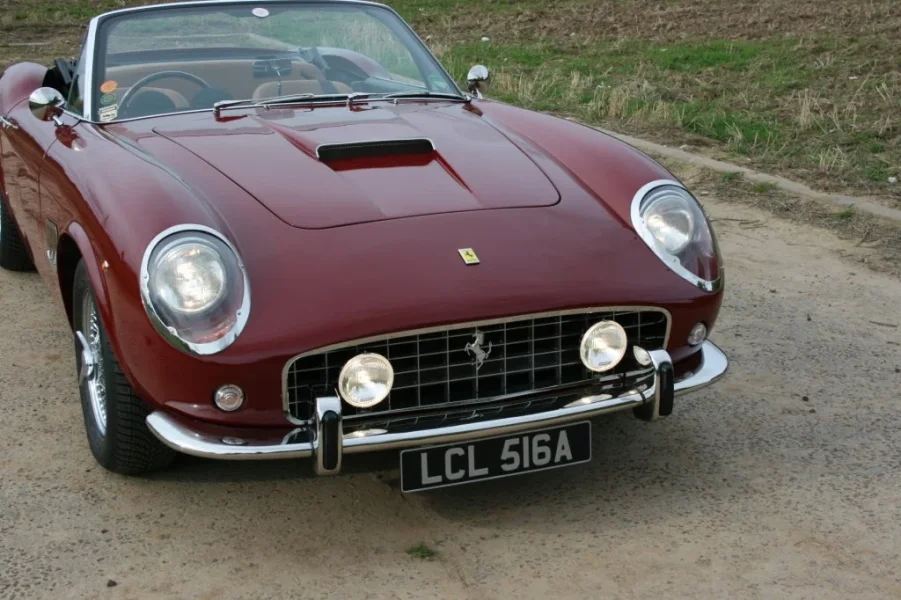
I think your fog lights are a little small. I had difficulty finding some for mine. Ended up importing some from The Netherlands as CBS ones were smaller.
I bought 5" Wipac stainless originally. They were too small. So I returned them and bought 5 3/4" Wipac (not stainless unfortunately). The extra 3/4" makes all the difference (so the wife tells me). I then bought some metallic 'Carello' stickers and put them on!

I looked for specific fog lights everywhere, but when I bought my latest ones (which were sold as fogs) they are identical lenses to driving lights. So driving lights (which are more common) are worth looking for aswell IMO.


IMG_9379.JPG

5"

20240830_180813.jpg

5 3/4"

IMG_0018.webp
 
Last edited:
I bought 5" Wipac stainless originally. They were too small. So I returned them and bought 5 3/4" Wipac (not stainless unfortunately). The extra 3/4" makes all the difference (so the wife tells me). I then bought some metallic 'Carello' stickers and put them on!

I looked for specific fog lights everywhere, but when I bought my latest ones (which were sold as fogs) they are identical lenses to driving lights. So driving lights (which are more common) are worth looking for aswell IMO.


View attachment 362981

5"

View attachment 362983

5 3/4"

View attachment 362989
Thanks. Yes they look perfect. I'm going to do some research.
 
Thanks. Yes they look perfect. I'm going to do some research.

Made it home ok. A few noises that I need to look into but nothing serious. Now to enjoy running it in for a while. Paint needs a lot of correction and detailing but I don't mind doing that as I'm out driving it and having some fun in the sun. Who cares if it needs a bit of work, I love kg and its attracting a lot of attention as it is. Lovely to chat to people about it.

20260523_132051.jpg
 
Last edited:
and its attracting a lot of attention as it is. Lovely to chat to people about it.
Get used to it. I can't stop anywhere without someone coming over. I didn't like it at first, but am getting used to the attention (not me the car).
 
- Hi, I hope you don't mind me asking, but what is it?
- It's a kit car.
- Oh

That always seems to be it for me, although the first drive out was interesting, as there was a Belgium-plated car that had a kid hanging out of his window photographing it. It's only happened once.

I do get people trying to out-gun me, until they find they brought a knife to a gunfight =)) .
 
- Hi, I hope you don't mind me asking, but what is it?
- It's a kit car.
- Oh
I don't get that at all. I mainly just get "that's gorgeous" and "wow" a lot. I always tell people it's not real after a few minutes. Most don't care TBH, they just like it cos it's purdy and shiny. The 1960s look DEFINITELY helps and seems to make people happy.

People seem to be drawn to old cars these days.

I do find it funny that people who want to take pictures ALWAYS ask first. Politeness in the UK is alive and kicking.
 
Some of you may know but disaster struck a couple of weeks back and the car was in a garage fire. The fire crew got the car out just in time but it suffered quite a lot of paint and body damage.

20260726_125941.webp


20260726_070525.webp

20260726_070411.webp

20260726_070503.webp

20260726_094906.webp
20260726_094858.webp


After a couple of weeks of hard graft and buying every tin of brasso i could find ibe managed to get 95% of the melted tar, plastic and crap off it.

20260731_180612.webp


20260731_180617.webp

20260731_180621.webp


I was most worried about the rear screen but all the damage has been to fibreglass panels which I can fix. The rear screen and window glass is pretty much recovered. Just need a good clean.

Top tip is brasso. My old man used to paint cars and we used brasso to flat down some of the areas after painting so I used that all over and it was brilliant. It kills the shine but on solid gloss buffs back up great.

Ive got a lot of work to do repairing the roof, bonnet and door panels where falling debris has marked the car but im so glad I painted it myself and can fix it.

Ive decided to take it back into the unit now and do all the upholstery work for a change. Ive got the new replica dashboard, centre console and some rover 75 seats to get into it.

Ive Just got an industrial sewing machine and a box of leather offcuts to learn upholstery now before venturing into a new skill.

Ive had a bit of fun this summer which has been cut short but it's an incentive to now get the project fully finished for 2027 inside and out. I may leave painting until next springtime and focus on inside for a bit

 

Attachments

  • 20260731_160603.webp
    20260731_160603.webp
    103.2 KB · Views: 36
  • 20260731_144203.webp
    20260731_144203.webp
    128.6 KB · Views: 45
Some of you may know but disaster struck a couple of weeks back and the car was in a garage fire. The fire crew got the car out just in time but it suffered quite a lot of paint and body damage.

View attachment 368486

View attachment 368485
View attachment 368483
View attachment 368484
View attachment 368487View attachment 368488

After a couple of weeks of hard graft and buying every tin of brasso i could find ibe managed to get 95% of the melted tar, plastic and crap off it.

View attachment 368489

View attachment 368490
View attachment 368491

I was most worried about the rear screen but all the damage has been to fibreglass panels which I can fix. The rear screen and window glass is pretty much recovered. Just need a good clean.

Top tip is brasso. My old man used to paint cars and we used brasso to flat down some of the areas after painting so I used that all over and it was brilliant. It kills the shine but on solid gloss buffs back up great.

Ive got a lot of work to do repairing the roof, bonnet and door panels where falling debris has marked the car but im so glad I painted it myself and can fix it.

Ive decided to take it back into the unit now and do all the upholstery work for a change. Ive got the new replica dashboard, centre console and some rover 75 seats to get into it.

Ive Just got an industrial sewing machine and a box of leather offcuts to learn upholstery now before venturing into a new skill.

Ive had a bit of fun this summer which has been cut short but it's an incentive to now get the project fully finished for 2027 inside and out. I may leave painting until next springtime and focus on inside for a bit
I saw your pictures on FB. Left me speechless.

Amazing recovery there. Well done :scorecard:
 
I didn't know until now. Wow that's a s*** show.
I hope you get it back to it's best without too much pain or work.
 
Well I've just gone for it....plan of attack is to do all thr interior and exterior over the next 6 or so months, and then respray in the spring when I've got the weather and long evenings again. Plus I really can't face more rubbing and sanding at the moment.

Dash is out. Im now designing up the one i want to replace it based upon the 250 style. Im thinking of traditional but with a modern twist as I love the resto mod fusion idea.

20260819_180705.webp
 
. . . .Dash is out. Im now designing up the one i want to replace it based upon the 250 style. Im thinking of traditional but with a modern twist as I love the resto mod fusion idea.

Ooh!. Good plan. Edge of my seat here. Keep us posted. :thumbsup:
 
Well I've just gone for it....plan of attack is to do all thr interior and exterior over the next 6 or so months, and then respray in the spring when I've got the weather and long evenings again. Plus I really can't face more rubbing and sanding at the moment.

Dash is out. Im now designing up the one i want to replace it based upon the 250 style. Im thinking of traditional but with a modern twist as I love the resto mod fusion idea.

View attachment 368822
That picture brings back memories. Not many good ones, either! Good luck with it all and if you need any help don't ask me. Only joking.

If you are planning on making the new dash yourself the only thing I would say is to pay attention to the sides where the A pillars are. If there are inconsistent gaps it will show. I'm sure you know what you are doing so good luck.
 
That picture brings back memories. Not many good ones, either! Good luck with it all and if you need any help don't ask me. Only joking.

If you are planning on making the new dash yourself the only thing I would say is to pay attention to the sides where the A pillars are. If there are inconsistent gaps it will show. I'm sure you know what you are doing so good luck.
Thanks. I think Sunday will be a big and long day. Thanks for offer of help
 
Thanks. I think Sunday will be a big and long day. Thanks for offer of help
Are you going to change the seats? If so, have you decided which ones?
 
You obviously have a strong constitution……. seeing your car after the fire must have been a real kick in the gut: but well done for stoically soldiering on.
Taking out the dash was not too bad in my project (retrofitting Aircon) but re-fitting with just standard components was more challenging- so good luck with hand crafted one-off - you obviously don’t mind a bit of hard work.
(Now’s the time to fit Aircon if you don’t have it already !!! - ignore Pond telling you it is not necessary 😂)
 
(Now’s the time to fit Aircon if you don’t have it already !!! - ignore Pond telling you it is not necessary 😂)
Ah but I went the opposite route. Mine has a/c fitted (and it worked. It still has pressure as I have fridge gauges and have checked) but I took the switch out. Not in keeping with my 'authentic as possible' goal.
 
You obviously have a strong constitution……. seeing your car after the fire must have been a real kick in the gut: but well done for stoically soldiering on.
Taking out the dash was not too bad in my project (retrofitting Aircon) but re-fitting with just standard components was more challenging- so good luck with hand crafted one-off - you obviously don’t mind a bit of hard work.
(Now’s the time to fit Aircon if you don’t have it already !!! - ignore Pond telling you it is not necessary 😂)
Thanks. Yes it's certainly turning into a longer project than expected. I'd be interested in your retrospect fitting of air con as mine doesn't have it as standard and was wondering if it it possible.

Any help or tips on that process would be great while I have the dash out
 
Internal sections starting to go in ok. Centre console located well. Lots of work to do on the dashboard with new vents to and a few other modifications for fun.

It's taking way longer than expected but there's no rush.

20260822_143852.webp
20260822_143843.webp
20260823_183130.webp
 
Internal sections starting to go in ok. Centre console located well. Lots of work to do on the dashboard with new vents to and a few other modifications for fun.

It's taking way longer than expected but there's no rush.

View attachment 369566View attachment 369567View attachment 369568
OK so you may thank me later (or may not) but I have to say that the piece where the gear lever is needs to sit over the piece covering where the heater controls were. You will never 'fill' the gap, otherwise, IMO.
Also....make sure the 'handbrake' piece and the 'gear lever' piece are exactly lined up, or it will look terrible. There will always be a 'join' so it needs to look square. I used uneven, glued, packers underneath to make them sit level. I can't attach pictures anymore (for whatever reason) to show.
 
Back
Top