Artic Silver 2.8 - OEM+ long term project

Well laid out and thought out! It's amazing what a bit of paint and time does to the look of your brakes, well done! As for welding aluminium wheels it's done over here with no problems, in most cases the weld is stronger than the wheel without it. JIM
 
Never heard of alloy wheels being widened.
Steel wheels yes, aluminium wheels yes but alloy never

Would be interested to see the process
 
@Sharpy i am sooooo impressed by how amazing your seats look that is very impressive :p
Good job well done :happy::thumbsup:
 
Kit was about £40

Only took a few coats to really hide the scuffs.

5 coats in and there is no visible damage.

They do it in every colour imaginable too

Just Google scuff master / liquid leather
 
Got bored the other night after work and decided to bin off some dead weight from the car.

This might not be to everyone's taste but i personally would rather pay for and be recovered by the AA than drive on the crusted, decreped, awkward skinny piece of junk that is hidden under our cars.

so i removed (permanantly) the spare wheel and carrier.


the old top up valve was welded onto the wheel with rust so even if i was at the side of the road it would have never been able to be fitted.

i then went to remove the carrier, it would come off as the bolts were rusted to oblivion

so i hacksawed it off, cut the grommets off and stuck them back on


My green flag break down policy stipulates that if the car came with a space saver spare and it's not present in the event of a puncture I will be charged for the recovery despite being 'covered'
 
My green flag break down policy stipulates that if the car came with a space saver spare and it's not present in the event of a puncture I will be charged for the recovery despite being 'covered'

My car doesn't even have the carrier now so I'll blag it worst case scenario
 
So I've been experimenting with led bulbs with this car as it's something I'm interested in and I wanted to remove all traces of orange from the car.

It would have been very simple to use the chrome coated bulbs but they still reflect orange when you look closely.

Standard cheap led replacements are fine on the rear and the side but due to the design of the reflectors and diffuser in the headlights they don't provide enough light and are not safely visible.

Here is a comparison of a standard halogen bulb (left) and a cheap led unit (right)

DSC_2667.webp


As you can see, the halogen is much brighter. In direct sunlight you can barely see the led.

I then swapped in some super 40w led bulbs. They are pricey but I think they look amazing.

Top = new led
Middle = halogen
Bottom = cheap led

DSC_2670.webp


And the result. Much deeper and brighter than the halogen. Less heat, less energy needed and they don't reflect any orange at all

DSC_2671.webp


DSC_2668.webp
 
They look very nice Tim, I used the single SMD chip CREE style with resistors. The light output is much nicer than the normal bulb. You can't see any colour from yours, very nice clear lens.:thumbsup:

Tony.
 
Another small job last night

my third brake light was really shoddy, a bit dull and past its best.


I saw Chip Foose on overhaulin once sand a rear light down to clean off the part numbers and smooth it off.

So I set about removing the rear light which is dead easy.

the lens then seperates and i started sanding it.

staring with 400 grit then

600
800
1200 (wet and dry)
1500 (wet and dry)


after sanding i hit it with some course poorboys polish on my polisher


Busy weekend as the wife was away on a hen do.

Friday night:

Decided to wrap my centre console in 6D carbon


took about two hours and need a fair bit of patience and a very sharp craft knife. im not 100% happy with it but im not sure if its the wrap im not happy with or whether ive spent too long looking at it. might skin it in proper carbon in the summer.

Saturday

removed the centre console in the car to upgrade it to a new facelift version.


spaghetti!

was absoltuely filthy so i hoovered up the years of biscuit crumbs!


fitted everything back in
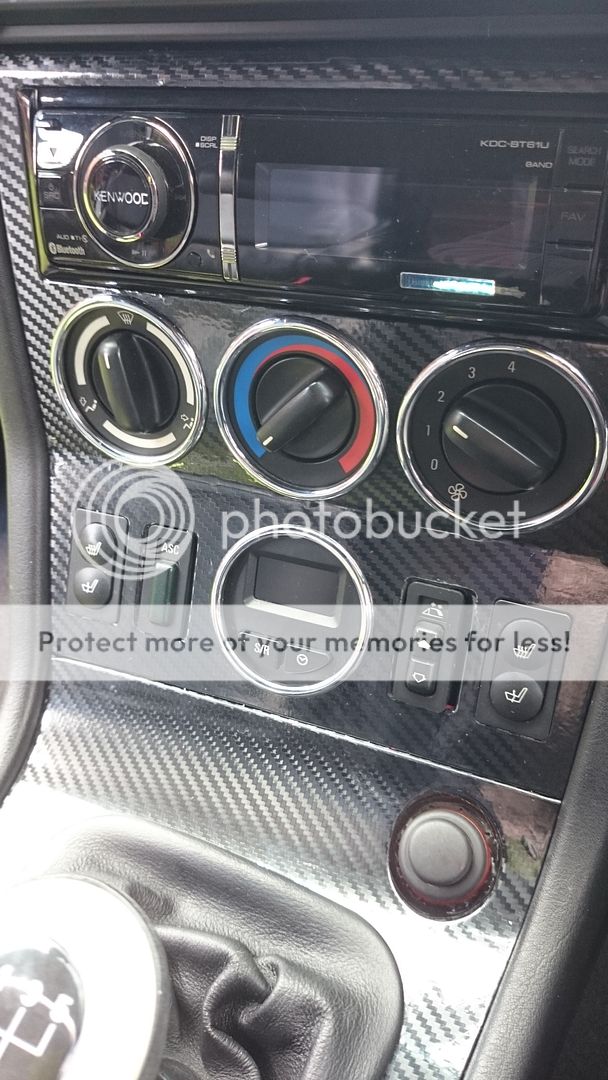


notes from doing this.

All the wiring is a straight swap (even the OBC) apart from the ASC / DSC
prefacelift switches dont fit in facelift spaces and vice versa
all the wiring for illuminated gearknobs etc are there next to the airbag module.

the wiring for the DSC button was easily overcome as all the connectors are AMP Tyco connectors so the piuns are all the same. Take the pins out of the early connector and pop them into the facelift connector, et voila!


i then fitted a e36 dimming rear view mirror as i hate manual ones and these are dead easy to wire in.

they fit on the sam windscreen mount as the Z3 and just need power and ground to work, i took a permanent live from the dome light and an earth from the same place. you can also wire them into the rear lights so that it resets when reversing but i couldnt be bothered with that.


Sunday morning:

Few little jobs

painted the headlight bolts as they were rusted


replaced the oil cap seal as mine was crumbling


then went for a drive to Southampton to see the mighty saints destroy man city.


car goes into the paint shop tomorrow to have the bonnet painted :D
 
That's some very handy info there. Did you use a heat gun to apply the wrap ?
 
Back
Top
