Z3 Battery Cable Route

t-tony

Zorg Expert (II)
Supporter
British Zeds
#ZedShed
Joined
Dec 31, 2013
Points
226
Location
Torksey Lock,Lincoln, England
Model of Z
E89 Z4 23i Auto
Have a look in the 6 “slots” around the centre (like between the M and the W in the picture) perhaps you could put a hook behind one of the lugs maybe?

Tony.
 

colb

Zorg Guru (V)
British Zeds
Joined
Nov 25, 2012
Points
178
Location
Newport, South Wales,UK
Model of Z
Z3 M43 1.8 (1999) and Z4 E85 2.5 (2003)
This may be of help with your electrical problem, found it on the link another member posted about today. It is for the Z4 E85 but battery cable routing will be much the same.
 

Attachments

Last edited:

IanA

Zorg Legend
British Zeds
Joined
Oct 4, 2014
Points
74
Location
Oxon
Could be useful- many thanks.
 

IanA

Zorg Legend
British Zeds
Joined
Oct 4, 2014
Points
74
Location
Oxon
All useful stuff- thanks. I'll be interested to see where the red fuse box feed lead crosses the car from the battery side (RH rear) to the fuse box side (LH front).
 

Andyboy

Zorg Guru (II)
Joined
Jun 2, 2019
Points
119
Location
SHEFFIELD
The battery cable runs through the rear bulkhead, down behind the drivers side plastic bulkhead trim, under the drivers side carpet, up the front bulkhead near the throttle pedal and through the bulkhead under the brake master cylinder where it connects to the cable connector for the engine looms etc. Check for power there. You'll need to remove the drivers seat and some plastics but really, I can't see it taking much more than a couple of hours to replace. I have a good used one here if you need one.
 

IanA

Zorg Legend
British Zeds
Joined
Oct 4, 2014
Points
74
Location
Oxon
Thanks Andy- that sounds like the main lead to the jump point and starter. It's OK on mine.
It's the lighter 40mm2 cable to the fuse box that's lost the volts.
 

IanA

Zorg Legend
British Zeds
Joined
Oct 4, 2014
Points
74
Location
Oxon
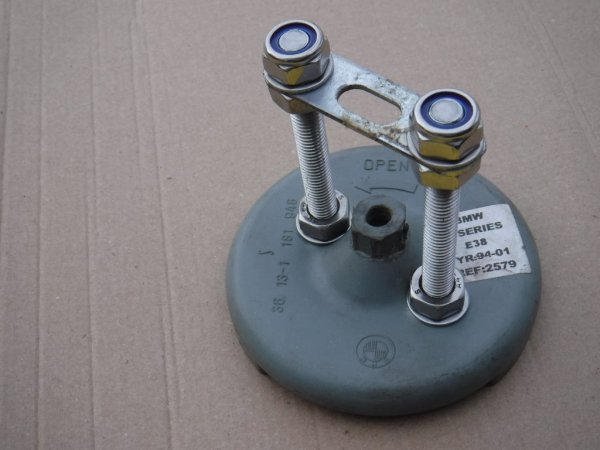
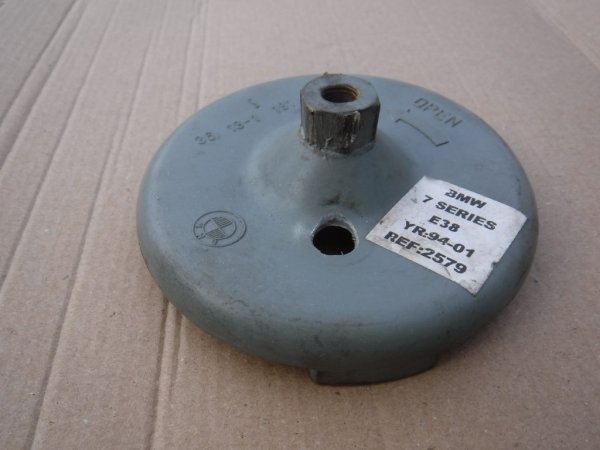
I've found out what the hub cap removal tool looks like:

https://www.ebay.co.uk/itm/E39-E38-740i-750iL-BMW-Wheel-Center-Cap-Tool-E39-E38-Wheel-Style-4-5-6-15-bmw/264760161524?_trkparms=aid=1110006&algo=HOMESPLICE.SIM&ao=1&asc=20200520130048&meid=de837144bc3046dd8b95bdd7f2cf1beb&pid=100005&rk=1&rkt=12&mehot=pf&sd=293124883368&itm=264760161524&pmt=1&noa=0&pg=2047675&algv=SimplAMLv5PairwiseWebWithDarwoV3BBEV2b&brand=BMW&_trksid=p2047675.c100005.m1851

Just need to see if there's one lurking in the boot... If not, the Part No is 36 13 1 181 948.

Bought one on eBay. How it was delivered (without the hole):

DSCF1273.JPG

and how I had to modify it in order to deploy it:

DSCF1274.JPG
 
Last edited:

t-tony

Zorg Expert (II)
Supporter
British Zeds
#ZedShed
Joined
Dec 31, 2013
Points
226
Location
Torksey Lock,Lincoln, England
Model of Z
E89 Z4 23i Auto
That’s good, hence the 3 lugs in the centre. I did wonder if they needed turning but couldn’t figure out how you could. Hope you have one!

Tony.
 

IanA

Zorg Legend
British Zeds
Joined
Oct 4, 2014
Points
74
Location
Oxon
Result !!!
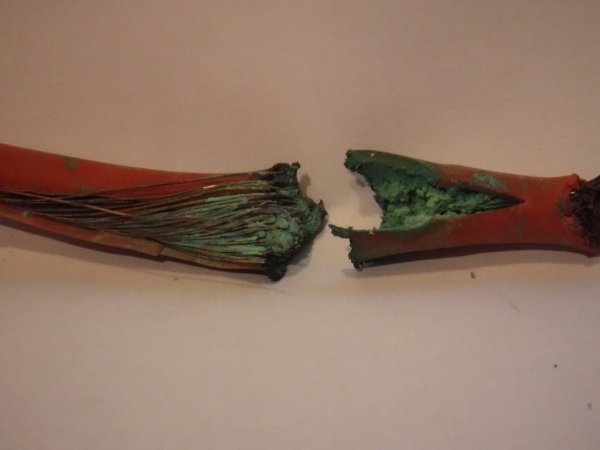
Having removed the driver's seat and peeled back the (sopping wet) carpet, the problem revealed itself. No obvious cause, just a lot of corrosion. I don't think it would be a good idea to crimp in a repair section in an area so prone to dampness so I've ordered a length of 40mm2 cable to replace the complete run. For now there is a fan heater and a dehumidifier running inside the car.

Added- Without getting too forensic about it, the bit of green nasty to the left of the cable fell out when touched. The insulation on the nearer end looks as if it's been cut whereas the farther end shows signs of melting. Damaged upon installation? I might chop a few inches off of either end to have a closer look.

Upside- I found £2.05 under the seat. I won't be offering that to the previous owner.
DSCF1224.JPG
DSCF1225a.jpg
 
Last edited:

t-tony

Zorg Expert (II)
Supporter
British Zeds
#ZedShed
Joined
Dec 31, 2013
Points
226
Location
Torksey Lock,Lincoln, England
Model of Z
E89 Z4 23i Auto
Congrats on tracking it down Ian. That’s a new one on me.

Tony.
 

colb

Zorg Guru (V)
British Zeds
Joined
Nov 25, 2012
Points
178
Location
Newport, South Wales,UK
Model of Z
Z3 M43 1.8 (1999) and Z4 E85 2.5 (2003)
Well found, like I thought it was on my earlier post, must have been damage to the insulation at that point to allow the copper to fester away like that over a long time, the dampness was obviously a contributor to the festering. You are doing the correct thing replacing the entire length bearing in mind the power it carries for starting, any further joints added by grafting a replacement length just increases the risk of future troubles. Seen just as bad on boot looms and it travels back from each side of the breaks so quite a lot of stripping those back to find clean copper to solder.
 

IanA

Zorg Legend
British Zeds
Joined
Oct 4, 2014
Points
74
Location
Oxon
The heavier starter cable looks OK. This one is the feed to the busbar under the fuse box. The cable is rated at 300A and fused at 200A by the battery terminal. I think that soldering such a heavy cable might de-temper the copper and crimping would definitely let moisture in even under heat shrink. I'll be sleeving the new cable in flexy conduit as well.
 

IanA

Zorg Legend
British Zeds
Joined
Oct 4, 2014
Points
74
Location
Oxon
So- having run the replacement cable (a more flexible 40mm2 with thicker butyl insulation) and tested all OK, I've cut some of the old cable out to see what the problem was. The loom around the failed area looks as if it has received some attention in the past as the woven sleeving has been replaced by black plastic tape. I think that the insulation on the battery cable was nicked when removing that sleeving. This has allowed moisture ingress to the copper which has led to corrosion and eventual failure. The fan heater and dehumidifier are still running. The flexy conduit is expected soon so I'll be able to complete the repair.
DSCF1226.JPG
 

IanA

Zorg Legend
British Zeds
Joined
Oct 4, 2014
Points
74
Location
Oxon
Finale:
Dried out carpets and floor with fan heater and dehumidifier.
Laid in new 40mm2 cable with properly crimped terminals and sleeved in flexy conduit
Attacked rust spots with Kurust (similar action to Bilthamber). Waxoyled whole floor
Tested electrics. Engine started and ran.
Replaced carpet, trim and driver's seat
Reset airbag light using C110 scanner with "pacman" adaptor.
Replaced glovebox with new fasteners (16mm x 4.2mm black passivated flanged pozi screws)

Many thanks to everyone who responded with suggestions, links, pics, etc.
 

t-tony

Zorg Expert (II)
Supporter
British Zeds
#ZedShed
Joined
Dec 31, 2013
Points
226
Location
Torksey Lock,Lincoln, England
Model of Z
E89 Z4 23i Auto
Good news Ian and thanks to you we’ve al learned something new.:thumbsup:

Tony.
 
Top