Little MAU

Clockwatcher

Zorg Legend
Supporter
British Zeds
Joined
Jun 30, 2018
Points
71
Location
Lincoln
Model of Z
Z3 2.8 Roadster
Introducing Little Mau

Little Mau.jpg
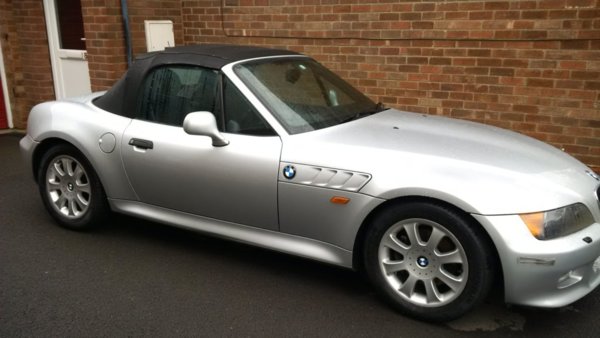
After many years of my good lady asking for a convertible and looking at various options from different manufacturers, we bought a Z3. Although she initially wanted a TT or MX5, the minute she finished test driving MAU her first words to the dealer was "So, lets talk money!". Being a long time BMW owner, this was music to my ears.

After a week of enjoying her it was time to ensure she was protected for the many years we intend to keep her. The content on ZRoadster has proved valuable in the progress we have made to date.

So, first job first, how rusty was she......

Removing sills: https://zroadster.org/articles/bmw-z3-sill-removal-and-protection.67/ (thanks Gaz)
IMG_20180721_140928.jpg
IMG_20180715_152100.jpg
IMG_20180715_153050.jpg
IMG_20180715_151852.jpg
IMG_20180721_121726.jpg
IMG_20180721_121736.jpg
 
Last edited:

Jack Ratt

Zorg Expert (I)
Supporter
British Zeds
The West Country
Joined
Dec 3, 2013
Points
200
Location
TRURO, CORNWALL
Model of Z
2.8i AUTO and 2.8i MANUAL
Looks like she just rolled off the production line. I assume she's a Japanese import? They don't put salt on their roads so cars come here looking like new underneath
 

roadvoyager1

Zorg Guru (III)
British Zeds
Joined
Dec 1, 2013
Points
128
Location
Shotley Bridge
Model of Z
2.8ltr
Looks in great condition. Get it put back together and drive it!!
Apply rust protection to the sill and wings before the winter and the car will be good for many years.
 

Clockwatcher

Zorg Legend
Supporter
British Zeds
Joined
Jun 30, 2018
Points
71
Location
Lincoln
Model of Z
Z3 2.8 Roadster
A Wee Bit of Rust Proofing

Thanks for the kind comments. She is Japanese, late 1999 with 48500 miles on the clock when we picked her up. Although there are a few stone chips and minor scratches, she looks like she was well cared for.

Carried out rust proofing using Bilt Hamber products. This included the inside of the outer sills, front and rear quarter panels and box sections.

https://www.bilthamber.com/corrosion-protection-and-rust-treatments/
IMG_20180725_200247.jpg
IMG_20180725_200234.jpg
IMG_20180725_200319.jpg
IMG_20180725_200306.jpg
 
Last edited:

Clockwatcher

Zorg Legend
Supporter
British Zeds
Joined
Jun 30, 2018
Points
71
Location
Lincoln
Model of Z
Z3 2.8 Roadster
Rust Removal for the Spare Wheel

As for the spare wheel, it still had the original tyre from the factory! Although it showed the only slightest hint of crazing in the rubber, it was definitely past its sell by date and needed replaced. The wheel itself was in reasonable condition.
IMG_20180715_145303.jpg
IMG_20180715_145318.jpg
IMG_20180715_150602.jpg
 
Last edited:

t-tony

Zorg Expert (II)
Supporter
British Zeds
#ZedShed
Joined
Dec 31, 2013
Points
226
Location
Torksey Lock,Lincoln, England
Model of Z
E89 Z4 23i Auto
Hi @Clockwatcher welcome from near Lincoln. Many people ditch the spare wheel on a Z3 and prefer to carry an aerosol of tyre sealant and a 12v compressor (the only option with a Z4). The car looks in very good condition corrosion wise. Where are you located?

Tony.
 

t-tony

Zorg Expert (II)
Supporter
British Zeds
#ZedShed
Joined
Dec 31, 2013
Points
226
Location
Torksey Lock,Lincoln, England
Model of Z
E89 Z4 23i Auto

t-tony

Zorg Expert (II)
Supporter
British Zeds
#ZedShed
Joined
Dec 31, 2013
Points
226
Location
Torksey Lock,Lincoln, England
Model of Z
E89 Z4 23i Auto
No not really as an odd meal won't be an issue at the White Swan.

Tony.
 

Clockwatcher

Zorg Legend
Supporter
British Zeds
Joined
Jun 30, 2018
Points
71
Location
Lincoln
Model of Z
Z3 2.8 Roadster
Fitting a Hard Top Demister Switch and Tidying the Wiring

However, in a bid to put the hard top demister switch in the rear of the center console, I got carried away.... I blame another user on the forums for putting their OCD cable husbandry idea in my head.... I wonder who it was? ;)

I have deliberately not tightened down the top wood panel which has left a temporary gap. It has a slight warp I need to sort out first.

Removing the center console: https://www.pelicanparts.com/BMW/te...cement/97-BODY-Center_Console_Replacement.htm

NOTE: There are a few differences on my car (Facelift, late 1999)

1. Removing the HVAC is a different process, Pelican Parts figures 18 and 19, which I will document elsewhere and place a link in here.
2. I did not have the driver knee support, figures 3, 4 and 5.
3. My OBD plug is under the driver's knee trim panel, this will need to be removed.
4. I had a large green gong (BMW speak for warning sounder/speaker) in the same place as the OBD socket in the Pelican Part's figure 22, you will need to unplug this

IMG_20180723_204812.jpg
IMG_20180727_141740.jpg
IMG_20180728_132618.jpg
IMG_20180728_132633.jpg
IMG_20180728_192659.jpg
IMG_20180730_072030.jpg
 
Last edited:

Clockwatcher

Zorg Legend
Supporter
British Zeds
Joined
Jun 30, 2018
Points
71
Location
Lincoln
Model of Z
Z3 2.8 Roadster
Fitting a New Radio and Modifying the Locating Pin

The radio was a BMW C33, cassette player. Unfortunately the stereo was made for the Japanese market so the FM range only went up to 90 MHz rather than 108 MHz we use in the UK.

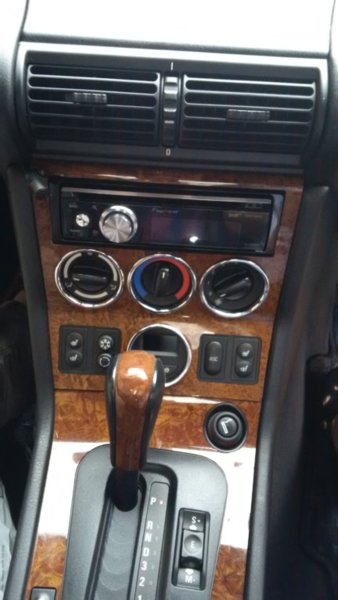
We decided to change the radio rather than fit a bluetooth/DAB adapter, choosing a Pioneer DEH X8700DAB. Normally £200, but for some reason you can get it from Half*rds for £120!! All you need is a harness adapter, DAB antenna and an aerial adapter. It will runs DAB, FM, CD, Bluetooth (phone and music) USB (music) and Aux. And for audiophiles, it will play Flac files too. Synched to our phones simply and easily, and they are not iPhones or Androids! It will auto dim when put the lights on and it does not look to flashy. The chrome volume/control matches the chrome rings on the HVAC and computer.

Most importantly, all the display colours can be adapted to match BMW orange perfectly! Unfortunately the night shot is not good. Plus I need to replace the HVAC bulbs. I plan on doing a DIY LED retrofit for these by making new ones using the old bulb holders.

The one modification made was to take the rear locating pin out of the old radio and transfer it. Luckily the heatsink unbolts from the Pioneer allowing me to safely drill and tap a screw hole for the locating bolt. If you do this, be careful you do not damage anything on your radio! The new radio fits perfectly and securely at the front and rear. (The first picture is borrowed from the Internet, I forgot to take a pic of the old radio).
download.jpg
IMG_20180722_142609.jpg
IMG_20180722_142656.jpg
IMG_20180722_142840.jpg
IMG_20180730_072059.jpg
IMG_20180730_220313.jpg

CW
 
Last edited:

Clockwatcher

Zorg Legend
Supporter
British Zeds
Joined
Jun 30, 2018
Points
71
Location
Lincoln
Model of Z
Z3 2.8 Roadster
Replacing Door Handle Gaskets

Replaced the door handle gaskets seals. The old one literally fell apart as I removed them. I obtained the handle seals from Ebay rather than pay BMW for a new handle surround plus the gasket. Before putting the new rubber gasket in place I made sure to pre soak in Nextzett Gummi Pfledge.

Handle gaskets: https://www.ebay.co.uk/itm/UK-STOCK-X2-Door-Handle-Gasket-Rubber-Seals-for-BMW-E36-E34-E32-Z3-3-5-7-Series/401362983748?ssPageName=STRK:MEBIDX:IT&_trksid=p2057872.m2749.l2649
Nextzett Gummi Pfledge: https://www.amazon.co.uk/Gummi-Pfle...020517&sr=8-2&keywords=Nextzett+Gummi+Pfledge
How to get the door handle surround off (and on): http://www.eatsleeptinker.com/2015/01/14/e36-door-handle-trim-replacement/ (thanks Chad)

IMG_20180721_090917.jpg
IMG_20180721_152630_hdr.jpg
IMG_20180730_191916.jpg
 
Last edited:

Clockwatcher

Zorg Legend
Supporter
British Zeds
Joined
Jun 30, 2018
Points
71
Location
Lincoln
Model of Z
Z3 2.8 Roadster
New Foils Sir?

The foils for protecting the body when you close the bonnet were becoming worn. I ordered new ones from BMW Sopers for around £5 (and a billy bonus, you get 2 left and 2 right in the pack!)

51148410661 - LEFT PROTECTION FOIL
51148410662 - RIGHT PROTECTION FOIL
https://www.realoem.com/bmw/enUS/sh...-1999-Z3-BMW-Z3_28&diagId=41_0036#51148410661

It was a pain removing them. I used label remover and a plastic trim removal tool. Instead of repainting the worn area I used Bilt Hamber HYDRATE 80 to form a protective barrier.

IMG_20180721_091122_hdr.jpg
IMG_20180721_091021.jpg
IMG_20180727_181705_hdr.jpg
 
Last edited:

Clockwatcher

Zorg Legend
Supporter
British Zeds
Joined
Jun 30, 2018
Points
71
Location
Lincoln
Model of Z
Z3 2.8 Roadster
HVAC Bulb Replacement: But With LEDs!

It was time to replace the pesky lamps in the HVAC, but I was not prepared to pay silly prices for a plug with a soldered in bulb.

Snap_001.jpg


Plus, maybe LEDs are the way forward. So, I sourced white 12V LEDs, the resistors are built in, identified which was the ground wire on the car sockets, its brown and white;), and went to work.

The pictures below are the 3 versions of mod, first version was cutting away to reveal the soldered connection to finally deciding that you can pull the pins out one side, then remove the bulb from the other. The bulb plug on the left shows the final version. I have also shown the one bulb I manged to remove complete with soldered pins. I can only assume BMW did this to stop bulbs falling inside the HVAC control unit!

Snap_035.jpg


The LED legs were tinned to add a bit of bulk so they made a good connection with the car's plugs, then trimmed the legs to length. One leg is penned in black. This is because new LEDS have the +ve identified by a longer leg. When I trimmed them to length, you lose this identifier! There is another way of identifying it though, the -ve normally links to the largest metaled area inside the LED.

After triple checking the LED cathode and anode (-ve and +ve) were correctly orientated, glued the LED in place with hot glue, using the LED's legs to replace the soldered pins shown on the right. The sharp eyed amongst you will spot that the middle plug (where the plug was cut shorter than the later versions) has the LED inserted the opposite way to the other 2. This is because the ashtray plug was wired incorrectly at the factory.

Snap_031.jpg


I attempted to ensure the element of the LED that generates the light was roughly in the same place as the bulb filament. These pictures shows the LEDs fitted and working. The only limitation is that the LEDs used have a narrow viewing angle with leaves parts of the HVAC with poorer light coverage. This will be remedied when I source a 12v LED with a wider viewing angle. (Or use lower voltage LED with a wider viewing angle and an external current limiting resistor)

IMG_20180812_120126.jpg
IMG_20180812_120423.jpg


Cost? circa £18 for 30 LEDs which included postage and packaging which works out at roughly 60p each!

LEDs: https://www.rapidonline.com/4-8mm-low-profile?Attributes={"Forward Voltage Typical":["12V"]}
 
Last edited:

Sean d

Zorg Expert (I)
Supporter
British Zeds
Joined
Sep 29, 2015
Points
201
Location
Lincolnshire
Model of Z
Z3 2.8
It was time to replace the pesky lamps in the HVAC, but I was not prepared to pay silly prices for a plug with a soldered in bulb.

View attachment 85857

Plus, maybe LEDs are the way forward. So, I sourced white 12V LEDs, the resistors are built in, identified which was the ground wire on the car sockets, its brown and white;), and went to work.

The pictures below are the 3 versions of mod, first version was cutting away to reveal the soldered connection to finally deciding that you can pull the pins out one side, then remove the bulb from the other. The bulb plug on the left shows the final version. I have also shown the one bulb I manged to remove complete with soldered pins. I can only assume BMW did this to stop bulbs falling inside the HVAC control unit!

View attachment 85856

The LED legs were tinned to add a bit of bulk so they made a good connection with the car's plugs, then trimmed the legs to length. One leg is penned in black. This is because new LEDS have the +ve identified by a longer leg. When I trimmed them to length, you lose this identifier! There is another way of identifying it though, the -ve normally links to the largest metaled area inside the LED.

After triple checking the LED cathode and anode (-ve and +ve) were correctly orientated, glued the LED in place with hot glue, using the LED's legs to replace the soldered pins shown on the right. The sharp eyed amongst you will spot that the middle plug (where the plug was cut shorter than the later versions) has the LED inserted the opposite way to the other 2. This is because the ashtray plug was wired incorrectly at the factory.

View attachment 85859

I attempted to ensure the element of the LED that generates the light was roughly in the same place as the bulb filament. These pictures shows the LEDs fitted and working. The only limitation is that the LEDs used have a narrow viewing angle with leaves parts of the HVAC with poorer light coverage. This will be remedied when I source a 12v LED with a wider viewing angle. (Or use lower voltage LED with a wider viewing angle and an external current limiting resistor)

View attachment 85860 View attachment 85861

Cost? circa £18 for 30 LEDs which included postage and packaging which works out at roughly 60p each!

LEDs: https://www.rapidonline.com/4-8mm-low-profile?Attributes={"Forward Voltage Typical":["12V"]}

CW
Great idea, do the led pins go all the way through into the connecting plug, I didsomething similar but soldered them, it was a pain, I take it you have a number of spare bulbs you may be selling at lets say a £1 each :D
 
Top