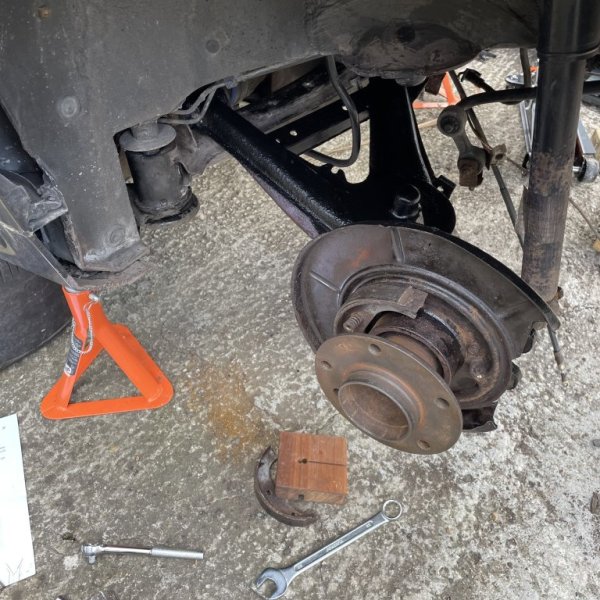
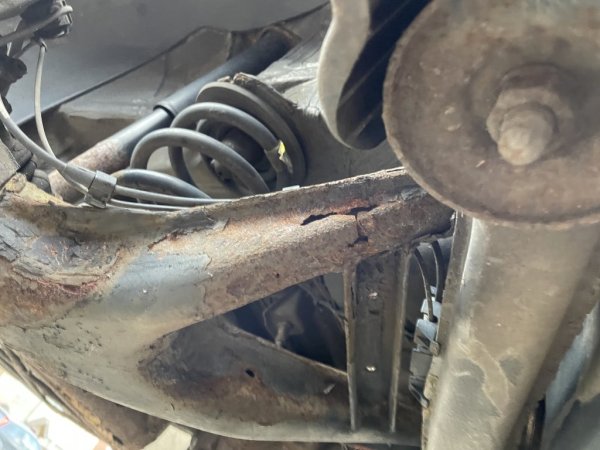
It's all fun fun fun...

bernd

Zorg Addict
Joined
Mar 23, 2022
Points
46
This is just a quick update. I've been busy doing other stuff (mostly work), so I haven't done much to the Z3. What I have done though, in an attempt to cure the "sticky" throttle, is squirt some WD40 onto the throttle cable and give the adjustment screw a turn to take the slack out, which has massively improved how the car feels. Much more than I expected. This must be the best value for money "performance upgrade" ever.
12/10 recommend!
 

bernd

Zorg Addict
Joined
Mar 23, 2022
Points
46
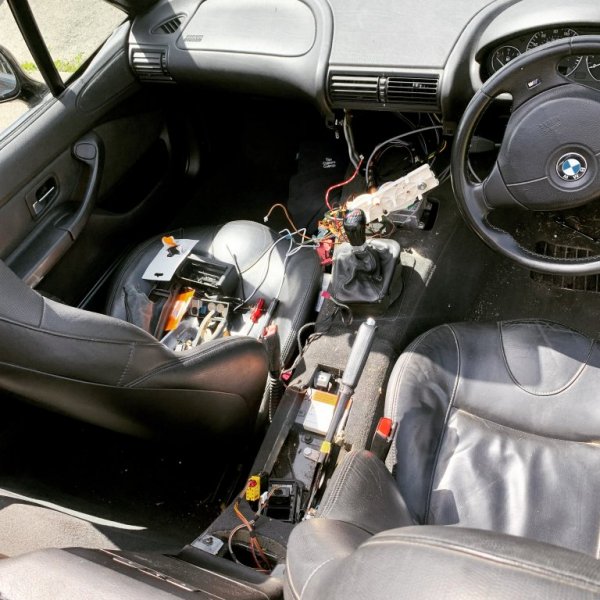
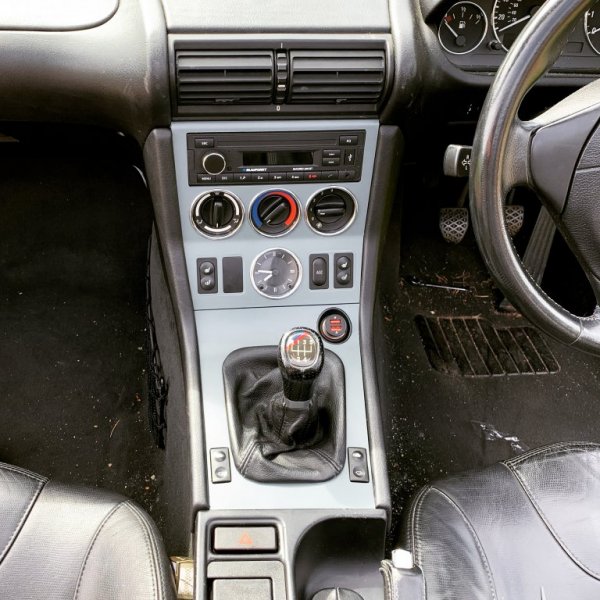
I've de-blinged the centre console. (The randomly brushed aluminium was a bit much, really) I had some matte grey vinyl leftover from doing the kitchen cupboards, so I used that. I like it. It looks much neater. While I had the centre console out, I also replaced the bulbs behind the heater controls. It's a bodge job though I admit. That's because a 285 bulb is 59p from Eurocarparts and the same bulb wired into a BMW holder is £10.79.
Anyway, here are a couple of pictures:
B80E8695-8383-4122-AE2A-3540E28DA2FA 2.JPG353CB719-B2D8-4514-9553-F47F1D13AE77.JPG
 

bernd

Zorg Addict
Joined
Mar 23, 2022
Points
46
It's been months and months, and to be honest, there isn't a lot of progress to report. All I've done all summer really was having great fun driving around in my BMW roadster (more than 8000 miles apparently since I bought it in March).
Ok, it developed a minor coolant leak, and obviously the bodge-job with the heater control lights lasted for about 24 hours. So as I was at BMW anyway to get a new upper radiator hose, I also got a new rubber hose connecting the MAF sensor to the top of the injection rail, which was a bit dodgy (What does this actually do?), a new bonnet badge (the most expensive item on this list) and a couple of the very expensive bulbs.
IMG_5036.jpg

That looks much better...

IMG_5058.jpg

So do the beautifully illuminated heater controls.

I have also replaced the headlight bulbs with OSRAM Nightbreakers, which has made a big difference, and a pair of Bosch wiper blades. Speaking of headlights, what is really incredibly annoying is that apparently all these SUV and Crossovers ultra-bright LED headlights are at the exact same height as my eyes. Especially when waiting at the lights and they're right behind you and the light is reflected in all 3 mirrors straight at your retina.

Otherwise, all is well! It's even reasonably watertight. There's maybe a little bit of moisture coming in at the top of the driver side window when it really is chucking it down. That possibly needs a new rubber seal, or it might be an alignment issue with the window, which is a bit funny going up and down sometimes as well. I will do some investigating there...
 

colb

Zorg Guru (V)
British Zeds
Joined
Nov 25, 2012
Points
178
Location
Newport, South Wales,UK
Model of Z
Z3 M43 1.8 (1999) and Z4 E85 2.5 (2003)
Treat your rubber seals with Gummi Pflege Rubber Protection, it will plump the seal up for a better seal. Cheapest supplier here
Apply it a couple of times a year to keep them conditioned, bottle will last you ages.
 

bernd

Zorg Addict
Joined
Mar 23, 2022
Points
46
Treat your rubber seals with Gummi Pflege Rubber Protection, it will plump the seal up for a better seal. Cheapest supplier here
Apply it a couple of times a year to keep them conditioned, bottle will last you ages.
Yeah, I did that a while back. It's good stuff this, definitely made a difference with wind noise etc.
 

bernd

Zorg Addict
Joined
Mar 23, 2022
Points
46
It's MOT time! (Technically it was MOT time last Monday, but never mind) Looking at last year's advisories, we definitely needed new brake disks and pads in the front. So off to Eurocarparts I went (in the Golf, which has got a valid MOT), got a set of Brembo disks and pads, put the Z3 on axle stands and in doing so apparently opened Pandora's box...
Here we go:
I might get away with not doing the front wishbone bushes immediately, but realistically, they need replacing rather sooner than later, so do the track rod ends, drop links and anti roll bar bushes. But that's not the worst bit, oh no. Both rear tyres are so badly worn on the inside that they will need replacing after less than a year. The one on the passenger side is actually completely bald and the 245/40R17 are really ridiculously expensive (about £30 more per tyre compared to the 225/45R17 front tyres). To prevent that from happening again we're also looking at replacing all rear suspension bushes and potentially a new passenger side trailing arm. (The driver side one was replaced for last year's MOT because it was a bit too crumbly). So while I'm at it I might as well replace the rear brake disks and pads.

I knew it was gonna happen and I really should have done it bit for bit over the last year, instead of now having to do it all at once (D.Oh! Idiot...)

So, if anybody knows any tips and tricks on how to do the rear trailing arm / subframe bushes without pushing my blood pressure into the danger zone, any advice would be much appreciated. Also, what's the opinion on poly bushes? Yes or No?

Thank you! I'll let you know what happens...
 

bernd

Zorg Addict
Joined
Mar 23, 2022
Points
46
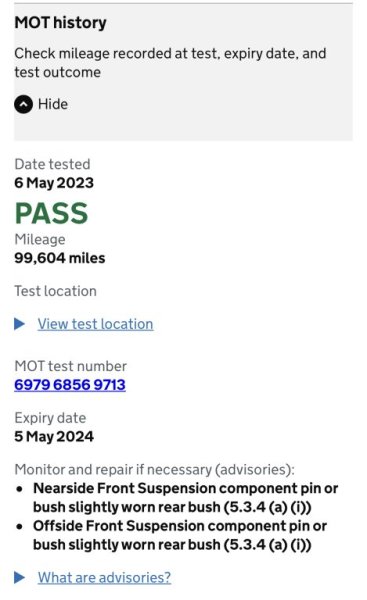
Ok, so the good news first. This was the outcome of yesterday's M.O.T. test:
IMG_0399.jpg
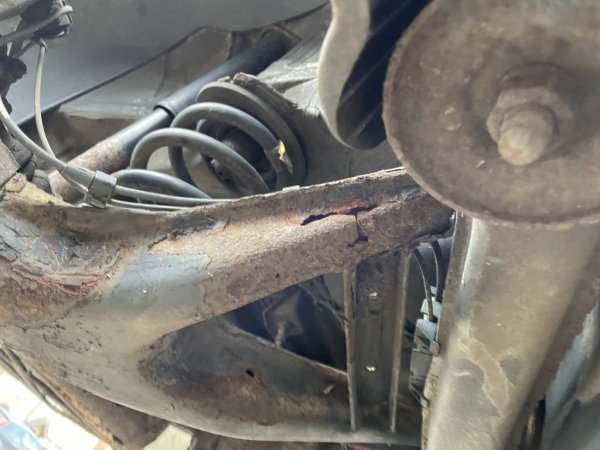
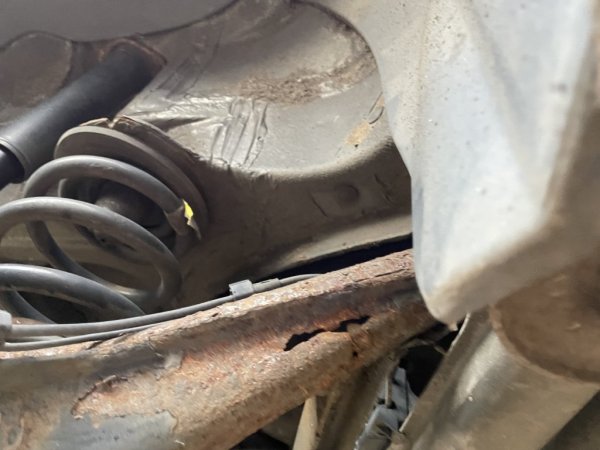
After me last (incredibly naive) post, I put the Z on axle stands and discovered that the offside trailing arm looks like this:IMG_0202.jpeg
Before I bought the Z I did check out the M.O.T. history and it had failed for a rusty trailing arm a month or so before I bought it and a week later it passed, so I assumed that it had been fixed. I did have a look underneath when I bought it and at least superficially it looked much better than the other one, but I do wonder now about how legit that last M.O.T. test really was.
For a brief moment I wondered if it's worth fixing or if I should just sell it for parts. Then I found out that it wasn't the first time in the Z's history asked the same question:
I can confirm that he sold it...
Anyway, I did fix it because I knew I would have to buy another one if I didn't...
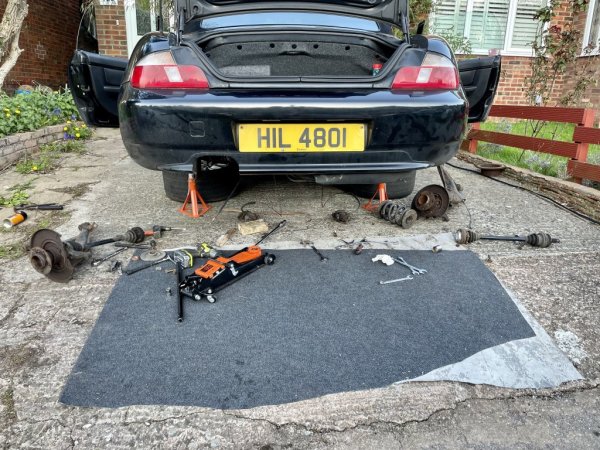
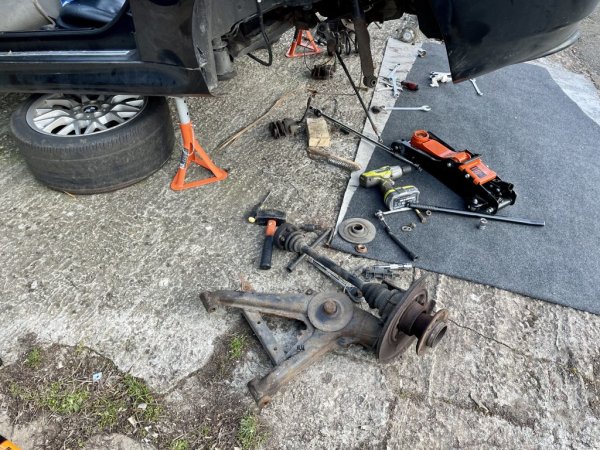
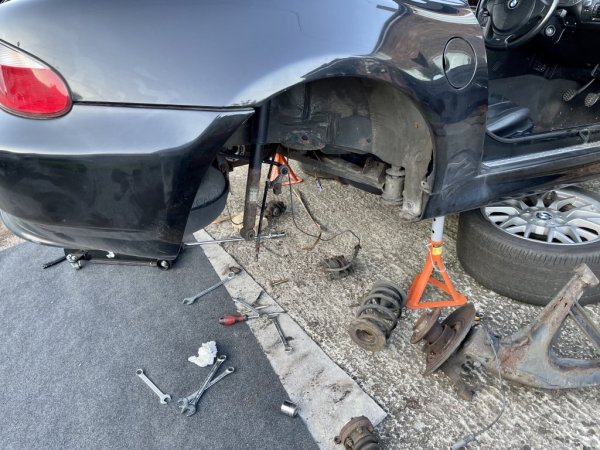
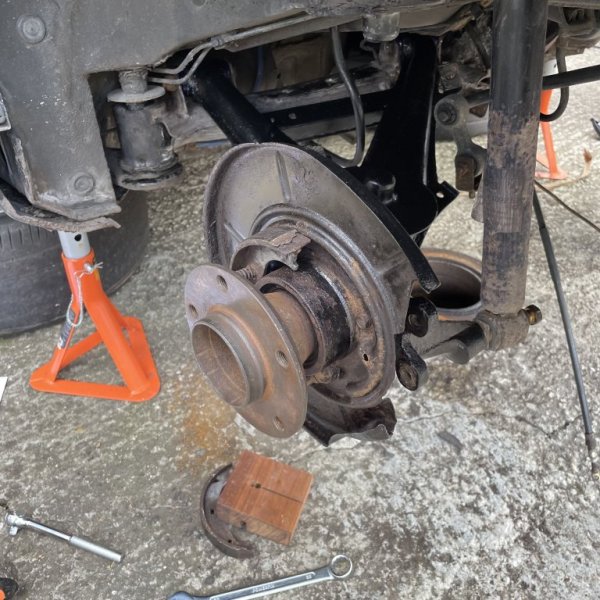
So for about 3 months, the drive looked a bit like this:
IMG_0360.jpegIMG_0362.jpeg
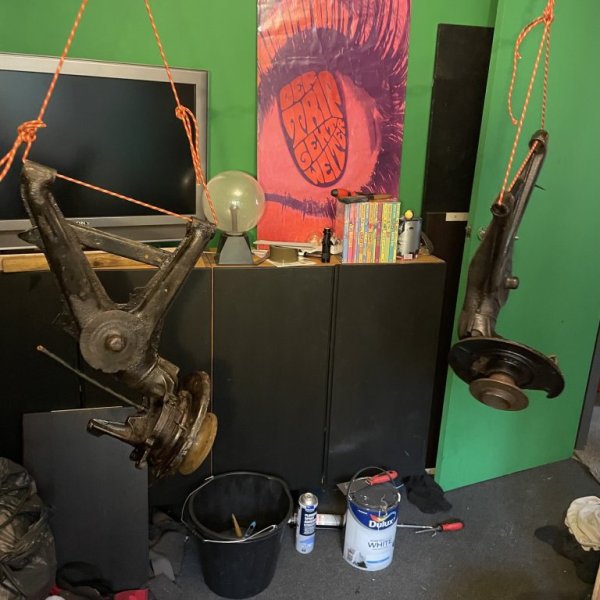
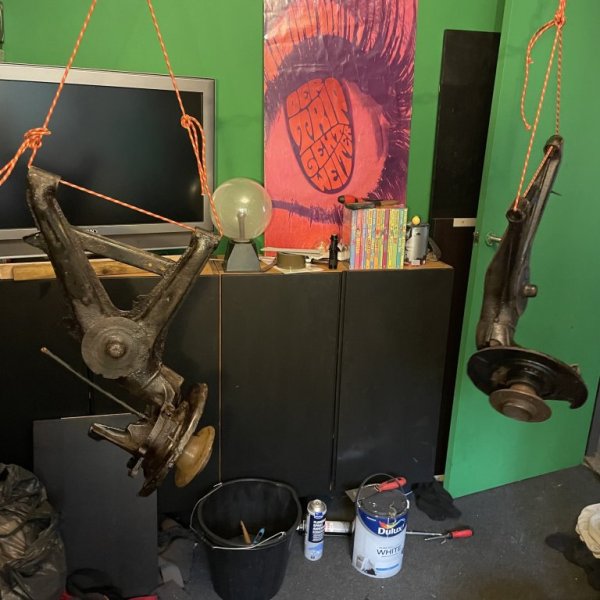
For a while, the trailing arms hung from the ceiling in the spare bedroom while being painted with Hammerite:
IMG_0226.jpeg
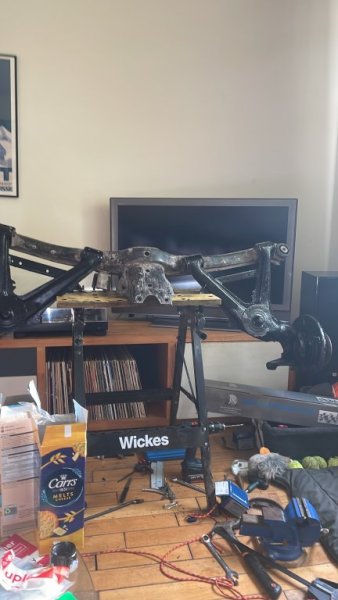
And because it seemed to be always raining, the living room looked like this while I installed the trailing arm bushes and put the arms back onto the beam:
E4C406FB-86DB-4C33-A0EB-F6260AF04BB3.jpg
But we did it in the end. I had lots of help from my neighbour who is an engineer, BMW fanboy with a well equipped workshop. And @Lee who very kindly swapped the beam bushes for me. Again, many thanks mate!
Obviously not everything went smoothly. We spent a whole Sunday afternoon with removing the "bolts of doom" from the beam plates. We got 3 of them out in one piece, but the fourth had to be drilled out. The nearside driveshaft was impossible to remove from the hub. In the end I gave up and ordered a new one. But the most frustrating thing was that when it was time to start putting it together again, I said to attach the diff to the beam first, then jack it in place and attach the beam. But matey was adamant that it was no problem to put the diff up separately, because "I've swapped the diff on my E30 loads of times mate". Well, we managed to cross thread both the pretty much inaccessible upper bolts that hold the diff to the beam, which caused quite a bit of swearing and throwing spanners on the ground in frustration. But it's done and I'm rather quite that we managed to do quite a big job successfully. And as the sun's come out, I'm gonna go now put the roof down and go for a little drive...
 

Attachments

t-tony

Zorg Expert (II)
Supporter
British Zeds
#ZedShed
Joined
Dec 31, 2013
Points
226
Location
Torksey Lock,Lincoln, England
Model of Z
E89 Z4 23i Auto
Congrats on sticking with it and getting it done.:thumbsup:

Tony.
 

bernd

Zorg Addict
Joined
Mar 23, 2022
Points
46
There's more to report (now that I've calmed down a bit). So, about a week after I had the Z3 back on the road, I was putting the roof down one sunny morning and thought uh oh, that sounded funny. What happened was that the zip had come apart in the top right corner of the rear screen. Hurrah!
Eventually I found a slidy bit that fitted in my sewing stash to try to un- and re-zip and of course the whole thing just unravelled completely. As I had spent all of my money on suspension bits, taking it somewhere to have a new screen fitted was out of the question. I did buy a length of zip from Amazon and a piece of window film from Ebay. Now I'm quite capable sewing stuff, so how hard can it be? Very, as it turns out. Cutting the new window using the old one as a template and sewing half of the zip around the edge was done in a matter of minutes. But then I spent many extremely frustrating evenings and weekends messing around with "speedy" sewing awls and portable sewing machines trying to attach the other half of the zip to the hood. In the end I sewed the whole thing in by hand over what felt like 100 hours and after the third application of black silicone it is now not very pretty but watertight.
Then about 4 weeks ago, more exciting things happened. I was driving along fairly late in the evening when I noticed that the car is pulling to one side and something smells a bit funny. when I pulled over I saw smoke coming off the left front wheel before even getting out of the car. When I looked, the brake disc was glowing red, because (you guessed it) brakes stuck on solid. So I sat in a lay-by in deepest rural South Oxfordshire, in the pitch black, in the drizzle, waiting for things to cool down a bit while imagining potential brake related horror scenarios in my head, before giving the calliper a prod and a wiggle with whatever tools I could find in the boot (mainly the big extension from my socket set) and driving home veeeeery slowly. Luckily a flush through with some fresh brake fluid and a clean and polish of the calliper sliding pins and bushes has apparently solved the problem. Phew!
All in all then business as usual in Old-BMW-world.
There's some good news as well though:
The rear suspension re-built was a big success. The rear of the car now feels absolutely stable and planted which has led to me driving around corners a lot more (let's say) confidently than before. I've also checked tyre thread depth and on the fancy digital read out of my calliper, the difference between inside and outside on both rear tyres is less than half a millimetre after 3000 miles. We'll just gloss over the fact that I evidently didn't put enough grease on one of the polyurethane bushes on the left side trailing arm, cause that's a bit creaky, and that I somehow have bent the heat shield, so at exactly 2500rpm the exhaust rattles against it like crazy.
Last week the Z3 and I went on another 1500 mile road trip across half of Europe, during which it did not miss a single beat. Driving home on Sunday, I went from Schengen to Reading, that's 403 miles (649km), on a single tank of fuel which works out as 6.75 l/100km (42 mpg). That's not bad at all, especially as I was not driving particularly slowly and years ago I had a 3 cylinder diesel VW Polo that also had a 45 l fuel tank and that only ever just lasted to Schengen, which is of course where you wanna stop for fuel and cigarettes because of the deliciously low tax rates in Luxembourg.
This week then because I still got the week off work and all the shiny new rear end stability has very much highlighted that the front suspension bushes are all extremely worn too, I got myself the whole set (inner and outer tie rods, wishbones, lollipop bushes, anti roll bar bushes and drop links, and strut top mounts). The last of which arrived Wednesday. As I had done this job before on my E46 I thought it's not that tricky and estimated to be finished by Wednesday evening when I started work after lunch. (Why oh why do I still keep doing this? I really should know better by now!) At least I managed to take off everything that needs to come off by Wednesday evening. Well, almost everything. There's this one ball joint, obviously the one that attaches to the wheel hub where I cooked the brakes, to which I spend several hours yesterday afternoon applying every method for removing stuck ball joints I could think of, including getting a bigger hammer, and burning it with fire until I threw my tools onto the drive (toys out of the pram) and walked away in a huff. I think I might need to drill that one out. wish me luck...
During all this, I couldn't help but notice that there is a bit of an oil leak happening, presumably from the rocker cover gasket, but nothing major, so that will keep for a bit.
 

bernd

Zorg Addict
Joined
Mar 23, 2022
Points
46
Been there, had that. Wound up fitting OEM type rubber bushes after a while, much quieter.
I’m gonna leave it for now. It’s only occasionally that it sounds like an old sailing ship. It adds character …
 

bernd

Zorg Addict
Joined
Mar 23, 2022
Points
46
165BC840-38C2-4BF0-B0E7-1D096A7B3EE6.jpeg
C294BE6C-A317-4B36-8AEE-B624486177E9.jpeg

They did put up a good fight, but the end result is: Bernd - 1, rusted on ball joints - 0 !
I’m about to take it off the axle stands, wash hands and go for a test drive. Very excited!
 
Top