Headlight tab repair kit?

Stevo7682

Zorg Expert (I)
Supporter
The M44 Massive
Scottish Zeds
Joined
Apr 1, 2016
Points
218
Location
Maybole , South Ayrshire
Model of Z
Z3 Individual Dakar / Orinoco Individual

yellowjacket

Regular Member
Joined
Oct 28, 2018
Points
22
I'm going to start a new thread to see if anyone's had luck repairing these things.
 

t-tony

The Legend
Deceased
Supporter
#ZedShed
Joined
Dec 31, 2013
Points
226
Location
Torksey Lock,Lincoln, England
Model of Z
E89 Z4 23i Auto
I'm going to start a new thread to see if anyone's had luck repairing these things.

Show some pictures of what you want to repair and I may have some ideas.

Tony.
 

yellowjacket

Regular Member
Joined
Oct 28, 2018
Points
22
OK, thanks. Below are effected tabs on the right (top image) and left (bottom image) headlights.

The first has a tab broken in the middle, below the fastening bolt. Whatever silly glue I'd tried on this didn't work. The other is trickier, since the bracket that holds the bolt is pretty much gone. In both cases, there's only one good bolt connection holding the headlight to the body, making them sadly wobbly.

It's a fairly simple physical connection. I've thought there would be a way of screwing a modified L bracket into the top of the headlight housing that would meet up with the chassis bolt receiver, but the 'hole in the headlight' bit makes me a little nervous.

This must have come up before, and I hope for some advice from bracket-challenged veterans.

IMG_8890.jpg
IMG_8897 2.jpg
 

Stevo7682

Zorg Expert (I)
Supporter
The M44 Massive
Scottish Zeds
Joined
Apr 1, 2016
Points
218
Location
Maybole , South Ayrshire
Model of Z
Z3 Individual Dakar / Orinoco Individual
If your zed has orange indicators then I would be getting my hands on a replacement 2nd hand headlight
If it's clear lense indicators lights are more expensive.
Repair wise possibly something like fibre glass or epoxy resin could facilitate a repair.
Maybe a black L piece of metal one bit attached to mount hole and self tapping screw other side into the headlight.
 

Sean d

Zorg Expert (I)
Supporter
British Zeds
Joined
Sep 29, 2015
Points
201
Location
Lincolnshire
Model of Z
Z3 2.8
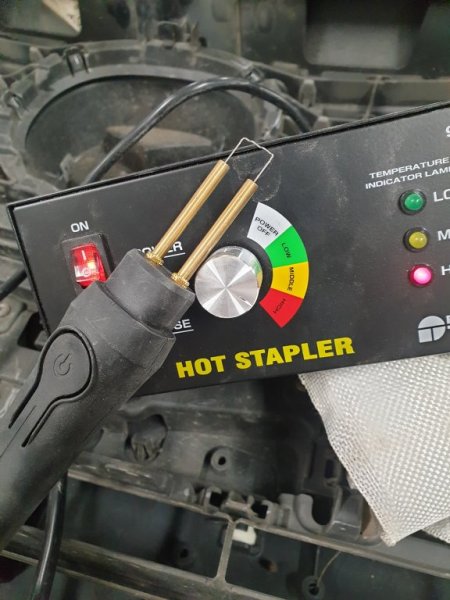
There is only one way to repair those tabs and it's a hot staple gun, I am currently using this one as we speak, if used correctly they are very strong
20191114_101842.jpg
 

t-tony

The Legend
Deceased
Supporter
#ZedShed
Joined
Dec 31, 2013
Points
226
Location
Torksey Lock,Lincoln, England
Model of Z
E89 Z4 23i Auto
If you don't have access the the tool Sean is using I would do what Steve is suggesting, with only slight differences.
For the upper picture I would make a steel (or alloy bracket - easier to work with) and place it under the plastic. With both parts properly aligned drill 1/8" holes and use "pop" rivets to fix the two pieces. Before riveting the repair mix some epoxy glue and create apply between the joint. Wear gloves too as it can be a bit messy.
For the lower picture cut off the rear part of the lug but leave the vertical sides. Make a bracket to fit between the sides, again to use "pop" rivets and epoxy. You can paint them black afterwards and they won't look too obvious.

Tony.
 

yellowjacket

Regular Member
Joined
Oct 28, 2018
Points
22
If your zed has orange indicators then I would be getting my hands on a replacement 2nd hand headlight
If it's clear lense indicators lights are more expensive.
Repair wise possibly something like fibre glass or epoxy resin could facilitate a repair.
Maybe a black L piece of metal one bit attached to mount hole and self tapping screw other side into the headlight.
Replacement headlights would be ideal, but I was trying to stay away from the cost involved. It seems they'd run 500 USD/400 GBP for a used pair if I was lucky, and I'm saving up for behind-the-dash AC work so I can use the car in the summer in the US South. (Ragtop's not enough, sadly.). I'm not choosy about the indicator color--right now, one is clear and one is amber.

Re the metal L/self-tapping screw suggestion: do you mean tapping into the top of the headlight itself? Just trying to get a visual idea. Thanks for these ideas.
 

yellowjacket

Regular Member
Joined
Oct 28, 2018
Points
22
There is only one way to repair those tabs and it's a hot staple gun, I am currently using this one as we speak, if used correctly they are very strongView attachment 122811
Thanks--I'd consider buying one. Would the staple go directly into the headlight housing? Is the housing plastic receptive to this? And what brand is the stapler unit?
 

yellowjacket

Regular Member
Joined
Oct 28, 2018
Points
22
If you don't have access the the tool Sean is using I would do what Steve is suggesting, with only slight differences.
For the upper picture I would make a steel (or alloy bracket - easier to work with) and place it under the plastic. With both parts properly aligned drill 1/8" holes and use "pop" rivets to fix the two pieces. Before riveting the repair mix some epoxy glue and create apply between the joint. Wear gloves too as it can be a bit messy.
For the lower picture cut off the rear part of the lug but leave the vertical sides. Make a bracket to fit between the sides, again to use "pop" rivets and epoxy. You can paint them black afterwards and they won't look too obvious.

Tony.
Thank you for the detailed suggestion, Tony. I'm not that experienced, but would assume this kind of riveter would work? https://www.amazon.com/ARROW-Rivete...&qid=1573740527&sprefix=rivete,aps,175&sr=8-4

For the lower picture suggestion, would the drill (and the rivets) also be going directly into the top of the headlamp housing?
 

Sean d

Zorg Expert (I)
Supporter
British Zeds
Joined
Sep 29, 2015
Points
201
Location
Lincolnshire
Model of Z
Z3 2.8
Thanks--I'd consider buying one. Would the staple go directly into the headlight housing? Is the housing plastic receptive to this? And what brand is the stapler unit?
The stapler is about £100 to buy, you can get a second hand set for that sort of money
 

t-tony

The Legend
Deceased
Supporter
#ZedShed
Joined
Dec 31, 2013
Points
226
Location
Torksey Lock,Lincoln, England
Model of Z
E89 Z4 23i Auto
Thank you for the detailed suggestion, Tony. I'm not that experienced, but would assume this kind of riveter would work? https://www.amazon.com/ARROW-Riveter-Professional-Assorted-Rivets/dp/B07GDK8K71/ref=sr_1_4?crid=1QR42BGB9XPZS&keywords=riveter+tool&qid=1573740527&sprefix=rivete,aps,175&sr=8-4

For the lower picture suggestion, would the drill (and the rivets) also be going directly into the top of the headlamp housing?
Yes that tool is the right one, you can buy different length rivets too. You just need to be careful as the drill bit breaks through into the headlight but it will be ok.
I bought a pair of all chrome aftermarket headlights for my Z3 a few years ago from California for around £225 shipped

Tony.
 

IainP

Zorg Guru (III)
British Zeds
Joined
Feb 20, 2019
Points
125
Location
Out of my Tree, North of Perth, Scotland
Model of Z
1.9
I've repaired those a few time with variations on the above methods.

I remove the headlight.
Make sure the broken bits fit perfectly. Clean them thoroughly with brake/carb cleaner or, alcohol. Something which cleans and evaporates easily. Use some thin aluminium section hot glued to the headlight to align everything exactly.
I can tell you from experience, use a release agent wherever the epoxy could possibly contact the alloy. Epoxy sticks Really Well to alloy!
Bond on the broken section with epoxy resin glue. I generally use 5 min epoxy, then leave 2 hours. Remove the hot glue and alloy.. Key the reverse side with 80 grit and paint with fast epoxy resin. Add two precut pieces of diolen fabric. Stipple in just enough resin to wet out the diolen. Do NOT use masses of resin! I try to cover two sides of the bracket if possible, usually the reverse and at least one side/edge, it's much stronger that way.
Diolen is a fabric midway between fibreglass and twaron (kevlar ), it's stronger and more flexible than 'glass and generally thinner and more pliable than twaron. Two layers should be about 0.3mm thick, three layers will take it to just under 0.50mm. So it's not hugely visible. If you have any missing bits, cut up or tease apart bits of diolen, mixed with resin, you can use those as a filler. Work quickly and leave for 24 hours. Trim any sharp edges.

Diolen is cheap, easy to cut if you use decent scissors, comes in black, so you don't have to add a die or paint afterwards, and it's a bonkers strong fabric once cured. If you can, take the headlight, or a broken tab to whomever you get the resin from. They're not all the same. Read the instructions carefully and measure accurately, epoxy isn't like polyester/fibreglass resin, the ratio's have to be spot on.
Some companies have small trial packs of resin and sample pieces of fabric, probably all you would need.
 

mrscalex

Zorg Guru (IV)
Supporter
British Zeds
3rd Party Trader
Joined
Jun 10, 2016
Points
165
Location
Swindon & Swansea
The tabs are designed to break-off in an accident. Although I can't quite see what benefit that has to the car or a pedestrian. So in theory making the repair too strong is counter to the intended design. But I think most of us would say stuff that.

More recent BMW designs allow the whole bracket to be replaced. I'm with Sean on the plastic stapling/welding.
 
Top