
You are using an out of date browser. It may not display this or other websites correctly.
You should upgrade or use an alternative browser.
You should upgrade or use an alternative browser.
Hardtop Alignment
- Thread starter Rui Almeida
- Start date


IIRC those bolts are 25 - 30mm.x 8.0mm ?
Tony.
Tony.


thank you for the replies
yes, I know what I’m asking sounds fairly obvious, but there are two issues with the oversized hole in the base plate:
1) most M10 or M12 allen bolts have a correspondingly larger head size/diameter (than an M8) and that is ‘chewing up’ the plastic surround as it goes in.
2) I think the OEM M8 bolt is purposely a little undersized for the hole it goes in through the frame. This allows for a little more room for movement/wiggle room/adjustment as it goes up through the frame into the baseplate to help with the fitting and alignment of the hardtop. (I don’t really want to start drilling out the hole in the frame as well !)
I guess I’ll keep hunting for an M10 or M12 Allen bolt with a shorter length and a much smaller head diameter than most
yes, I know what I’m asking sounds fairly obvious, but there are two issues with the oversized hole in the base plate:
1) most M10 or M12 allen bolts have a correspondingly larger head size/diameter (than an M8) and that is ‘chewing up’ the plastic surround as it goes in.
2) I think the OEM M8 bolt is purposely a little undersized for the hole it goes in through the frame. This allows for a little more room for movement/wiggle room/adjustment as it goes up through the frame into the baseplate to help with the fitting and alignment of the hardtop. (I don’t really want to start drilling out the hole in the frame as well !)
I guess I’ll keep hunting for an M10 or M12 Allen bolt with a shorter length and a much smaller head diameter than most
So, after following the hardtop fitting instructions, (which were very helpful) I got my hardtop sitting nice and firmly on my car (even if it is with the wrong bolts!)
Took it for a drive and no rattling or shaking but once above 70 miles an hour, the wind noise which appears to come from the front, is really loud.
I can put my hand in front to me and feel no drafts/gaps, so I’m guessing it’s noise generated by the air going over the front lip of the hardtop.
visually, the hardtops sits flush with the top of the windscreen, but I’m just wondering if it’s too far away and if it should be much closer to the top of the screen.
as you can see from the pictures, I’ve got 10 or 11 mm of rubber visible along the front of the hardtop before it meets the screen frame
if anyone could have a look (in the daylight tomorrow) and post any pictures of how tight their hardtop fits up against the windscreen frame, then would help me to either eliminate or assume that this is causing the noise.
Took it for a drive and no rattling or shaking but once above 70 miles an hour, the wind noise which appears to come from the front, is really loud.
I can put my hand in front to me and feel no drafts/gaps, so I’m guessing it’s noise generated by the air going over the front lip of the hardtop.
visually, the hardtops sits flush with the top of the windscreen, but I’m just wondering if it’s too far away and if it should be much closer to the top of the screen.
as you can see from the pictures, I’ve got 10 or 11 mm of rubber visible along the front of the hardtop before it meets the screen frame
if anyone could have a look (in the daylight tomorrow) and post any pictures of how tight their hardtop fits up against the windscreen frame, then would help me to either eliminate or assume that this is causing the noise.
Attachments
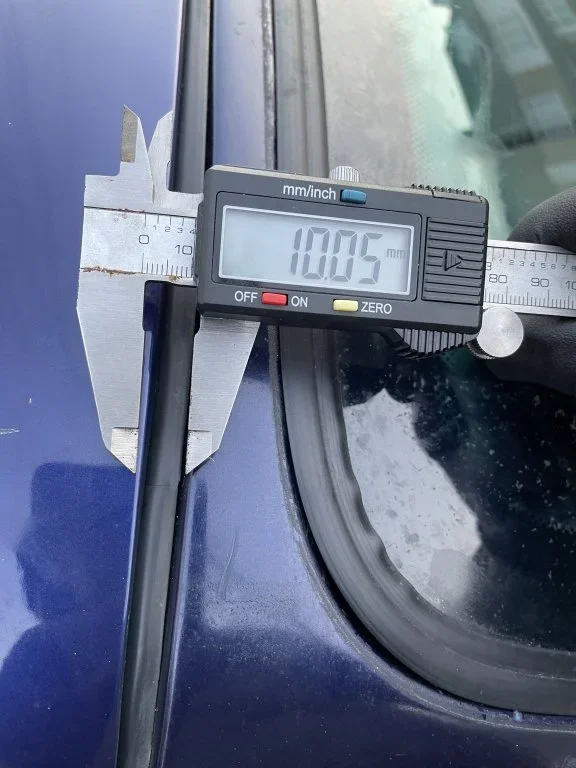
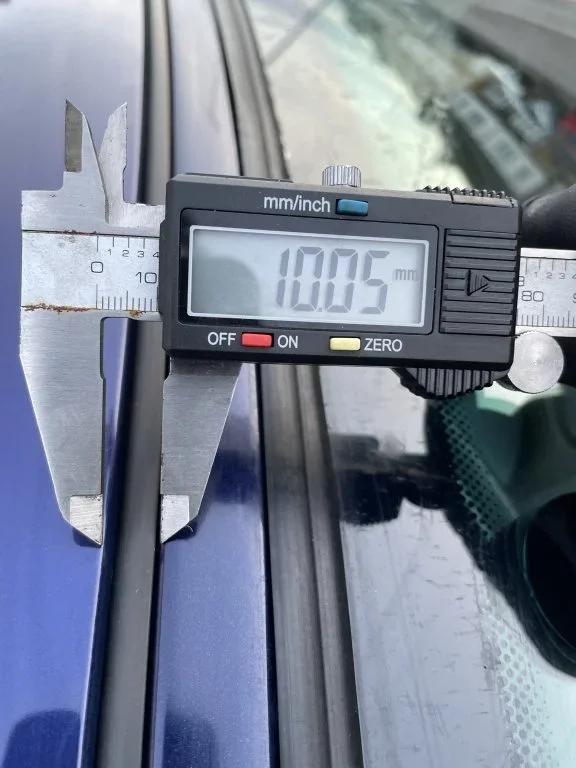
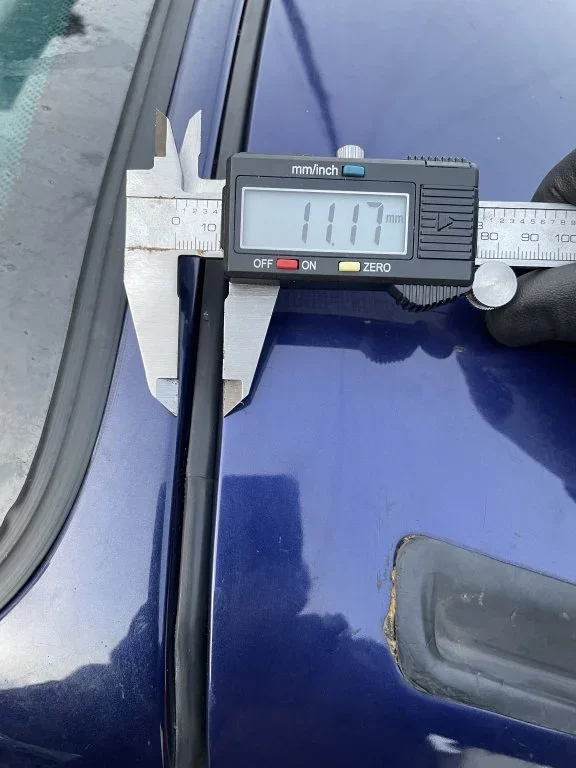

So, after following the hardtop fitting instructions, (which were very helpful) I got my hardtop sitting nice and firmly on my car (even if it is with the wrong bolts!)
Took it for a drive and no rattling or shaking but once above 70 miles an hour, the wind noise which appears to come from the front, is really loud.
I can put my hand in front to me and feel no drafts/gaps, so I’m guessing it’s noise generated by the air going over the front lip of the hardtop.
visually, the hardtops sits flush with the top of the windscreen, but I’m just wondering if it’s too far away and if it should be much closer to the top of the screen.
as you can see from the pictures, I’ve got 10 or 11 mm of rubber visible along the front of the hardtop before it meets the screen frame
if anyone could have a look (in the daylight tomorrow) and post any pictures of how tight their hardtop fits up against the windscreen frame, then would help me to either eliminate or assume that this is causing the noise.
See how the hardtop lines up exactly with the front edge of the rear panel/wing.
This next picture isn't sharp but you see the roof sits snug up against the rubber.
I don't have any wind noise from there
It looks like you need to move forward 2-3mm.
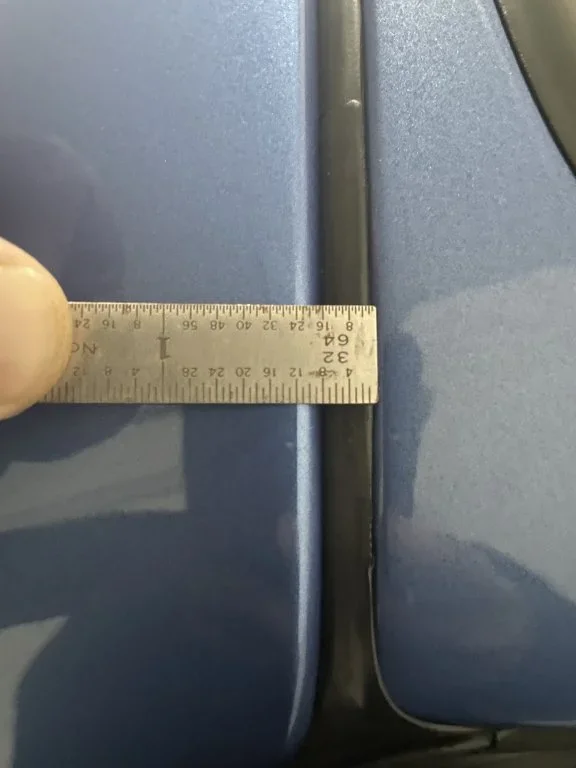
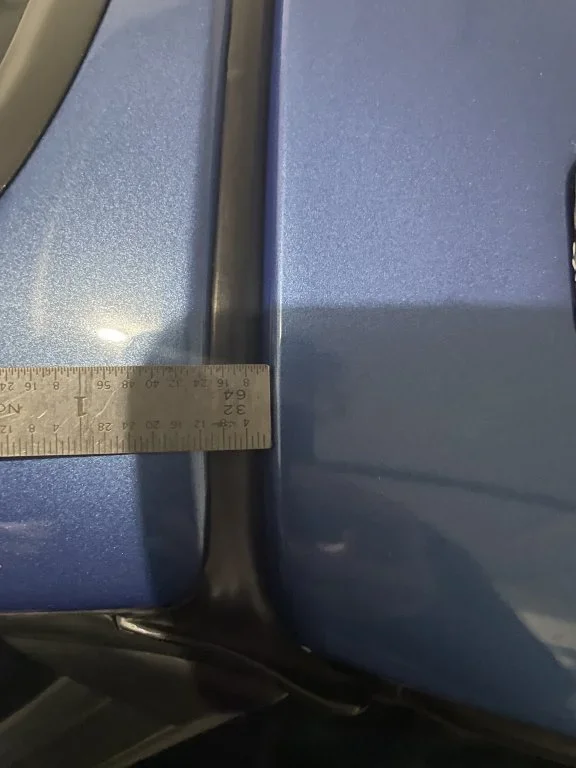
my calipers are at shop. But imperial machinist ruler for reference.
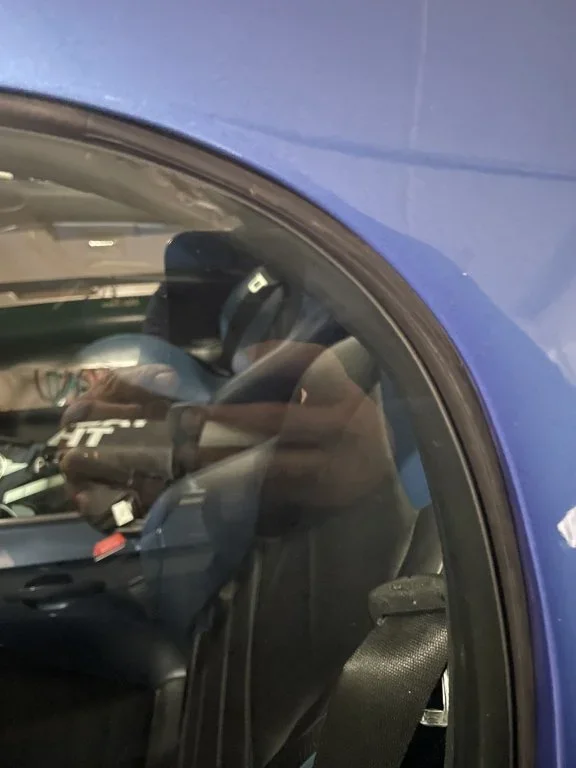
how is window sitting in jamb? Mine needs to slide back 1-2 mm on LHD side.
so picture 1 LHD is too tight.
Picture 2 RH side is perfect on mine.
Picture 3 shows LHD window gasket needs to slide back a ‘scootch’
I think 10/32 x .7913 or 8mm is my target.
also, check A pillar gap for noise source prior to moving. If any gap, try putting piece of something to seal it up.
my calipers are at shop. But imperial machinist ruler for reference.
how is window sitting in jamb? Mine needs to slide back 1-2 mm on LHD side.
so picture 1 LHD is too tight.
Picture 2 RH side is perfect on mine.
Picture 3 shows LHD window gasket needs to slide back a ‘scootch’
I think 10/32 x .7913 or 8mm is my target.
also, check A pillar gap for noise source prior to moving. If any gap, try putting piece of something to seal it up.
Attachments
Last edited:

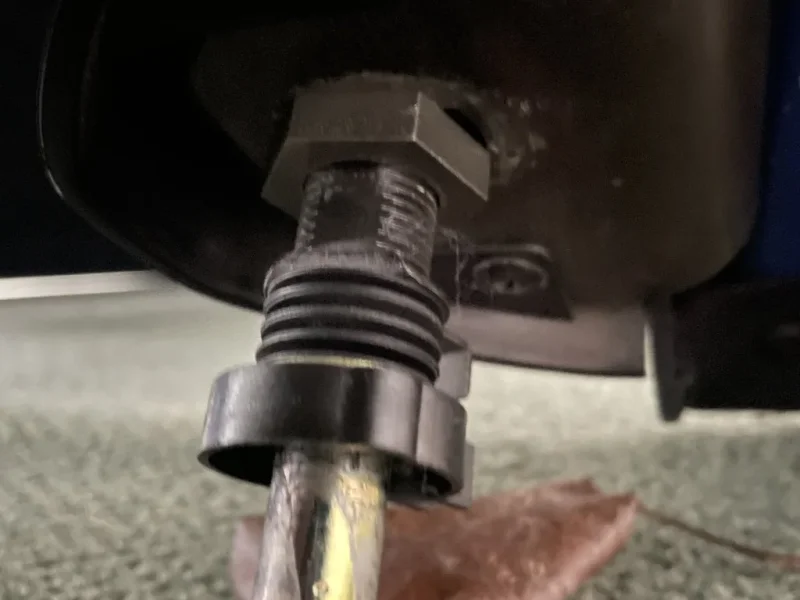
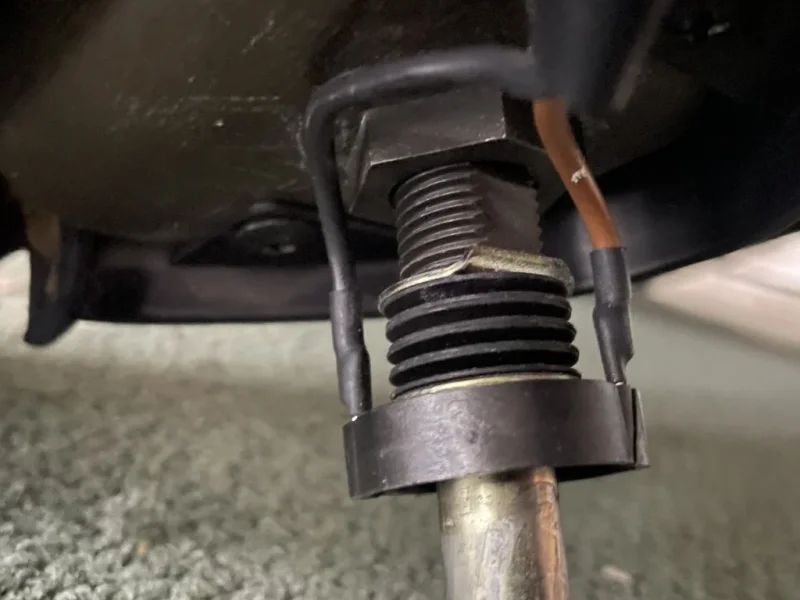
The screw in your hand the original with the o ring are you saying that it’s a sloppy fit and does not engage into the thread ?
The reason I’m asking is that if anyone drilled out the original ? You should still be able to screw the top down as long as the top had been tapped
But would need to be the right length as per original, another member and myself have just fitted hard tops to both our cars it’s the sort of thing that the more you play with the better understanding of the process you get good luck
The reason I’m asking is that if anyone drilled out the original ? You should still be able to screw the top down as long as the top had been tapped
But would need to be the right length as per original, another member and myself have just fitted hard tops to both our cars it’s the sort of thing that the more you play with the better understanding of the process you get good luck
Last edited:
Where are you located, as a nearby member maybe able to help you ?
See how the hardtop lines up exactly with the front edge of the rear panel/wing.
View attachment 286439
I think mine sit back about 2 mm on each side, so perhaps that should be my starting point, to get the hardtop right up flush against the door shut line
It looks like you need to move forward 2-3mm.
my calipers are at shop. But imperial machinist ruler for reference.
how is window sitting in jamb? Mine needs to slide back 1-2 mm on LHD side.
so picture 1 LHD is too tight.
Picture 2 RH side is perfect on mine.
Picture 3 shows LHD window gasket needs to slide back a ‘scootch’
I think 10/32 x .7913 or 8mm is my target.
also, check A pillar gap for noise source prior to moving. If any gap, try putting piece of something to seal it up.
Thank you the close up pics
I agree that 8 mm is probably what I should be aiming for along the top
hadn’t looked at the door window gaps all the way round , but that’s something I should look at to see if they are even in uniform and not distorting the rubber.
probably best if I slacken everything off and start again
Hi Bazza,
yes, the base plates have been drilled out and re-threaded to an M10 or M12 Allen bolt (no idea why) so the original torx bolt is too small for the baseplate thread.
i’ve had to use the larger bolt which is a very tight fit through the hole on the window frame but threads into the base plate ok.
(and I have loosened the 3 bolts of the baseplate itself to give me more adjustment.)
I Think, and someone may be able to correct me, that the original torx bolt that you all have for your hardtops does have a little bit of wiggle room as the hole in the windscreen frame is bigger than it needs to be where the thread part of the Torx bolt protrudes.
as I mentioned, I might be best slackening everything off and starting again.
The hardtop fitting instructions are very comprehensive It’s just a case of getting a few millimetres extra here or there.
I just wondered if anyone had any pictures of the top front seal where it meets the windscreen frame and just how tight to the windscreen frame it should be. i’m in Watford, Hertfordshire,
yes, the base plates have been drilled out and re-threaded to an M10 or M12 Allen bolt (no idea why) so the original torx bolt is too small for the baseplate thread.
i’ve had to use the larger bolt which is a very tight fit through the hole on the window frame but threads into the base plate ok.
(and I have loosened the 3 bolts of the baseplate itself to give me more adjustment.)
I Think, and someone may be able to correct me, that the original torx bolt that you all have for your hardtops does have a little bit of wiggle room as the hole in the windscreen frame is bigger than it needs to be where the thread part of the Torx bolt protrudes.
as I mentioned, I might be best slackening everything off and starting again.
The hardtop fitting instructions are very comprehensive It’s just a case of getting a few millimetres extra here or there.
I just wondered if anyone had any pictures of the top front seal where it meets the windscreen frame and just how tight to the windscreen frame it should be. i’m in Watford, Hertfordshire,
As people have pointed out before the alignment between the hard top edge and the door edge is very important
We had wind noise even though everything seemed to be fitted right, but it wasn’t until we moved the main brackets forward
until they both aligned we had a perfect fit with no wind noise.
We had wind noise even though everything seemed to be fitted right, but it wasn’t until we moved the main brackets forward
until they both aligned we had a perfect fit with no wind noise.
If you need anymore information I could always WhatsApp face time, just send a private message for my phone number.
“3. Ensure two rubber mounts are on the inside of the hardtop.”
Anyone have picture or video to share of the above?
is it this p/n 54218163055 ?
I had time for garage today…. I found couple things related to rattle of hardtop.Awake old thread..I too am searching for a noise and leak free hardtop adjustment spell. Lots of try and adjust I see. Thanks!
1. Upon review of the fitting guide, the post can be adjusted vertically. I found one post on passenger side was loose. Not real loose, but loose.
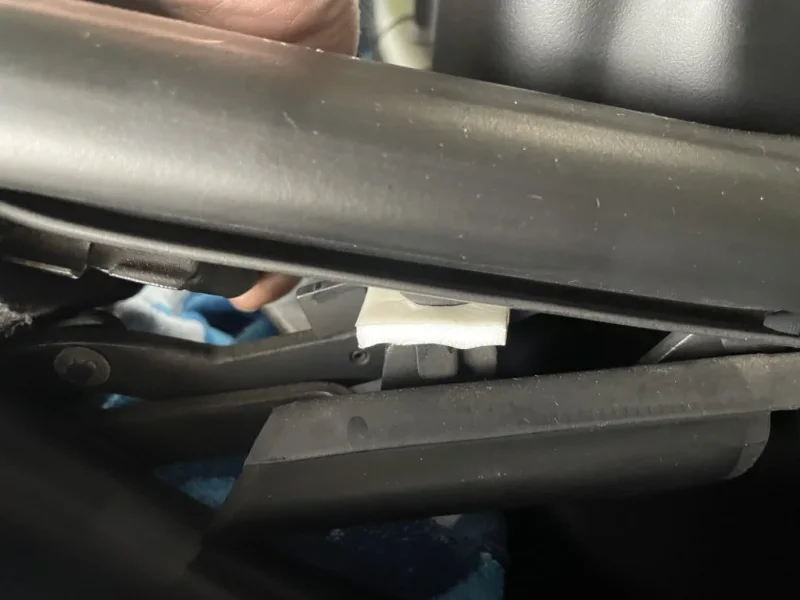
2. The soft top frame has some hard bump stops. I put rubber pieces on it to dampen rattle. See picture.
3. Adjusted the Driver LH side up, about 2mm. Which now allows window to tuck under door jamb gasket. This side also needed tightened.
4. Inspected the OEM defrost connector and found one of two wires unplugged. Cleaned and plugged in.
5 inspected rubber bumpers on rear and found them to be pretty stiff. Placed small foam piece to help aid vibration noise. Supplemented the rear painted ‘mantle’ the top rests on, with helicopter tape/film to prevent chafing.
Attachments
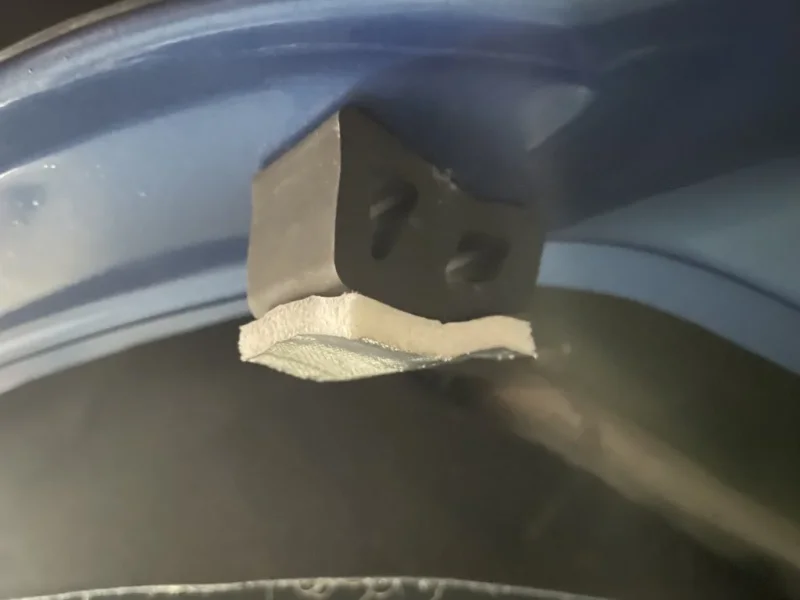
The bump stops for the soft top, another member also found these to be crushed down think this is likely to be the age of them,I had time for garage today…. I found couple things related to rattle of hardtop.
1. Upon review of the fitting guide, the post can be adjusted vertically. I found one post on passenger side was loose. Not real loose, but loose.
2. The soft top frame has some hard bump stops. I put rubber pieces on it to dampen rattle. See picture.
3. Adjusted the Driver LH side up, about 2mm. Which now allows window to tuck under door jamb gasket. This side also needed tightened.
4. Inspected the OEM defrost connector and found one of two wires unplugged. Cleaned and plugged in.
5 inspected rubber bumpers on rear and found them to be pretty stiff. Placed small foam piece to help aid vibration noise. Supplemented the rear painted ‘mantle’ the top rests on, with helicopter tape/film to prevent chafing.
So what we decided to do was to fill the voids with a piece of rubber tubing this then pushed the bump stop back as close to the original position this in turn stiffened the bump stop this help to eliminate rattling (maybe worth a try)
To be fair your stops don’t look too bad ?
These foam pads are temporary.The bump stops for the soft top, another member also found these to be crushed down think this is likely to be the age of them,
So what we decided to do was to fill the voids with a piece of rubber tubing this then pushed the bump stop back as close to the original position this in turn stiffened the bump stop this help to eliminate rattling (maybe worth a try)
To be fair your stops don’t look too bad ?
Thanks for note about rubber bumpers compression. Having pointed that out, I may opt to fill the middle with something to expand it to original shape.
May be a whiskey cork…
I never know what to do with them.


