Bertie Jaffa's //M

bertiejaffa

Zorg Guru (III)
Supporter
British Zeds
Joined
Mar 15, 2014
Points
135
Location
Manchester
Model of Z
Z3M
The dash does look good though but don't blame you for wanting to tackle that peice again. I saw they did covers for the A pillars and steering colum shrouds but I think these would not clip back in if wrapped round due to making the pieces bigger, what do you think.
Thanks - Barry (Southernboy) has done this twice too and we are both agreed that once is challenging, twice is because you know you can... but 3 times would be madness.

I've got the pieces for the steering column shroud - it comes in 2 halves just like the shroud itself - I haven't started gluing that bit yet, its one of those pieces I am going to do later but yes it should clip back in. I would expect the A pillars would be ok too. I didn't bother with those pieces though as I thought it would look out of place where it joined the windscreen surround so instead I am just going to freshen up the a pillars and windscreen surround with some Estoril Blue scuff master.

All the pieces you've said you are doing (or thinking of doing) should be easier to be honest as they are all plastic which means you dont have to worry about removing the original vinyl first. That job is a real PITA and then you have to spend ages getting rid of all the glue remains and then spend time bringing the panels back to smooth before applying the leather.
 
Last edited:

bertiejaffa

Zorg Guru (III)
Supporter
British Zeds
Joined
Mar 15, 2014
Points
135
Location
Manchester
Model of Z
Z3M
Not much progress over the last few days but slowly getting there... FIrstly I have fitted new 2 way speakers to the trim behind the seats. My 2.0l Z had something similar and it really helped with the sound distribution. These will be wired to the rear channel of my new head unit.


I've also got some new gaiters to match my re-trimmed dial dome....


and continuing with the detailing of items that nobody will ever see.... :banghead:


One thing I have realised is that BMW's attention to detail isn't as good as it should be. I have always hated the alarm LED on the front panel and so it has always been my intention to extend the wires to the rear demist button and install this up front to complete the switch panel with something proper. As you know BMW changed the style of the switches on the centre console when they released the facelift Z in 1999 and made them more rounded. However, when they released the M in 1998 they used the new style switches from the outset which I think was a great idea as they look better IMHO. BUT for some unknown reason they didn't bother upgrading the rear demist switch which means that it is still the old fashioned square type which will look c**p if I moved it up to the front panel.

I have pulled both switches apart to see if the electronics can be switched but thats a no go - so can anyone tell me is they have ever seen a way to retrofit the new button onto an M? I know the new button needs the unloader relay which is currently used for the heated seats in the M and pre-facelift car.
 
Last edited:

oldcarman

Zorg Guru (V)
Supporter
Canadian Zeds
The M44 Massive
Joined
Feb 11, 2014
Points
188
Location
Pine Falls Manitoba can.
Model of Z
1.9 M44
Very nice Lee!! would you happen to know what the weigh measure of the leather used is? I have a sh******load of black leather in a low oz count that I would like to try out and some in black cherry that's a bit heavy for this type of work. Also some green in lighter weight which would match my interior. I also have several sewing machines for stitching and the patience of a saint for this kind of work. Just not always available for some people unfortunetly!! lol. JIM
 

bertiejaffa

Zorg Guru (III)
Supporter
British Zeds
Joined
Mar 15, 2014
Points
135
Location
Manchester
Model of Z
Z3M
Very nice Lee!! would you happen to know what the weigh measure of the leather used is? I have a sh******load of black leather in a low oz count that I would like to try out and some in black cherry that's a bit heavy for this type of work. Also some green in lighter weight which would match my interior. I also have several sewing machines for stitching and the patience of a saint for this kind of work. Just not always available for some people unfortunetly!! lol. JIM
Hi Jim, sorry I have absolutely no idea - the leather that I was sent is very tough too be honest, especially the blue stuff. The leather I have used on my doorcards is some I rescued (pinched) from a friend and that is much more stretchable.

I can always send a few little pieces of off cut if that helps?

If you are going to make these I reckon you could be onto a gold mine !!
 

oldcarman

Zorg Guru (V)
Supporter
Canadian Zeds
The M44 Massive
Joined
Feb 11, 2014
Points
188
Location
Pine Falls Manitoba can.
Model of Z
1.9 M44
At my age Lee that's highly unlikely but one never knows! It would cut into my happy time cruising and when you don't know how much time you have left you make use of as much pleasure time as possible. No need for samples, I'll just wing it with what I have. Thanks anyway! JIM
 

bertiejaffa

Zorg Guru (III)
Supporter
British Zeds
Joined
Mar 15, 2014
Points
135
Location
Manchester
Model of Z
Z3M
Ok so the sun finally decided to come out this afternoon which allowed me to do a few bits and pieces.

First of all I was able to add my new purchases - a couple of S54 style M badges. There has never been one on the front of the car but I think its about time there was...


And then it was time to update the faded one on the back - I had bought the decals off Aceman to refresh the badge, but my new front badge came with a free S54 version for the rear so that was quickly fitted. The new colours and the curved effect looks much better I think


And then with the sun out I was able to fit the rear carpet and put the roll hoops and rear trim back in - here it is with my new rear speakers. (The plastics will be treated to a quick blast of black scuff master once they are in situ). I also gave the seat belts a good coating of silicone spray to lubricate them whilst the trim was off and I could get at the retraction unit before refitting the trim


And finally the front carpet - Thanks to @Brian H for the information on removing the accelerator pedal to make this fit without having to cut it.


Looks much better than the ghastly mess that was installed previously !!

I have also started the install of my new head unit by fitting the DAB windscreen aerial and feeding the wires down in anticipation of the dash going back in and I have fitted some foam behind the footwell speakers to help reduce the loss of sound.
 
Last edited:

bertiejaffa

Zorg Guru (III)
Supporter
British Zeds
Joined
Mar 15, 2014
Points
135
Location
Manchester
Model of Z
Z3M
new badges look great!
Cheers Tim - its amazing how the small things can make a big difference to the look of the car. I was sceptical about the positioning of the front one for a while and played about with it but having been out today I came home and surprised myself by catching a glimpse of it parked on the drive and the position looks perfect.

Anyway, managed to get another few bits done today..

FIrst of all I have managed to install the wiring for the foot well lights I bought from littlefeller 2 years ago. I had these in my 2.0l Z and they are really effective and a load better than the horrible blue florescent tube that was there before.

The next thing I was able to do is wire in my new head unit and test the rewire of all my speakers and the DAB aerial to ensure they are working, unfortunately to do this I have had to reconnect the battery and turn on the ignition which means I am going to have to find my airbag reset tool :banghead: but I thought it would be better to test this out now with everything out rather than finding out that it doesn't work after I have hidden all the wires behind the dash. Thankfully everything seems good and there is sound coming out of all the speakers. I do think that the subwoofers in the footwell are going to have to be changed as the one on the drivers side seems to be popping a bit so I might just disconnect it for now and see how it sounds.

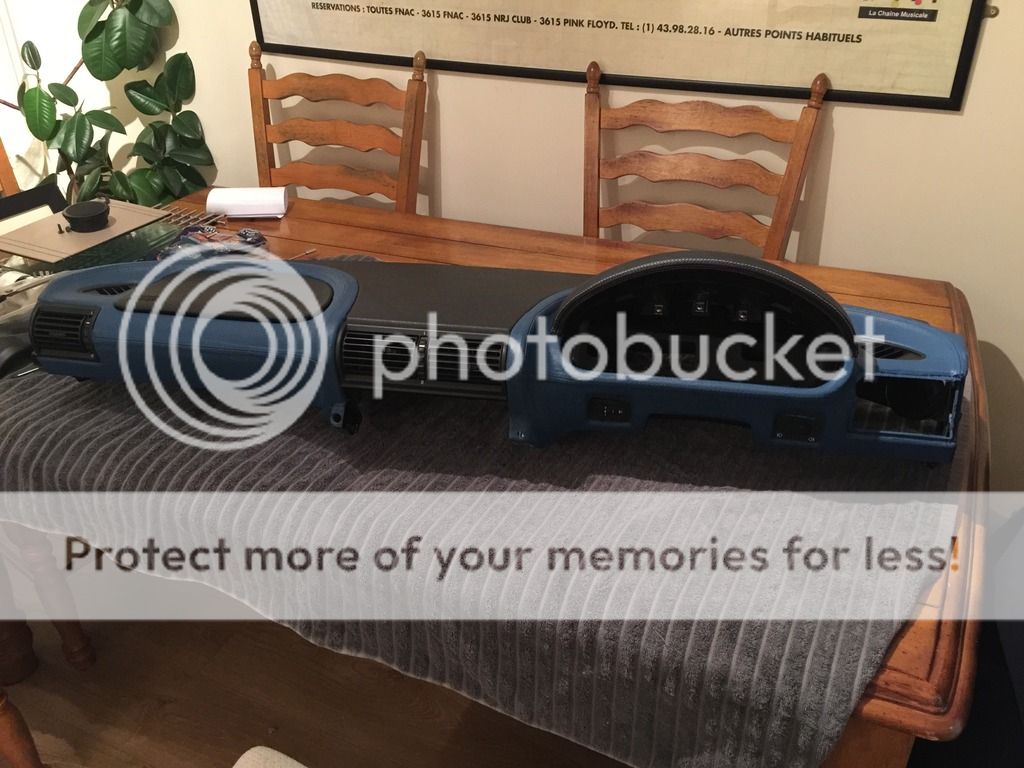
Finally this evening I have been able to reassemble my new dashboard ready to be reinstalled tomorrow. The hardest part is putting the dial dome back together as BMW have designed it in such a way that it should never be separated. The whole thing is held together by pressure in opposing directions and then the plastic is welded/melted together. When I separated the dash I had to Dremmel this bit apart so it was out with my new glue gun (the old one went pop yesterday!) and reglue all the plastics after spending about an hour trying to bend and manipulate the whole thing together.


With this done I could now start putting all the screws back in to hold all the parts together and then to start reassembling the air vents. After almost 20 years the foam around the vents had all but perished and gone (probably blown out into my face over the past couple of years!) so I used some draught excluder seal stuff to recreate the seals back to "as new"


Unfortunately the dash I am now installing is missing one of the small pipes that carries air to the 2 little vents on the top of the dash. Having swapped the dashes on my old Zed I was aware that BMW changed the underside of the dashboards so I couldn't just use the parts of my existing dash so it was into the garage to find a piece of washing machine hose and some gorilla tape....


and then with all the vents now assembled the dash is pretty much ready to be fitted into the car tomorrow..
 

Zeti

Zorg Guru (IV)
Supporter
Romanian Zeds
The M44 Massive
Joined
Oct 9, 2013
Points
167
Location
Bucuresti/ Romania
Model of Z
Z3 roadster 1.9
Great work and very detailed description, which will encourage people who wants to do it!
Dan
 

Grumps

Always happy, apart from when I'm not 🤬
Supporter
British Zeds
Joined
Apr 27, 2014
Points
226
Location
Forest Town, Mansfield
Model of Z
Z4 e85 2.5i
Wow Lee your one brave fella. I thought me dying my leather was making good reading lol!! Look forward to seeing the finished article. :thumbsup:
 

Sean d

Zorg Expert (I)
Supporter
British Zeds
Joined
Sep 29, 2015
Points
201
Location
Lincolnshire
Model of Z
Z3 2.8
Great thread and very interesting stuff, I'm sure I will be picking your brains in the future as I will be moving on to the interior next winter.
 

bertiejaffa

Zorg Guru (III)
Supporter
British Zeds
Joined
Mar 15, 2014
Points
135
Location
Manchester
Model of Z
Z3M
....here are a few further updates...

I was asked about some of the other leather pieces that are available and here are the 2 pieces that cover the steering shroud - they are in 2 perfect pieces just like the shroud itself and are fairly easier to glue direct to the plastic..


...they then fit on as normal, as people know, the shroud itself is just a couple of pieces of plastic that don't fit together perfectly at the best of times but with a bit of tinkering they are back together better than the picture actually gives them credit for - especially when you are looking normally.


I've also continued the little bits of trim detailing with subtle M stitching to the sun visors...


...then the brushed wrap continues on the steering wheel tabs to match the centre console and door trims....


With storage being at a premium in the Z3 I really find these additional cargo nets are very handy for holding maps etc... Here you can also see that the interior is all the same colour now too... something that hasn't happened to this car for sometime !!


just a quick comparison photo to give an indication of the difference between before and now...


..Ok so I haven't been able to finish everything, my seats still need doing as well as my door cards and there are a number of other bits I need to touch up but they will all have to wait as I have had to put the car back together ready for the DTEC Challenge with Deano, Pingu and special guests...but it is going in the right direction...


oldcarman

Zorg Guru (V)
Supporter
Canadian Zeds
The M44 Massive
Joined
Feb 11, 2014
Points
188
Location
Pine Falls Manitoba can.
Model of Z
1.9 M44
Looks absolutely great Lee and I'm not particularly a fan of blue!! Job well done can't wait to see the completed job! JIM
 

billz

Zorg Expert (II)
Supporter
British Zeds
Joined
Dec 4, 2011
Points
226
Location
Langley Mill
Model of Z
Z4 3.0si Individual Ruby Black Last one produced in this colour combo
Excellent job you are doing. :thumbsup:
 

Grumps

Always happy, apart from when I'm not 🤬
Supporter
British Zeds
Joined
Apr 27, 2014
Points
226
Location
Forest Town, Mansfield
Model of Z
Z4 e85 2.5i
Blimey you don't hang about do ya! Looking good Lee.
 

bertiejaffa

Zorg Guru (III)
Supporter
British Zeds
Joined
Mar 15, 2014
Points
135
Location
Manchester
Model of Z
Z3M
Looks absolutely great Lee and I'm not particularly a fan of blue!! Job well done can't wait to see the completed job! JIM
Excellent job you are doing. :thumbsup:
Blimey you don't hang about do ya! Looking good Lee.
Thanks all - I'll keep the posts coming when I do a bit more, in the meantime I am just enjoying having the top down for the last 2 days and not having to worry about the music switching off !!
 

bertiejaffa

Zorg Guru (III)
Supporter
British Zeds
Joined
Mar 15, 2014
Points
135
Location
Manchester
Model of Z
Z3M
Lee, as always I applaud your commitment, glad to see the sun visors seeing some sun!
Aye, you're a star... it meant my original visors have joined the Z3M parts museum in the loft.... I might have to take the vinyl off to mak the new leather fit better to be honest as they are a very tight fit at present...
 
Top