Continued from Part 1 (Vacuum and Electrical M54B25 on M52TU - Part 1)...
Connection #10
Hard plastic pipe from center bottom of manifold to port on VANOS:


Connection #11
Large vacuum hose from power brake unit to valve just right of throttle cable/body


Connection #12
Pressure regulating valve (CCV) underside of manifold to Y connector on oil dipstick tube


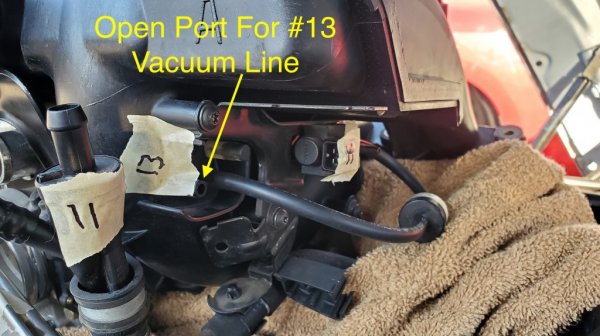
Connection #13
Blue vacuum hose (fuel system breather/vapour) to port on left rear of manifold


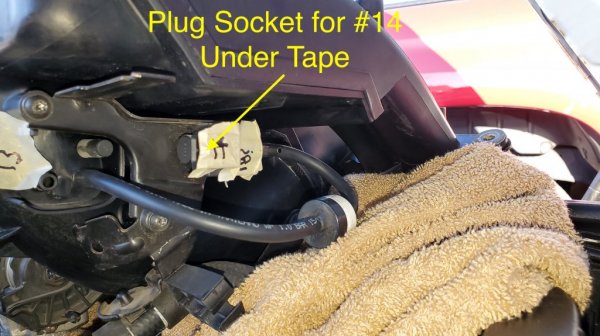
Connection #14
Plug from Engine Wiring Harness to socket at left rear of manifold


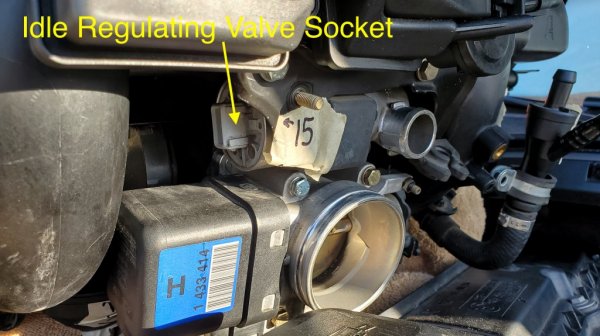
Connection #15
Engine Wiring Harness plug to Idle Regulating Valve socket


Connection #16
Plug originating from camshaft sensor to socket on bottom of Engine Wiring Harness

Connection #17
Vacuum line from Fuel Pressure Regulator along firewall to top rear nipple of injector fuel rail

Connection #18
Very thin vacuum line from upper left side of firewall to port on rear of manifold


Connection #19
From Intake Distribution Piece, between 1st and 2nd cylinders, 90 degree quick connect to Y in hose (CCV)...


Connection #20
Vacuum hose from rear of Intake Distribution piece to port on #19 hose (CCV)

Connection #10
Hard plastic pipe from center bottom of manifold to port on VANOS:


Connection #11
Large vacuum hose from power brake unit to valve just right of throttle cable/body


Connection #12
Pressure regulating valve (CCV) underside of manifold to Y connector on oil dipstick tube


Connection #13
Blue vacuum hose (fuel system breather/vapour) to port on left rear of manifold


Connection #14
Plug from Engine Wiring Harness to socket at left rear of manifold


Connection #15
Engine Wiring Harness plug to Idle Regulating Valve socket


Connection #16
Plug originating from camshaft sensor to socket on bottom of Engine Wiring Harness

Connection #17
Vacuum line from Fuel Pressure Regulator along firewall to top rear nipple of injector fuel rail

Connection #18
Very thin vacuum line from upper left side of firewall to port on rear of manifold


Connection #19
From Intake Distribution Piece, between 1st and 2nd cylinders, 90 degree quick connect to Y in hose (CCV)...


Connection #20
Vacuum hose from rear of Intake Distribution piece to port on #19 hose (CCV)

Last edited:

