Time for an overhaul of my 1.9 '98 BMW Z3 Individual

Jack Ratt

Zorg Expert (I)
Supporter
British Zeds
The West Country
Joined
Dec 3, 2013
Points
200
Location
TRURO, CORNWALL
Model of Z
2.8i AUTO and 2.8i MANUAL
cheers mate...I never gave it a thought before, was just going to get M8x22!.. I inherited my Dad's tools and part of that is a box full of "come in handy" bolts....I wonder!
The grade should be marked on the head of the bolt. IE, 8.8 is grade 8, 10.9 is grade 10.

Don't know if you're aware, but the second number denotes the bolts yield value. On a grade 10 bolt "10.9" means the yield is at 90% of ultimate tensile strength. The first number, 10 means it's ultimate tensile strength is 100kN/mm2
 
Last edited:

Matt Barnes

Zorg Guru (II)
Supporter
British Zeds
Joined
Jul 18, 2020
Points
123
Location
Portchester, Fareham
Model of Z
1998 BMW Z3 Individual 1.9 M44 B19
The grade should be marked on the head of the bolt. IE, 8.8 is grade 8, 10.9 is grade 10.

Don't know if you're aware, but the second number denotes the bolts yield value. On a grade 10 bolt "10.9" means the yield is at 90% of ultimate tensile strength.
wow....thanks!.. I know I definitely have some 8.8 bolts..so I'll have a rummage!
 

Mazza

Zorg Guru (V)
Supporter
British Zeds
The M44 Massive
Joined
Nov 1, 2017
Points
175
Location
Bognor Regis
Model of Z
Z3 1.9 M44 Roadster Z3 2.8 Project
Just been reading all this Matt …..Fun isn’t it

I’m not a million miles away in Bognor if you need a second pair of hands at any time 😂
 

Matt Barnes

Zorg Guru (II)
Supporter
British Zeds
Joined
Jul 18, 2020
Points
123
Location
Portchester, Fareham
Model of Z
1998 BMW Z3 Individual 1.9 M44 B19
well.... today was the day.... took off the heatshield and I must have had the gods looking down on me.. none of them snapped

1690647175281.png


so the new exhaust I had fitted a few years back came with a O2 sensor that was clearly not made for my car !.. it was swinging in the breeze !

1690647259972.png


underside is very tidy I must say

1690647324561.png


1690647353542.png


dodgy sill I need to attack with Bilt Hamber @DrWong !

1690647408488.png


I think the pipes are original as when I scraped off the black paint... the pipes were clean copper underneath

1690647486546.png


driveshafts are still very decent !

1690647523622.png


Needed "The Persuader" for the Propshaft bolts

1690647566160.png


Crimped, then cut the brake lines... fixings weren't having it

1690647616503.png


Slightly precarious but it worked ....complete with my Parkside Nugga !!

1690647650284.png


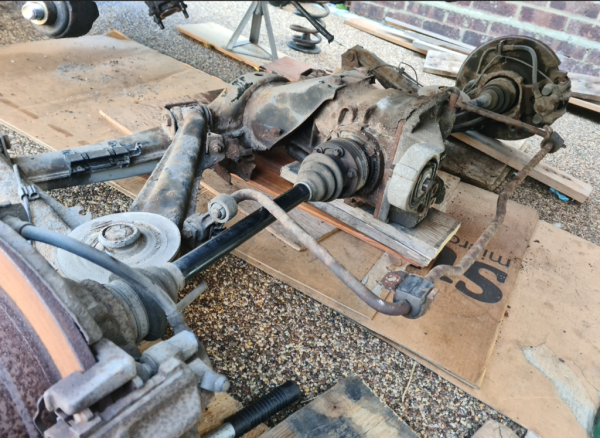
aaaaaaand.... wallop.... subrame out

1690647685587.png


Used the Anti Roll Bar as a handle !!

1690647788158.png


1690647821337.png


dragged it on planks into the garage
1690647917933.png


so now starts the strip down.. underside of the car is remarkably clean... ends of the sills need a few sessions of Bilt Hamber but nothing really on the body that worries me at the moment
 

Attachments

Matt Barnes

Zorg Guru (II)
Supporter
British Zeds
Joined
Jul 18, 2020
Points
123
Location
Portchester, Fareham
Model of Z
1998 BMW Z3 Individual 1.9 M44 B19
Just been reading all this Matt …..Fun isn’t it

I’m not a million miles away in Bognor if you need a second pair of hands at any time 😂
cheers Malc.... yeah getting to you for the Tank straps didn't take as long as I thought... My Aunt lives in Bognor but must say, before coming to you I hadn't been there in donkeys
 

DrWong

Zorg Guru (III)
Joined
May 8, 2017
Points
125
Model of Z
3.0i
Excellent work mate and does look very clean under there. You may find the rust has gotten in under the thick seam sealer and travelled further back under what looks like good paint. At least that was my experience. You'll soon find out when you start stripping the obviously nasty stuff. I found rust under the seam sealer from the front of the sills to at least six inches into the floor pan. I stopped at that point because it was getting cold (for the time of year) with the intention of going back to it.
 

Matt Barnes

Zorg Guru (II)
Supporter
British Zeds
Joined
Jul 18, 2020
Points
123
Location
Portchester, Fareham
Model of Z
1998 BMW Z3 Individual 1.9 M44 B19
Excellent work mate and does look very clean under there. You may find the rust has gotten in under the thick seam sealer and travelled further back under what looks like good paint. At least that was my experience. You'll soon find out when you start stripping the obviously nasty stuff. I found rust under the seam sealer from the front of the sills to at least six inches into the floor pan. I stopped at that point because it was getting cold (for the time of year) with the intention of going back to it.
yeah I'm just going to focus on the back end for now..was going to flip it round once I'd done the back to start the front..but might wait.... oh..and the car is now SORN'd which will save some pennies !
 

Matt Barnes

Zorg Guru (II)
Supporter
British Zeds
Joined
Jul 18, 2020
Points
123
Location
Portchester, Fareham
Model of Z
1998 BMW Z3 Individual 1.9 M44 B19
in terms of undersealing...what are peoples weapon of choice?...I'll end up using lechlar as an epoxy primer, but is there a 'go to' underseal?.. or gravel paint?.. cheers
 

DrWong

Zorg Guru (III)
Joined
May 8, 2017
Points
125
Model of Z
3.0i
Internet says Tiger Seal, but it's expensive and any similar polyurethane sealant should do the trick. I used Everbuild Puraflex 40, which is available for £3 off eBay having just checked. It's held up fine on my car.

Resealing a tube of sealant to use later(e.g. jabbing a screw into the nozzle) rarely works in my experience and it always just goes off in the tube regardless. On that basis, I reckon best just to cheap out, i.e. better to throw away half a tube of £3 Puraflex vs. half a tube of £10 Tiger Seal.
 

DrWong

Zorg Guru (III)
Joined
May 8, 2017
Points
125
Model of Z
3.0i
I went bare metal > Lechlar epoxy primer > Puraflex 40 underseal where it was needed > Lechlar on top of the underseal to act as primer > colour coded rattle can for top coat > rattle can lacquer
 

Matt Barnes

Zorg Guru (II)
Supporter
British Zeds
Joined
Jul 18, 2020
Points
123
Location
Portchester, Fareham
Model of Z
1998 BMW Z3 Individual 1.9 M44 B19
I went bare metal > Lechlar epoxy primer > Puraflex 40 underseal where it was needed > Lechlar on top of the underseal to act as primer > colour coded rattle can for top coat > rattle can lacquer
cheers mate....I'll go bare metal on the sills definitely...underside looks very solid apart from a few places where the seam sealer has split..I'm quite liking green undercarriage.... sorry @DrWong did you mean that as seam sealer ?....or underseal ?
 
Last edited:

Matt Barnes

Zorg Guru (II)
Supporter
British Zeds
Joined
Jul 18, 2020
Points
123
Location
Portchester, Fareham
Model of Z
1998 BMW Z3 Individual 1.9 M44 B19
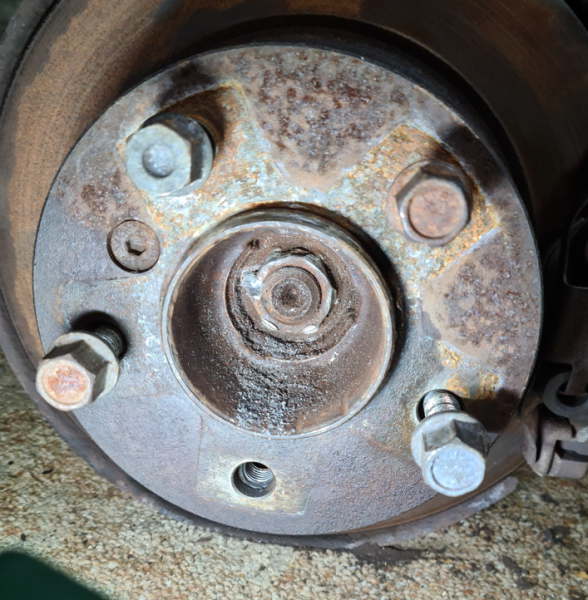
So after yesterday's euphoric progress, today I hit my first hurdle.... was intending just clearing up from yesterday, and the driveshafts were just staring at me.... "undooooo meeeee...undooooo meeeee".... so I did..... Torx bolts came out simple enough (I'd already bought the correct socket).... then thought I'd use the nugga on the wheel nut, accidentally picked the wrong socket (32mm) and rounded it off... tried a 30mm and a breaker bar but no dice......guess I could try drilling into the side of it to weaken it maybe

1690719977548.png
 

Mazza

Zorg Guru (V)
Supporter
British Zeds
The M44 Massive
Joined
Nov 1, 2017
Points
175
Location
Bognor Regis
Model of Z
Z3 1.9 M44 Roadster Z3 2.8 Project
Is your socket 6 or 12 point? Looking at the nut a Six point should work on it ?
 

Matt Barnes

Zorg Guru (II)
Supporter
British Zeds
Joined
Jul 18, 2020
Points
123
Location
Portchester, Fareham
Model of Z
1998 BMW Z3 Individual 1.9 M44 B19
Is your socket 6 or 12 point? Looking at the nut a Six point should work on it ?
Hi Malc.... the 32mm was 12 point and I have a 30mm 12 point and one 6 point... tried both... tried the 6 point with a breaker bar..it catches, then pings off.. might try it with a nugga...the nut is shot anyway... if that fails I might need to drill into it.... cheers
 

Matt Barnes

Zorg Guru (II)
Supporter
British Zeds
Joined
Jul 18, 2020
Points
123
Location
Portchester, Fareham
Model of Z
1998 BMW Z3 Individual 1.9 M44 B19
well...... the 30mm on the nugga turned it into a perfect circle.... =))

so when technology fails..you resort to human basic instinct...... violence.. :D

used progressively larger drill bits to create a cavity... then trying crow bar and hammer to split the nut...it's not budging so far... but it will !!

1690726872927.png
 

Attachments

Last edited:

Althulas

Zorg Guru (V)
Supporter
British Zeds
Joined
Jun 14, 2014
Points
198
Location
Banburyshire
Model of Z
M Roadster
I used the epoxy paint primer and tiger seal using a mixture of a sponge, roller and a brush cut short to achieve a stippled effect but I also used some stone chip spray which was rather good and over paintable but can not remember what make it was and used some 3m stuff that I had to remove after over painting it caused a reaction. If you have a compressor you can get the 3m Schultz stuff that will give you that perfect oem finish.
 

Matt Barnes

Zorg Guru (II)
Supporter
British Zeds
Joined
Jul 18, 2020
Points
123
Location
Portchester, Fareham
Model of Z
1998 BMW Z3 Individual 1.9 M44 B19
I used the epoxy paint primer and tiger seal using a mixture of a sponge, roller and a brush cut short to achieve a stippled effect but I also used some stone chip spray which was rather good and over paintable but can not remember what make it was and used some 3m stuff that I had to remove after over painting it caused a reaction. If you have a compressor you can get the 3m Schultz stuff that will give you that perfect oem finish.
cheers mate...I'm not professional enough to have a compressor...I can blow pretty hard though 😄....think some form of stone chip could do the job
 

Matt Barnes

Zorg Guru (II)
Supporter
British Zeds
Joined
Jul 18, 2020
Points
123
Location
Portchester, Fareham
Model of Z
1998 BMW Z3 Individual 1.9 M44 B19
So in the latest round of Man v Hub Nut.... the scores are in

Man - 0.... Hub Nut 3 drill bits, 4 Dremel bits one bent punch....but i think it's getting smaller =))

1690912843497.png
 

Mint

Zorg Expert (I)
Supporter
British Zeds
East Anglian Crew
Joined
Sep 23, 2012
Points
222
Location
Stafford
Model of Z
2.2 & 3.0 Sport
It's definitely fighting you to the end. Of course once you get the nut off the next fight will be getting the hub and drive shaft apart ;)
But on a positive note, you're doing a great job and I'm following your progress:thumbsup:
 
Top