Revshift diff raiser kit Z3

Dino D

Zorg Guru (V)
British Zeds
Joined
Mar 28, 2014
Points
176
Location
Kent
Model of Z
2.8 Manual
Thinking about winter work on the never-ending project that is the Z3!

Bringing this up for discussion to check the latest., I know at least @Delk and a couple of others have them fitted.

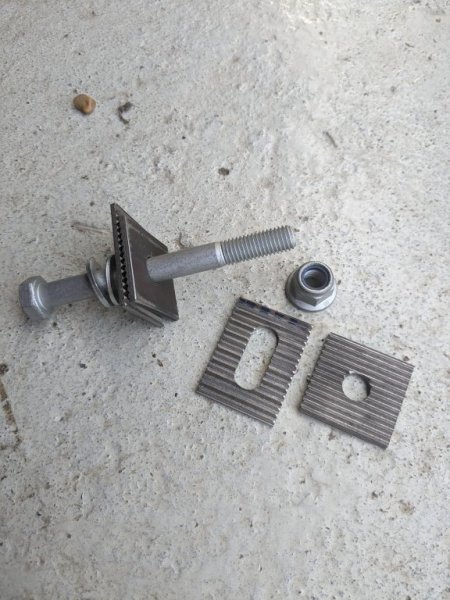
Riser 'kit'

Bushes to go with the kit

I've emailed revshift to find out of I ned just the kit or must I replace the bushes (I already have Powerflex purple in perfect condition in there..)

I'm going to raise the car by at least 10mm as the roads and speed bumps round here dictate it. I don't know how it will impact on track cornering but if it becomes a bit too 'rolly' I will look at beefier ARB's. Given I have BC racing 6 / 8 kg F/R I hope it won't be adversely affected by the increase in ride it. Will hurt my aero though(!)

My thinking that the 12mm riser kit plus 10-15mm suspension raise will help bring the camber down from around 4deg closer to 3 (I believe 2,5 is ideal) as well as correcting the toe - it is apparently the increase in toe out that makes it more skittish on bumpy roads and hammer the tyres, rather than the camber (conversely this makes it turn in very easily and can give an oversteer led balance in corners, which is awesome in the dry, but not so awesome on a wet Brands Hatch!)

If I'm still not happy then the weld in kit that allows proper correction will be next step but that requires proper welding skills (=£££).


Thoughts and experience welcome as always!
 

IainP

Zorg Guru (II)
British Zeds
Joined
Feb 20, 2019
Points
119
Location
Out of my Tree, North of Perth, Scotland
Model of Z
1.9
Unless you’re running a negative rake the front crossmember should be the lowest point surely?
Or is the rear raise kit in order to raise the exhaust pipes? in which case use oval pipes.

“If I'm still not happy then the weld in kit that allows proper correction will be next step but that requires proper welding skills (=£££).”

It’s not the welding, that takes just a few minutes, it’s the lining up and cutting that takes time. Having done it, next time I’ll line it up, weld it, THEN cut the slots. It would be both faster and easier.
 

Dino D

Zorg Guru (V)
British Zeds
Joined
Mar 28, 2014
Points
176
Location
Kent
Model of Z
2.8 Manual
I missed off an important detail:


If I remember correctly @Antm72 fitted these subframe bushes that straightens up the geometry. They work by lifting the subframe by 12mm to correct the camber and then spacers are used on the diff bolts to drop it by the same amount so the drive shaft stays at the same level. Clever stuff.
So they lift the subframe up by 12mm and the spacers are for lining up the diff properly.
 

Dino D

Zorg Guru (V)
British Zeds
Joined
Mar 28, 2014
Points
176
Location
Kent
Model of Z
2.8 Manual
Unless you’re running a negative rake the front crossmember should be the lowest point surely?
Or is the rear raise kit in order to raise the exhaust pipes? in which case use oval pipes.

“If I'm still not happy then the weld in kit that allows proper correction will be next step but that requires proper welding skills (=£££).”

It’s not the welding, that takes just a few minutes, it’s the lining up and cutting that takes time. Having done it, next time I’ll line it up, weld it, THEN cut the slots. It would be both faster and easier.
Great advice, do you have any pics and measurements to see how the camber and toe is now?
Were you able to correct the toe as well or just the camber?
 

AntStark

Zorg Guru (III)
Supporter
British Zeds
Joined
May 15, 2021
Points
139
Location
Hampshire
Model of Z
2002 3.0 Sport
I am going to ask the question everyone is thinking. What does this kit do and why ? Genuinely curious .. thnx
 

Rudyrov

Zorg Guru (I)
American Zeds
Joined
Jan 29, 2014
Points
95
Location
Phoenix, AZ
Model of Z
2.8 L Roadster
These polyurethane bushings will stiffen the rear subframe. They are
available in "stock height" to retain the stock suspension geometry or
"12mm" to raise the subframe to correct severe negative camber.
 

AntStark

Zorg Guru (III)
Supporter
British Zeds
Joined
May 15, 2021
Points
139
Location
Hampshire
Model of Z
2002 3.0 Sport
I get the subframe bit..but do Zeds suffer from issues with severe negative camber ? Sorry for the dumb questions..every day is a school day ..just trying to understand the problem these solve …thanks
 

IainP

Zorg Guru (II)
British Zeds
Joined
Feb 20, 2019
Points
119
Location
Out of my Tree, North of Perth, Scotland
Model of Z
1.9
Ahh, riiight, I get this now, to try and correct the toe/camber when heavily lowered and get back to some sort of normal camber curve. ??
Adjustable toe/camber is a lot better than just hoping. I know semi trailing arms are much maligned, but the e30 M3’s didn’t do too badly, or the 911, weight distribution excepted. Take any suspension design out of it’s intended range and bad things happen. My Fiero is a case in point, but we won’t go there.

Imo anyway.
But then I wouldn’t/won’t be lowering mine excessively, i leave that carry on to my son with his 24mm ground clearance e36. I want some suspension travel and I’d rather control that with springs and arb’s. If you go really low it starts to mess with roll centers v cog, well everything really, it’s going to be well out of the intended camber curve with nasty toe change under braking. Even with poly, I’d want solid beam bushes. Does anyone make solid?
@Dino D

Great advice, do you have any pics and measurements to see how the camber and toe is now?
Were you able to correct the toe as well or just the camber?”

I’ll take some tomorrow, I have masses of adjustment for both toe and camber, far more than I’ll need I think.
I fitted the plates ‘centered’, would be just as easy to offset either to correct a stupidly excessive reading.
Having done it, the easiest way, probably quickest too, is to clamp the beam to something solid. Level it in both planes. Clamp (lightly) on the plates, centered or offset, level them to the plane with the bolts inserted and using plain nuts. Tighten, double check. Tack. Triple check. Weld. Grind out the slots with tungsten carbides in a Dremel/die grinders/tool of choice. Polish. Trial fit and shorten the bolts.
I have a spare beam, I plan on 10” rear wheels with my original narrow rear arms at some time. That’s how I’ll do it.
 

Delk

Zorg Guru (III)
British Zeds
Joined
Oct 9, 2018
Points
125
Location
Hemsby Norfolk
Model of Z
Z3 2.8 real widebody
My grey car got the 12mm raised subframe and also the weld in toothed adjusters.

For my lowered car the 12mm lift wasn't enough. Really easy to do and only fight was getting the stock bushings out of the cross member. The diff spacers are just to lower it back down so the driveshaft and diff mount remain the same.

If you have basic welding skills the adjusters are not hard either. I aligned the plates using the original holes with them offset in the direction where I needed the adjustment and welded them in. They are just 30mm squares so nothing complicated. Then I took a burr bit grinder and slotted the subframe using the plates as guides.

The hardest part was aligning the rear the first time. I didn't have a lift then so it was a lot of up and down with trolley jacks. Would make an adjustment, drop the car down, roll it back and forth to settle the suspense then measure again. It was the most advanced alignment equipment I had in my garage. Spirit level and tape measure for the camber. Toe was checked with string and the same calibrated tape measure.

It was crude and took hours but was worth it. When I took it down to get the alignment checked it was spot on for what I wanted and didn't need any further changes. Toe is was spot on and camber was around 2 degrees. I wanted a pretty flat setup since I am running wide rears.

Ann-Maries blue car has the bushings installed and is lowered. I had a good amount of camber and suffers inner wear. This winter it will get the same adjusters welded inm
 

Delk

Zorg Guru (III)
British Zeds
Joined
Oct 9, 2018
Points
125
Location
Hemsby Norfolk
Model of Z
Z3 2.8 real widebody
These are the same adjusters in my car. Positive locking unlike the concentric bushings.

PXL_20230910_074637572.jpg
 

Delk

Zorg Guru (III)
British Zeds
Joined
Oct 9, 2018
Points
125
Location
Hemsby Norfolk
Model of Z
Z3 2.8 real widebody
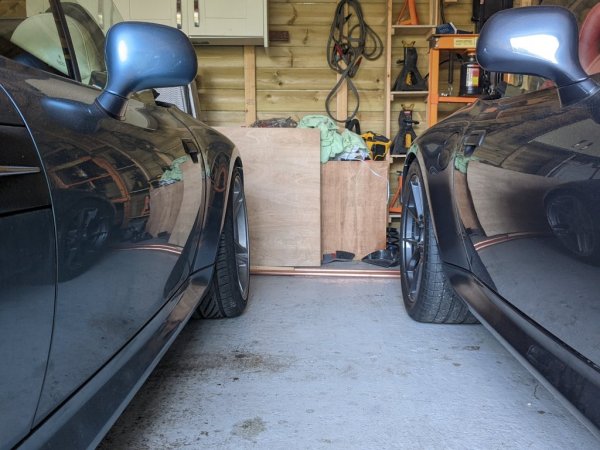
One more photo.

12mm raised subframe on the left. 12mm raised subframe and adjusters on the right. Very noticable difference in the amount of camber.

PXL_20230910_074814197.jpg
 
Top