
Our journey began in 2019, accepting the keys in a Shop Rite parking lot BUSSIN’ that throttle open to my hearts content. Five years later, (two years being a sitting duck) here we are.


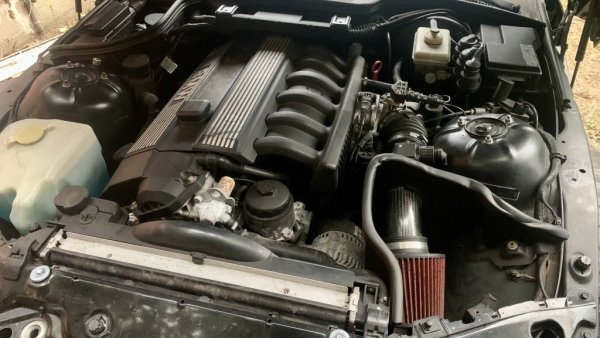
Majority of my time with my 2.8 the car was covered/uncovered on pavement driveway. Once it was sitting, it stayed parked on driveway covered. We never had problems with rats or mice, I found no nesting or debris at all aside from spiders and webs. I have no rust on my exterior, no rot so far in the engine bay or undercarriage that I’d been able to find & I want to keep it that way. (I have NOT removed my sills, but I WILL - stay tuned) I do have oxidation on some of my bare metals. Before I get ahead of myself, first a little 101 on my lil treasure. He’s a 1998 2.8L six cylinder roadster. The gentleman I bought it from added M model accessories but it is NOT a M model. It is the 2.8. I have the stock double over-head camshaft, mounted in line 6 with my tranny bolted on the rear end. It has been upgraded with a K&N cold air intake (cone filter), as well as a scorpion exhaust and tail pipe. Aside from that slight oxidation on my metals, everything is intact so far. I had a cracked intake boot which I replaced with an OEM boot I managed to get my hands on. However, the lower hose leading from the bottom of the intake boot to the side of the engine is cracked at the top where it meets the boot. So I will have to replace that as well. And the main issue I’ve struggled with is the ongoing hazards. I’ve read allot on it, and I have plenty to troubleshoot and try regarding that issue. It is why I have left the battery disconnected. Any input on experience with that is appreciated!
He’s wearing 18” wheels and tires 🛞, currently wearing DRY ROTTED Kenda Kaisers 265/35ZR18 in the rear, 225/40R18 in the front. These tires WILL BE SWITCHED sooner than later. I intend on keeping the size specs the same. Currently looking into buying tires within the next few weeks. My dad is keeping my hopes high that after a clean and some driving my rotors will look much better, but I’m keeping all the wheel and brake part numbers handy for peace of mind.


The stock stereo system was swapped for a simple but superior Sirius XM Bluetooth stereo. My speaker covers are rusted, I intend on popping those, cleaning them up and repainting them.

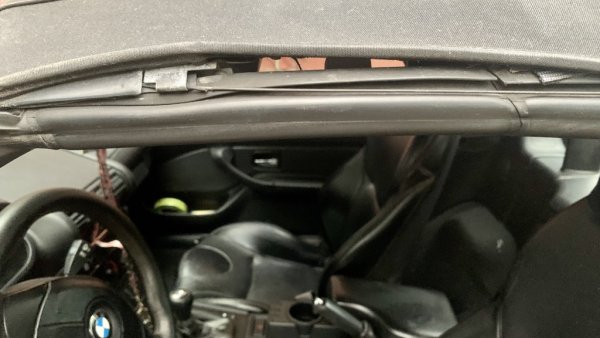
I do have the usual glove box sag, and although I don’t experience rocking seats I DO have the bushing kit for the seat issue which I intend on installing because I have to remove my seats regardless. Why? You may not be able to tell from these pictures, I was too ashamed to take any of it before 🫣 but due to this little problem with my top, as well as a missing rubber retainer in the rear


I was cursed with an exceptional amount of surface mold in my interior, mostly on the carpets and some rust in my truck. I spent three days, each day thoroughly on each section, to the BEST of my ability, cleaned, detailed, sanitized & disinfected every inch of what I could access with success! I cleaned so much, I got my very first crack in my passenger seat leather IF YOUR LEATHER FEELS DRY, CONDITION!! I was so worried about everything being sanitized that I neglected to condition and my passenger seat paid for it. It’s not terrible, I’m sure. But, you can bet I went out that very moment and did a full condition treatment on all the leather in the interior. Again, with great success!
 Here is a full list of everything I used for the cleaning and conditioning treatment of the interior:
* Chemical Guys All Purpose Cleaner, Disinfectant & Degreaser
* Tuff Stuff Multi-Purpose Foam Cleaner (red & yellow can)
* Turtle Wax Carpet Cleaner w/ Oxi
* Turtle Wax Multi-Purpose Interior Spray w/ Oxi
* Armor All Power Vac w/ attachments
* BOUNTY of Microfiber Towels
* Carpet Brush (handheld hard bristle brush)
* Paper Towels
* Sprayway Glass Cleaner
* Sprayway Leather Cleaner
* Griot’s 3-1 Leather Cleaner & Conditioner
* Leather Honey Leather Conditioner
* WD40 (was used in locks, latches, hinges)
I’m contemplating using some black to black plastic/vinyl restore, as well as some vinegar lemon solution for the back window. Any recommendations or advice is 100% welcome! I can’t see any mildew or grime under the seats with a flashlight but it’s wishful thinking to believe I could get away without cleaning underneath them as well. Not only for cleaning, but I developed an issue with my driver’s seat. It’s currently ALL the way back, from the last time my dad drove it. I’m only 5’0 so obviously I drive with it ALL the way forward. When I went to adjust this, I could not bring the seat forward. I can hear the motor working, but it almost seems as if the seat came off the track. It goes slightly forward and to the right towards my shifter then stops. This has resulted in it being stuck, only able to bring it all the way back again. Two good reasons to pop that sucker out, will do the same with passenger while I got the tools ready to go . Install the bushings, hopefully fix this issue with the seat alignment and the interior will be complete for the time being. Although, I do have a variety of upgrades in mind, one step at a time!
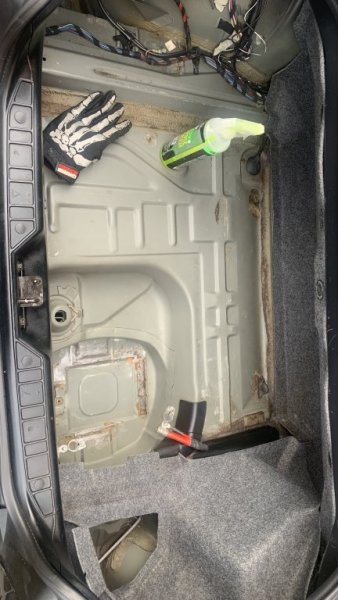
Currently, I’m working on the trunk. I sanded/brushed most of the rust out, a few more spots and it’ll be totally removed

 Once this is completed and sanded I will prep, apply rust prevention and paint. I’m currently looking into using Rustoleum to aid in removal, and POR15 with the top coat for rust prevention. Opinions are welcome as always.

Stay tuned as I make my way through this beauty!🛞
Yours truly - eastsideshego on PROJECT HALF PINT

Majority of my time with my 2.8 the car was covered/uncovered on pavement driveway. Once it was sitting, it stayed parked on driveway covered. We never had problems with rats or mice, I found no nesting or debris at all aside from spiders and webs. I have no rust on my exterior, no rot so far in the engine bay or undercarriage that I’d been able to find & I want to keep it that way. (I have NOT removed my sills, but I WILL
- stay tuned) I do have oxidation on some of my bare metals. Before I get ahead of myself, first a little 101 on my lil treasure. He’s a 1998 2.8L six cylinder roadster. The gentleman I bought it from added M model accessories but it is NOT a M model. It is the 2.8. I have the stock double over-head camshaft, mounted in line 6 with my tranny bolted on the rear end. It has been upgraded with a K&N cold air intake (cone filter), as well as a scorpion exhaust and tail pipe. Aside from that slight oxidation on my metals, everything is intact so far. I had a cracked intake boot which I replaced with an OEM boot I managed to get my hands on. However, the lower hose leading from the bottom of the intake boot to the side of the engine is cracked at the top where it meets the boot. So I will have to replace that as well. And the main issue I’ve struggled with is the ongoing hazards. I’ve read allot on it, and I have plenty to troubleshoot and try regarding that issue. It is why I have left the battery disconnected. Any input on experience with that is appreciated! He’s wearing 18” wheels and tires 🛞, currently wearing
DRY ROTTED Kenda Kaisers 265/35ZR18 in the rear, 225/40R18 in the front. These tires WILL BE SWITCHED sooner than later. I intend on keeping the size specs the same. Currently looking into buying tires within the next few weeks. My dad is keeping my hopes high that after a clean and some driving my rotors will look much better, but I’m keeping all the wheel and brake part numbers handy for peace of mind.The stock stereo system was swapped for a simple but superior Sirius XM Bluetooth stereo. My speaker covers are rusted, I intend on popping those, cleaning them up and repainting them.
I do have the usual glove box sag, and although I don’t experience rocking seats I DO have the bushing kit for the seat issue which I intend on installing because I have to remove my seats regardless. Why? You may not be able to tell from these pictures, I was too ashamed to take any of it before 🫣 but due to this little problem with my top, as well as a missing rubber retainer in the rear
I was cursed with an exceptional amount of surface mold in my interior, mostly on the carpets and some rust in my truck. I spent three days, each day thoroughly on each section, to the BEST of my ability, cleaned, detailed, sanitized & disinfected every inch of what I could access with success! I cleaned so much, I got my very first crack in my passenger seat leather
IF YOUR LEATHER FEELS DRY, CONDITION!! I was so worried about everything being sanitized that I neglected to condition and my passenger seat paid for it. It’s not terrible, I’m sure. But, you can bet I went out that very moment and did a full condition treatment on all the leather in the interior. Again, with great success!Here is a full list of everything I used for the cleaning and conditioning treatment of the interior:* Chemical Guys All Purpose Cleaner, Disinfectant & Degreaser
* Tuff Stuff Multi-Purpose Foam Cleaner (red & yellow can)
* Turtle Wax Carpet Cleaner w/ Oxi
* Turtle Wax Multi-Purpose Interior Spray w/ Oxi
* Armor All Power Vac w/ attachments
* BOUNTY of Microfiber Towels
* Carpet Brush (handheld hard bristle brush)
* Paper Towels
* Sprayway Glass Cleaner
* Sprayway Leather Cleaner
* Griot’s 3-1 Leather Cleaner & Conditioner
* Leather Honey Leather Conditioner
* WD40 (was used in locks, latches, hinges)
I’m contemplating using some black to black plastic/vinyl restore, as well as some vinegar lemon solution for the back window. Any recommendations or advice is 100% welcome! I can’t see any mildew or grime under the seats with a flashlight but it’s wishful thinking to believe I could get away without cleaning underneath them as well. Not only for cleaning, but I developed an issue with my driver’s seat. It’s currently ALL the way back, from the last time my dad drove it. I’m only 5’0 so obviously I drive with it ALL the way forward. When I went to adjust this, I could not bring the seat forward. I can hear the motor working, but it almost seems as if the seat came off the track. It goes slightly forward and to the right towards my shifter then stops. This has resulted in it being stuck, only able to bring it all the way back again. Two good reasons to pop that sucker out, will do the same with passenger while I got the tools ready to go . Install the bushings, hopefully fix this issue with the seat alignment and the interior will be complete for the time being. Although, I do have a variety of upgrades in mind, one step at a time!
Currently, I’m working on the trunk. I sanded/brushed most of the rust out, a few more spots and it’ll be totally removed
Stay tuned as I make my way through this beauty!
🛞Yours truly - eastsideshego on PROJECT HALF PINT
Attachments
-
 137.7 KB Views: 6
 -
 112.2 KB Views: 6
 -
 83.2 KB Views: 5
") , Knock off any powdery stuff first with a stiff brush. that way you dont have to disassemble anything, I did mine that way 2 years ago and they were worse than yours are, and the rear ones probably need it too... Still look good ...
, Knock off any powdery stuff first with a stiff brush. that way you dont have to disassemble anything, I did mine that way 2 years ago and they were worse than yours are, and the rear ones probably need it too... Still look good ...
 Or would I be alright to just re-oil at this point?

 for sure. Thank you kindly for the input, it helps.
 just to keep anything, or anyone
  out in the mean time.
 on the terminals holding them, to be a ground. NOT RECOMMENDED, DON’T EVER DO THAT. But we got power throughout the car. Everything lit up, but we got no start. (That’s a whole other post) HOWEVER, we DID get power. So I’m sure some of you already have seen critical errors on my behalf, but that’s what learning is about right?
 blew my main fuse.
 Hopefull I’ll get power back through this thing.