How do the outer sills actually come off?

DrWong

Zorg Guru (III)
Joined
May 8, 2017
Points
125
Model of Z
3.0i
Just stripping down the Z down for the first time to treat the inner sills. Been following instructions as per https://zroadster.org/articles/bmw-z3-sill-removal-and-protection.67/ and managed to get everything loosened off. The sill moves freely now.

I’m stumped on how to actually take the sill off the car though. Seems whichever way I move it something is in the way, such as the door or the securing tab for the rear wing. Does the rear wing have to come off?!

Have tried moving the sill forwards, backwards, down etc and and just can’t seem to get the clearance needed:(

Any help much appreciated, thanks!:thumbsup:
 

Grumps

Always happy, apart from when I'm not 🤬
Supporter
British Zeds
Joined
Apr 27, 2014
Points
226
Location
Forest Town, Mansfield
Model of Z
Z4 e85 2.5i
I believe you have to remove the small front wings and rear wings to get them properly.
@Sean d
 

Mazza

Zorg Guru (V)
Supporter
British Zeds
The M44 Massive
Joined
Nov 1, 2017
Points
175
Location
Bognor Regis
Model of Z
Z3 1.9 M44 Roadster Z3 2.8 Project
If all the bolts off then they just pull off. The rear wing needs to be eased out and the door open.
Is all the trim round the door undone?
E39C5E76-1269-4B5A-AE58-5E260B054B80.jpeg


616A7CDC-C429-4C35-A245-E81D9B96C9B4.jpeg

6424A6F5-0D89-4E43-AC33-C181493D555A.jpeg
 

DrWong

Zorg Guru (III)
Joined
May 8, 2017
Points
125
Model of Z
3.0i
If all the bolts off then they just pull off. The rear wing needs to be eased out and the door open.
Is all the trim round the door undone?
View attachment 89262

View attachment 89263
View attachment 89264
Thanks mate. Yeah all the trim is removed, bolts undone and the sill can move around. When you say the sill should just pull off, do you mean I should be able just pull it straight out, away from the chassis? Because when I try that the lip of the sill catches the bottom corner of the door, which I've got wide open.

On the rear wing securing tab, I can see the sill's tab is sandwiched between the chassis tab and wing tab. Not entirely sure it's meant to be like that as it was preventing me from pulling the sill away from the car at the back. So will try and wiggle the sill enough to move its tab so that it's on the outside and try again tomorrow.

Cheers for the photos - good to know the rear wing doesn't actually have to come off. And your inner sills look in really good nick mate:thumbsup:
 

Mazza

Zorg Guru (V)
Supporter
British Zeds
The M44 Massive
Joined
Nov 1, 2017
Points
175
Location
Bognor Regis
Model of Z
Z3 1.9 M44 Roadster Z3 2.8 Project
You can definitely take them off without removing the rear wing. I have looked but I haven’t taken any pictures of that area. Dont know if this helps
35EDE47B-F968-4040-964C-1BD1EF996B84.png
 

DrWong

Zorg Guru (III)
Joined
May 8, 2017
Points
125
Model of Z
3.0i
Thanks Mazza, appreciate that

The more I think about, the more I think my difficulties are to do with the sill’s securing tab being trapped between the rear wing and chassis securing tabs
 

Nodzed

Zorg Expert (II)
Supporter
British Zeds
M Power
Joined
Feb 18, 2016
Points
231
Location
Forest of Dean, Gloucestershire, England
Model of Z
Z3M Imola and Z4 (e89)
As long as all the bolts are undone then the sill will come off with a pull. I had to loosen the rear wing bolts on the rear of the door recess to allow the tab to free up. I've had 2 sets off and had no issues personally.
 

DrWong

Zorg Guru (III)
Joined
May 8, 2017
Points
125
Model of Z
3.0i
As long as all the bolts are undone then the sill will come off with a pull. I had to loosen the rear wing bolts on the rear of the door recess to allow the tab to free up. I've had 2 sets off and had no issues personally.
Thanks mate. Makes sense it should just come off with a pull, as long as the sill tab isn’t stuck behind one of the tabs for the wing or chassis (which is what I think my problem is):thumbsup:
 

DrWong

Zorg Guru (III)
Joined
May 8, 2017
Points
125
Model of Z
3.0i
I am a ‘tard:
673C9AB3-FDF4-40BB-856D-6C7423886981.jpeg

Thank you all for your input. It did just come off by pulling straight away from the body. My mistake was assuming some kind of sliding forward or back was involved. In my defence, this is the first time I’ve done this:bag:
 

Mazza

Zorg Guru (V)
Supporter
British Zeds
The M44 Massive
Joined
Nov 1, 2017
Points
175
Location
Bognor Regis
Model of Z
Z3 1.9 M44 Roadster Z3 2.8 Project
Success. Good stuff. The other side will be easy !!!!
 

colb

Zorg Guru (V)
British Zeds
Joined
Nov 25, 2012
Points
178
Location
Newport, South Wales,UK
Model of Z
Z3 M43 1.8 (1999) and Z4 E85 2.0i (2007)
Good job, inners look very clean, give them a good coat of waxoyle as well as the outers when you have cleaned them up.
 

roadvoyager1

Zorg Guru (III)
British Zeds
Joined
Dec 1, 2013
Points
128
Location
Shotley Bridge
Model of Z
2.8ltr
Well done, that looks in pretty good condition. If you have not do so yet, take the jack pads out and check underneath. This was the worst area on mine for rust.
As well as painting the outer surface of the inner sill with Waxoyl or similar get some spray wax and apply it to the inside through the holes. Also make sure the drain holes underneath are clear.
 

DrWong

Zorg Guru (III)
Joined
May 8, 2017
Points
125
Model of Z
3.0i
Good job, inners look very clean, give them a good coat of waxoyle as well as the outers when you have cleaned them up.
Thanks mate, was really pleased when I saw the inner sills as I expecting them to be much worse given the state of the outer ones. Good shout on Waxoyle - bought some Bilt Hamber stuff as apparently they're the dog's danglies:)
 

DrWong

Zorg Guru (III)
Joined
May 8, 2017
Points
125
Model of Z
3.0i
Well done, that looks in pretty good condition. If you have not do so yet, take the jack pads out and check underneath. This was the worst area on mine for rust.
As well as painting the outer surface of the inner sill with Waxoyl or similar get some spray wax and apply it to the inside through the holes. Also make sure the drain holes underneath are clear.
I'd seen your previous comments re: jack pads and it was one of the first things I checked. They're mildly crispy on the surface but thankfully still very solid underneath. The sill ends are probably worse than the jack pads for me.

Thanks for flagging the drain holes as I wasn't aware of them:thumbsup: Are they on bottom of the chassis sill?
 

DrWong

Zorg Guru (III)
Joined
May 8, 2017
Points
125
Model of Z
3.0i
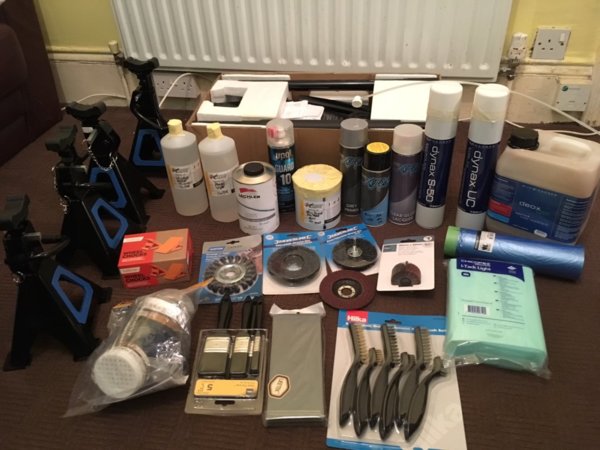
I was mildly horrified by the amount of stuff I had to acquire just to treat the two sills. I ordered all of this lot last week:
Sills n tings.JPG
We have 4x 2 tonne axle stands; 3 tonne trolley jack; chocks; epoxy primer + activator + thinner; panel wipe; stonechip paint; primer, topaz blue base coat and lacquer aerosols; Bilt Hamber Deox gel, S50 and UC waxes and injection lances; various flap wheels and discs; brushes; tack cloths; masking film; and AP1-P2 mask (safety first!)

Not pictured is a cheapo Dremel clone and 60 mini wire cup brushes that arrived from Amazon after all this lot
 
Last edited:

roadvoyager1

Zorg Guru (III)
British Zeds
Joined
Dec 1, 2013
Points
128
Location
Shotley Bridge
Model of Z
2.8ltr
Thanks for flagging the drain holes as I wasn't aware of them:thumbsup: Are they on bottom of the chassis sill?
Yes, the chassis sill is enbossed along the bottom egde. If you look carefully 2 of the emboses are larger and more rounded than the others. I used the end of a tie wrap to poke into them and make sure they were clear. They are drain holes for any moisture that gets into the sill.
 

DrWong

Zorg Guru (III)
Joined
May 8, 2017
Points
125
Model of Z
3.0i
Yes, the chassis sill is enbossed along the bottom egde. If you look carefully 2 of the emboses are larger and more rounded than the others. I used the end of a tie wrap to poke into them and make sure they were clear. They are drain holes for any moisture that gets into the sill.
Thank you roadvoyager, I would not have known to check for that otherwise
 
Top