Heated seats retrofit

Maxxxer

Dedicated Member
British Zeds
Joined
Aug 17, 2018
Points
32
Location
Staffordshire
Model of Z
2.8
So this weekend I made a start on replacing my seat bushes; managed to get the passenger side done (due to limited time, plus i wanted to try it as a practice run so if it was really hard i could still drive the car without the seat...).

When it was out, I notice there were two wires heading up into the seat which had been soldered on (as opposed to being on any kind of plug. these were promptly cut and terminated with Wago connectors, but it got me thinking....

My car doesn't have a switch for heated seats, and by the look of things these seats (or at least the one i took out) would suggest the actual heated seats are present. Can anyone confirm from my awful photos if this is the case?
file.jpeg
file1.jpeg
 

Jjim

Zorg Guru (IV)
British Zeds
Joined
Jul 21, 2017
Points
168
Location
Mansfield
Model of Z
1.9 Roadster
All Z3s have the wiring in place for heated seats. They all have the same internal wiring loom, which makes it really handy for retrofitting parts.

If yours didn't have heated seats, then you will need to add the switch to the centre console area and the connectors will be most likely tucked into the carpet.
For the seats, the seats will need to have the heating elements installed - not all seats have this. To see if your seats have the heating elements there is usually a few relays and wiring under the seat which go to a black connector block. In your first photo there are 2 main connector blocks for the seat - white one for that operates the seat motors and the black one that controls the heater elements.

Hope this makes sense.
 

Maxxxer

Dedicated Member
British Zeds
Joined
Aug 17, 2018
Points
32
Location
Staffordshire
Model of Z
2.8
I see - the white plug was connected under the seat; the black one had a plug to connect into, but nothing on the other side (i.e. the seat side) suggesting that they do not have the elements in then :(

Ah well - I need to concentrate on removing the gallons of water sat under the seats first (thanks to my leaky roof; didn't realise until it was too late, no i have a cover but very wet under-carpet sponges...).

Thankfully the hole is plugged, and I have a decent cover in place. I now need to remove the carpets to get to them and dry them out :grumpy:
 

Mazza

Zorg Guru (V)
Supporter
British Zeds
The M44 Massive
Joined
Nov 1, 2017
Points
175
Location
Bognor Regis
Model of Z
Z3 1.9 M44 Roadster Z3 2.8 Project
Been there and done that !!!!!=))
B5913203-3A5C-4FDE-B9CE-ECD436CCFC2B.jpeg


Mine was soaking under the passenger seat but dry under drivers seat.
Took about 3 or 4 days in the conservatory to dry it out. ( the carpet that is ....not the car :whistle:)
 

Maxxxer

Dedicated Member
British Zeds
Joined
Aug 17, 2018
Points
32
Location
Staffordshire
Model of Z
2.8
Wow that looks involved..!!

Is there a how to on here to carpet removal? I did try prising a few bits out but gave up as everything seemed to be tied in to the handbrake/gear console...
 

Mazza

Zorg Guru (V)
Supporter
British Zeds
The M44 Massive
Joined
Nov 1, 2017
Points
175
Location
Bognor Regis
Model of Z
Z3 1.9 M44 Roadster Z3 2.8 Project
Mine started as a hunt for all the loom connectors for retro fitting heated seats. And got it to this stage..
90A6F1BF-7CE8-4CBE-BD3F-6806F0E67D99.jpeg


But at this point put my hand under the carpet and found a lake !!!

So no choice but to take it all out
D21EFEE8-4642-46E4-AF72-9B851769C76B.jpeg


I had never worked on one of these cars before but it wasn’t difficult ....but had to workout the order in which it came apart...

If you want to see more photos showing where the carpet is fixed at the back, send a PM and l will reply with more info.
 
Last edited:

Space_coyote

Regular Member
Australian Zeds
Joined
Jan 6, 2022
Points
16
Location
Fremantle, Western Australia
Model of Z
Z3 Roadster 2.0 Manual post-facelift
Mine started as a hunt for all the loom connectors for retro fitting heated seats. And got it to this stage..
View attachment 95393

But at this point put my hand under the carpet and found a lake !!!

So no choice but to take it all out
View attachment 95394

I had never worked on one of these cars before but it wasn’t difficult ....but had to workout the order in which it came apart...

If you want to see more photos showing where the carpet is fixed at the back, send a PM and l will reply with more info.
I’m currently hunting for the seat heat wiring in my car as part of a retrofit. I’ve not removed the flooring or console yet, but I found two connectors tucked under a flap of flooring in front of the gear shift. They’re red connectors and I checked the wiring colours matches what should be the seat heating. I’ve assumed given the location that these are the seat heat switch connectors, and the wiring from them leads deeper into the console under the heater and AC controls. What I can’t find is the connectors to go into the seats - where did you eventually find yours? I’ve removed the seats and lifted as much flooring as I can without removing it to trace the seat loom but there’s no sign of spare connectors in either direction. Thanks!
 

Mazza

Zorg Guru (V)
Supporter
British Zeds
The M44 Massive
Joined
Nov 1, 2017
Points
175
Location
Bognor Regis
Model of Z
Z3 1.9 M44 Roadster Z3 2.8 Project
The red connectors ( 6 pin) are the switch connectors. Drivers and Passenger sides are determined by the trace colour of one of the wires. (Cant remember which is which )

Once the seat comes out, the connector for the heated seats should be part of the loom under the seat. In my case it was a 4 way black socket but on facelift cars it may be a different colour but should still be a 4 way socket.
I will edit this and add a couple of photos from my Ipad


The loom under my seats just had 3 connectors. Arrowed one was the seat belt connector
4BF0BD1B-81BA-4BF7-A4DF-90E3105A1978.jpeg


The other two were a white one to connect power to the seat motors for up/down and forward /back
The black one is the heated seat connector ( which at that point was unused)
D542ADD0-466D-48C9-9D73-B24A26A8BD56.jpeg


Looking at the wires it looks like the passenger side has a blue trace wire, which should correspond to the red connector.
 
Last edited:

ruan

Dedicated Member
British Zeds
Joined
Apr 26, 2024
Points
28
Location
Berkshire
Model of Z
3
I have almost got all the parts I need to retrofit heat pads to my seats, the only part I still need to source is the black connector to go on the heating pads, anyone know where I can get them, I haven't tried a salvage z3 yet. The alternative is to splice a new connector on to the loom under the seat that matches the existing connector on the new heat pads. Maybe I am just being too fussy?
 

Mazza

Zorg Guru (V)
Supporter
British Zeds
The M44 Massive
Joined
Nov 1, 2017
Points
175
Location
Bognor Regis
Model of Z
Z3 1.9 M44 Roadster Z3 2.8 Project
The original connector and the crimps are Molex parts and I even had the part numbers !!
working in electronics for years I had a lot of contacts, but those parts are made by Molex but they are not allowed to sell any or give any as samples as the rights to them are held by BMW. and BMW wont allow them to be supplied.

What I did was cut off the black connector and used a 4 way male and female to connect the heated seat pads to the loom in the car.

worked fine !!!
 

colb

Zorg Guru (V)
British Zeds
Joined
Nov 25, 2012
Points
178
Location
Newport, South Wales,UK
Model of Z
Z3 M43 1.8 (1999) and Z4 E85 2.5 (2003)
Fitted similar heated pads to my Z4, used the kit wiring and mounted switches behind gear lever, power from ignition controlled fuses on fuse board behind the glovebox. Could have used the unused connections on the factory loom and obtained a replacement switch panel for heated seat versions but went with the kit wiring and switches.
 

ruan

Dedicated Member
British Zeds
Joined
Apr 26, 2024
Points
28
Location
Berkshire
Model of Z
3
I have had all the parts to complete my z3 seat reconditioning and heated seat upgrade sitting in the garage for weeks ! I have finally plucked up the courage to get on with it. So hear goes.

Step 1 remove the leather seat covers. OK so I was surprised to find that the leather was glued to the blue parts, didn't notice that in the other blogs that I have read, but as we all know every z3 was built differently!
Pictures of seat base and back after removing covers.

DSC_3715.JPG

Bolster will need rebuilding
DSC_3718.JPG


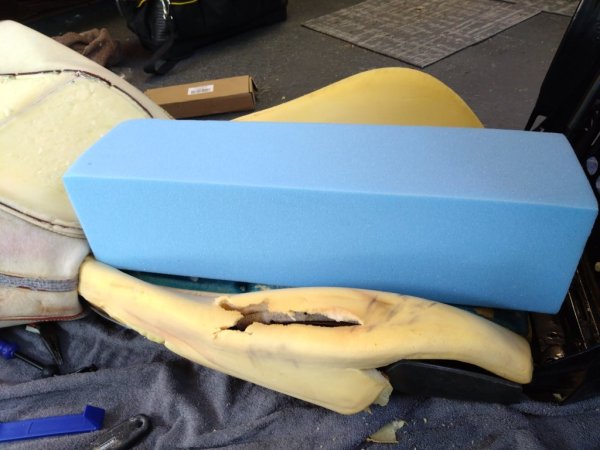
I have read articles that say you can rejuvenate foam using a steam cleaner, so let's try it!
Before steam
DSC_3726.JPG

After steam, the picturesmight not do it justice but after treating the whole base foam it was about 10mm thicker! I wonderhow long it will last!
DSC_3727.JPG


No going back now I have cut away the damaged part and glued in place the new foam.
DSC_3731.JPG

Maybe a bit extreme, I'll cut it down to size!
DSC_3733.JPG
 

Attachments

Last edited:

ruan

Dedicated Member
British Zeds
Joined
Apr 26, 2024
Points
28
Location
Berkshire
Model of Z
3
And no hog rings ! The new heating elements will have to be glued in place and then I guess I'll have to glue the leather to the heating element! I don't like that idea but don't see an alternative as without the glue the seat leather will not be tight. But first I have to shape the new foam.
 

Trevor /chedder

Zorg Addict
Joined
Oct 23, 2021
Points
59
And no hog rings ! The new heating elements will have to be glued in place and then I guess I'll have to glue the leather to the heating element! I don't like that idea but don't see an alternative as without the glue the seat leather will not be tight. But first I have to shape the new foam.
Lots of people just use zip ties. Fyi
 

ruan

Dedicated Member
British Zeds
Joined
Apr 26, 2024
Points
28
Location
Berkshire
Model of Z
3
I expected to find either hog rings or cable ties but there weren't any, it appears that my seats don't need them!
 
Top