
- Joined
- Nov 25, 2012
- Points
- 178
- Location
- Newport, South Wales,UK
- Model of Z
- Z3 M43 1.8 (1999) and Z4 E85 2.5 (2003)
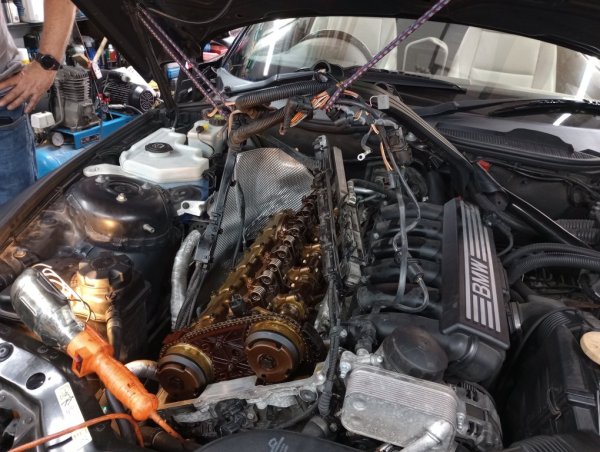
E89 in the Zedshed Cymru Shed today with leaking cam cover gasket dripping oil onto exhaust and producing oily smoke clouds as it burnt off.
First E89 I have had at the Shed with this problem so a bit of a learning curve stripping it down, got more to strip down than the E85's or E36's. which I have done a good few replacements of their cover gaskets. Once the beauty cover is taken off it starts with disconnecting and removing the coil packs then unclipping the wiring loom to them and putting it aside. Then turn your attention to the injectors and fuel rail, 10mm bolts hold that in and once they are removed the battle to pull the rail and injectors commences, only held in by o rings but they do hold on tight. Needed some upward lever action on the underside of the fuel rail to release them. Once out the rail can be laid aside. Diagonal brace on drivers side was removed and the plastic cable tray that routes the exhaust sensor wires came out to allow the cover to be lifted once all the retaining bolts were out. Interesting to note that most are captive bolts and stay with the cover when undone except two directly under the VVT Motor on the side of the cover, remove this first and its mounting bracket. Then go for all the cover bolts not forgetting the two centre earth wire studs that once the wires are taken off 8mm nuts. Once they are off it allows a 10mm socket to access the studs as these have to be undone, they are captive and stay with the cover when undone. Vacuum hose at the rear of the cover then disconnected and laid aside out of the way, pressure sensor at the front top of the cover was disconnected. All bolts and studs removed will then allow the cover to be pried upwards to break its seal and allow the cover to be manhandled out towards the front of the car. To aid removal I used a couple of Bungee cords to suspend the wiring looms out of the way.
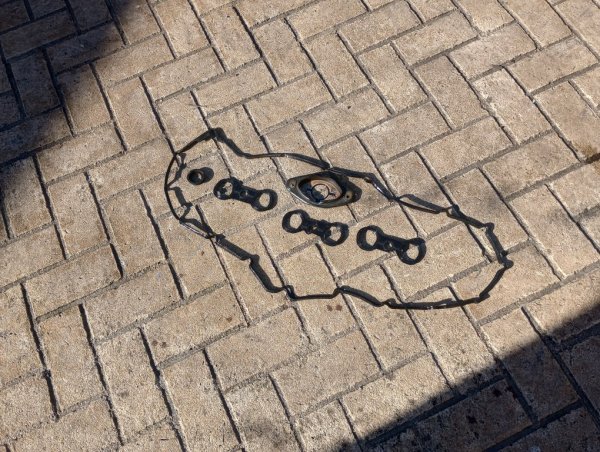
Once out the cover was cleaned out with brake cleaner and then jet washed, quite a lot of sticky crud clinging to the inside surface but it cleaned up well. The old gaskets were hard and brittle the centre plug well gaskets were very hard and one snapped when it was taken out. The main cover gasket was much the same and had started to crack in lots of places. Car has over 100k on the clock and the gaskets could be original so if they are they stood up well during the life of the car.
New gaskets installed in the cover and new seals for the VVT and the pressure sensor. Used Blue Hylomar gasket jointing compound at a number of places around the cover to ensure the gasket stayed in place when turned over to refit it to the engine. Gave it some time to set before putting it back on, ensure all the captive bolts line up especially the two earth studs that are in the centre of the cover and clamp down the plug well gaskets. Tighten to specified torque, label on the cover shows torque required. VVT motor and bracket refitted with new gasket. Fuel rail and injectors reinstalled, some silicon spray put on the injector O rings to aid relocation. A few taps with a hammer and bar had the fuel rail reinstalled, Bolted it all down then went back to the other side and reinstalled the coil packs, plug well heat shields and all the injector plugs. All the wiring put back in their routing clips. Pressure sensor plugged in and we were ready for a test start.
Started and it ran like a bag of spanners and set misfire codes for No4, changed the coils around and it still ran like a bag of spanners which had me wondering what we had done to cause this. Went over everything before remembering I had not reconnected that vacuum hose at the rear of the cam cover. Massive air leak with that left off no wonder it ran rough. Reconnected the pipe and we were back in business, ran as sweet as a nut. Beauty cover replaced and final clean before calling it a day.
Took us all day but job completed and no more oily smoke screen in the engine bay.
First E89 I have had at the Shed with this problem so a bit of a learning curve stripping it down, got more to strip down than the E85's or E36's. which I have done a good few replacements of their cover gaskets. Once the beauty cover is taken off it starts with disconnecting and removing the coil packs then unclipping the wiring loom to them and putting it aside. Then turn your attention to the injectors and fuel rail, 10mm bolts hold that in and once they are removed the battle to pull the rail and injectors commences, only held in by o rings but they do hold on tight. Needed some upward lever action on the underside of the fuel rail to release them. Once out the rail can be laid aside. Diagonal brace on drivers side was removed and the plastic cable tray that routes the exhaust sensor wires came out to allow the cover to be lifted once all the retaining bolts were out. Interesting to note that most are captive bolts and stay with the cover when undone except two directly under the VVT Motor on the side of the cover, remove this first and its mounting bracket. Then go for all the cover bolts not forgetting the two centre earth wire studs that once the wires are taken off 8mm nuts. Once they are off it allows a 10mm socket to access the studs as these have to be undone, they are captive and stay with the cover when undone. Vacuum hose at the rear of the cover then disconnected and laid aside out of the way, pressure sensor at the front top of the cover was disconnected. All bolts and studs removed will then allow the cover to be pried upwards to break its seal and allow the cover to be manhandled out towards the front of the car. To aid removal I used a couple of Bungee cords to suspend the wiring looms out of the way.
Once out the cover was cleaned out with brake cleaner and then jet washed, quite a lot of sticky crud clinging to the inside surface but it cleaned up well. The old gaskets were hard and brittle the centre plug well gaskets were very hard and one snapped when it was taken out. The main cover gasket was much the same and had started to crack in lots of places. Car has over 100k on the clock and the gaskets could be original so if they are they stood up well during the life of the car.
New gaskets installed in the cover and new seals for the VVT and the pressure sensor. Used Blue Hylomar gasket jointing compound at a number of places around the cover to ensure the gasket stayed in place when turned over to refit it to the engine. Gave it some time to set before putting it back on, ensure all the captive bolts line up especially the two earth studs that are in the centre of the cover and clamp down the plug well gaskets. Tighten to specified torque, label on the cover shows torque required. VVT motor and bracket refitted with new gasket. Fuel rail and injectors reinstalled, some silicon spray put on the injector O rings to aid relocation. A few taps with a hammer and bar had the fuel rail reinstalled, Bolted it all down then went back to the other side and reinstalled the coil packs, plug well heat shields and all the injector plugs. All the wiring put back in their routing clips. Pressure sensor plugged in and we were ready for a test start.
Started and it ran like a bag of spanners and set misfire codes for No4, changed the coils around and it still ran like a bag of spanners which had me wondering what we had done to cause this. Went over everything before remembering I had not reconnected that vacuum hose at the rear of the cam cover. Massive air leak with that left off no wonder it ran rough. Reconnected the pipe and we were back in business, ran as sweet as a nut. Beauty cover replaced and final clean before calling it a day.
Took us all day but job completed and no more oily smoke screen in the engine bay.
Attachments
-
 195.7 KB Views: 18
 -
 192.2 KB Views: 17
 -
 351.7 KB Views: 17

