#ZedShed Dave’s Z3M Coupe

Lee

Zorg Guru (V)
British Zeds
M Power
#ZedShed
Joined
Mar 26, 2014
Points
193
Location
Basingstoke
Model of Z
Z4 Coupe 3.0si
With Millers M coming to an end it was time to collect a celebrity in the M world, a stunning Estoril Blue Z3M Coupe with plenty of Ac and Hamman bits. On my drive home which was only 20mins it was very clear the rear beam bushes were gone, I could feel a subtle clunk on bumps through the seat, also she just felt loose overall.

Owner: @137699

Today seems to be an M kinda day. Another M popping in to get an idea of what we do and book in for some work.
0EBFC772-670A-4633-9EDB-35157B287343.jpeg

We did a few more jobs on Millers M before moving her outside. Then it was time to move Daves coupe in and see what we’re up against next week.
788F589D-5E11-4A9F-B8C0-C3B4D942530A.jpeg

I remember years ago when I had my M seeing the coupe guys modding their lights with these projector kits.
14433D6C-F55C-4B67-973B-19F1A1A73F61.jpeg

stunning interior with some nice touches.
DE91E814-004B-4EDA-8002-9397F5E3922E.jpeg

I love this mod, tyre indicator system powered from the cig lighter.
75E368EA-91BA-41F2-9B18-EA50EE8C9C81.jpeg

on each wheel label.
CC5A2ECF-B252-447B-9F8D-423971831584.jpeg

we also have a rear lower diffuser to fit, these really finish the rear.
48B0D4CE-0BF2-4874-8E6C-CC41BBB3A3BD.jpeg

Wheels are in the best colour combo, I think this colour came on the S54 as standard. We also noticed the rear tyres are down to the 1.3mm mark so could do with a fresh pair soon.
A6E5B822-226B-40FC-A820-6EE1597789B5.jpeg

Now the wheels are off we can see what to expect next week. Some light corrosion, relatively new rear shocks. Can see the roll bar is an upgrade, maybe a HnR under the dirt ?
656499A6-7C3C-4DC5-9826-ECE415D741B3.jpeg

Passnger side marginally better.
65352B3A-52F6-4EE2-98D6-2932E69B44BB.jpeg

the most crucial part to the trailing arms looks in good health, we’ve started calling it the gooch area =))
76E771A0-94FE-401F-811D-AFB49B247CB6.jpeg

I can’t foresee any issues with the rear. The front on the other hand looks very tired.
FE61E58C-673E-40B4-9688-B01C542DDDE6.jpeg

will need to measure the disks as I can feel quite a large lip.
258314E4-9E92-4B4A-9918-74D443C3E25A.jpeg

these brake lines will need to be cut off. Not a chance in hell of these undoing.
AACFB7D1-58AC-49E3-951B-9B31C2365FCB.jpeg

All in a days work in the shed :) look forward to making a start Monday.
 
Last edited:

137699

Zorg Legend
Joined
Jan 30, 2020
Points
84
Location
Hampshire
Model of Z
M Coupe 3.2 S50
Thanks Lee for my thread! Mega excited to watch this unfold....

Yes they are H&R ARBs on there & indeed when I had the wheels refurb'd I had them done in S54 style black/chrome finish (previous owner had done them in black - which I wasn't a fan of at all)

Interested to see you noted the knocking through the seat- I had the seat bushes done last year and assumed it to be that one hadn't been done properly and that's why I could still feel the knock.... didn't realise it was potentially transmitted vibration from the suspension!

Front brake pipes were advisory on last MOT - so no surprise there either!

Grabbed a big bag of popcorn - let the show commence!
 

BillH

Zorg Addict
Supporter
Joined
Jun 30, 2020
Points
63
Hi Lee
Thanks for an informative couple of hours this morning - great meeting you both and I'm really looking forward to seeing my underside stripped out 😂😂😂 oh, and those spacers just look great - maybe a 10 min job for you guys, half a day for me!
Reading all the updates and will follow them all now - just look after your back.
Cheers again
Bill 👍
 

Lee

Zorg Guru (V)
British Zeds
M Power
#ZedShed
Joined
Mar 26, 2014
Points
193
Location
Basingstoke
Model of Z
Z4 Coupe 3.0si
Day 1 of Daves build went really well. Nothing really gave me too much trouble. I thought I would break myself in gently and started to remove all the front end.

All the main hardware came off without too much fuss.
129AA028-8852-4218-83AC-B8110BF218EF.jpeg

love these top mount covers.
AE1D1154-C2E8-44AF-BDDC-242EC5B5AD29.jpeg

With the front end stripped it was time to break everything down to component form. See what’s got any life left and see what’s being binned.... safe to say Dave got his money’s worth.
50812329-111D-46B7-A2F8-B1CA9269EBEC.jpeg

Drivers side, brake lines both have blanks on them for the time being. Will swap these out later
994212BE-6ADB-468D-BD75-DF23DABD0AF7.jpeg

First to strip are the knuckles or hubs as some people call them. Big boy nugga needed to remove the nut.
499CBF13-8743-4A6A-94A4-D1220772B02B.jpeg

Least the front wheel bearing slide off, or at least should. Stripped ready for powder coat
FAEC5593-42FA-4128-B0E5-6903DD9A1323.jpeg
Other side gave me a bit of bother. The rear bearing race didn’t want to leave.
9A36C063-B32E-411E-B393-B1A7631A2600.jpeg

Once they were split it was the shocks next.

First one loaded. These are in a right state.
61F44E4F-4DE7-4F65-ACB5-8725AAE7E4F8.jpeg

collapsed top mount.
Both sides were like this, bearings were so dry I’m not surprised.
FD0F7DD0-5416-48E3-B50E-1E1E61B42FA7.jpeg

Was there any life in the shocks I hear you ask
Made me chuckle, going by the sticker on the shock these are the originals from factory.
AFC73D98-4831-4823-8DCF-9C06F4200E08.jpeg

I also think the front drop links are too long, they should be a few inches shorter, these old ones measured a whooping 9” (-steady boys =)) ) I’m pretty sure with the HnR roll bar they should be shorter, these held the roll bar at a strange angle pointing downwards, will check this.
7E8092E5-0A24-4DAB-BF79-B4F6371AB507.jpeg

so now I have a nice big pile of bits ready for coating. I better get ordering the front end bits. I’ll wait till I’ve got the rear end out and do one big drop off to the coaters.
25075CBE-F961-4807-A7E9-9772E8ED28E6.jpeg

we’ve got quite a bit of new hardware to order.
4AD89C85-5F18-4A7B-94B7-5D69BA348870.jpeg

tomorrow the rear end tear down starts.
 

137699

Zorg Legend
Joined
Jan 30, 2020
Points
84
Location
Hampshire
Model of Z
M Coupe 3.2 S50
Great work Lee!
Scary to think I’ve had that airborne on more than one occasion last summer and used it at 3 figure speeds on some twisty tarmac😁

I can only begin to imagine what it’ll be like with suspension that actually works😂
 

BillH

Zorg Addict
Supporter
Joined
Jun 30, 2020
Points
63
Following this as I saw the gleaming car last Saturday. It's a lesson in how to breathe new life into tired running gear.
Keep it up Zedshed 👍👍👍
 
  • Thank You!
Reactions: Lee

Lee

Zorg Guru (V)
British Zeds
M Power
#ZedShed
Joined
Mar 26, 2014
Points
193
Location
Basingstoke
Model of Z
Z4 Coupe 3.0si
Nice big juicy update. I always say now we’ve worked on so many zeds when we disassemble they tell us a story and this coupe didn’t disappoint, what’s more reassuring is it ties in with what Dave knows about the car.

Now the front is apart we turned our attention to the rear. With the arch liners off we can see the the condition of the beam bushes. One side was sat higher and one side was sat on the plate...odd

This is drivers side and turns out has been replaced in the past, why not replace both beam bushes...
44EAF3BC-A24C-4A88-80D9-23BE71C13256.jpeg

Now the passenger side. In a right state de laminating and sat on the plate.
734E0906-71DB-4F99-A876-484CF30A865C.jpeg

Drivers side arm had been replaced and it’s clear by the number a breaker had written on it.
85B10004-AC3D-473B-A0B6-86B2ACB0D18E.jpeg

with the exhausts out you can see so much.
409819BC-F9DA-4072-9E38-06C368B12EB6.jpeg

someone did a temp repair on the handbrake cables. Hiding a split under some tape. Quite common.
CE5363C5-63C9-4B5E-B76A-FC0381D25ADC.jpeg

Moving on, I only had a little trouble with the side bolts holding the beam plates. Within 2 hours the subframe was out.
4CA5D68A-182D-4E46-B5D3-9C5D1AFFF295.jpeg

Now it’s out we can begin the strip down.
BFF9A18E-C7F2-4A59-84BB-E08806AE1826.jpeg

removing old bushes. These were both unbranded bushes so have been changed at some point at different times. The passenger side core nearly fell out.
1E4B48E8-208E-4F04-8AA7-37EDACF86227.jpeg

Next up was a strip down of each arm, we remove everything so it can be grit blasted and powder coated.
D0EB35F2-44E6-4200-AD7A-D3044146C892.jpeg

Bearing extraction, also clear both sides have been removed before. The criss cross pattern on the bearing casing gives this away.
53E6DDCC-5503-47FA-A023-55767C2295B7.jpeg

main three items ready for coating. All looking in good condition.
20536E38-C293-4E29-8ECE-30633D679C48.jpeg

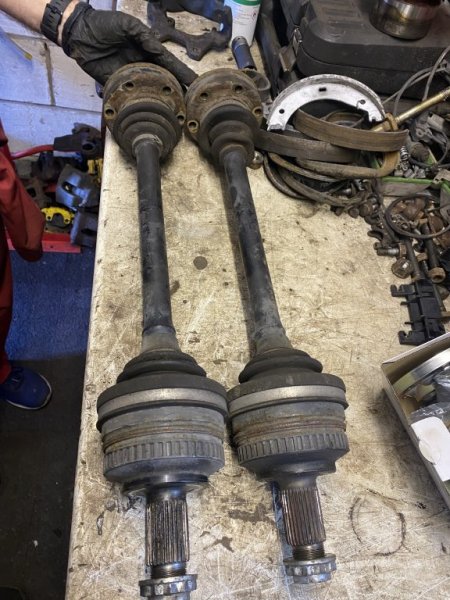
We next inspected the drive shafts. The drivers side had been replaced but with an older shaft that had clearly had a tough life. God knows how the rubbers twist.
9BAE6618-7B3E-4E44-BA8B-6AE7B34AF7E5.jpeg

both ends had holes in, were surprised it didn’t spray grease everwhere.
ADD26CB3-3C35-4986-AD18-C33ABA7804E7.jpeg

we’ll need to order a gator rebuild kit, we keep non M gators in stock so you can at least see what they look like.
E2D10A6F-CFD2-477B-98A5-8A2306E552C1.jpeg

We also removed the old fuel tank straps. Looking tired but still intact.
53224E63-B01A-4317-BD41-B26E3DD13AC2.jpeg

So this leaves the back end completely bare. She’ll get a good clean up and under-sealing on the seams.
E68B7ECB-DCB6-4BEF-B295-D6D5FBF722FD.jpeg

As I said before you can see it’s life history if you look close. I hear these coupes can pull their roll bar mounts off and it looked like Mr pigeon paid a visit to repair.
6D4B41A4-D28D-4B8A-A976-4934272A6EAE.jpeg

Diff hanger looking ok. Will check the boot floor at some point.
55BA65EB-D409-4BB1-9959-62896273D7A3.jpeg

Another little job I did was check the front discs. They had quite a large lip. If you look closely on the hub it gives a minimum thickness of 26.4mm we only have 1mm left not great for spirited driving as they don’t dissipate heat well.
1058274E-DECB-4D81-BBE7-A311F242E66E.jpeg

Reached photo limit :D
 

Attachments

Lee

Zorg Guru (V)
British Zeds
M Power
#ZedShed
Joined
Mar 26, 2014
Points
193
Location
Basingstoke
Model of Z
Z4 Coupe 3.0si
Last job of the day was removing the front subframe. Looks so odd seeing the engine floating.
C3E574D5-7213-4832-8B95-5CC94E66ED4B.jpeg

Front subframe on the bench. 4 main bolts and two bolts holding the rack.
0C676BEA-B9C9-4B39-ACAC-D16B0A88C68F.jpeg

View from underneath.
5B5C3192-0A77-49FD-994A-97AD6EBD6D9D.jpeg

Engine mounts looking tired so might be worth an upgrade. These really transform the way it feels, I fitted some vibratek mounts to mine.
05385316-CF64-42D8-9878-7FCAA8789ACD.jpeg

So tonight will be a mass order of parts, mostly from BMW and some Bilstein goodies. The powder coaters will love me next week as my boot is full.
 

andyglym

Shiny Dust Caps Make Your Zed Go Faster.
Supporter
British Zeds
Joined
Feb 20, 2015
Points
231
Location
Moresby, West Cumbria, England
Model of Z
2.8 Roadster
Great to see the ZedShed first hand today and meet the team working on my car!
So very pleased you're doing this work now - seeing how tired so much of the componentry is - this overhaul is not before time!

Looking forward to seeing the shiny stuff soon!
It'll be like night and day mate, these guys are wizards.
 

Lee

Zorg Guru (V)
British Zeds
M Power
#ZedShed
Joined
Mar 26, 2014
Points
193
Location
Basingstoke
Model of Z
Z4 Coupe 3.0si
Only a little update today. All the parts have been ordered and all the metalwork is at the coaters. They’re running a bit behind at the coaters but fingers crossed I get bits back for this weekend.
9D77EEA7-3A76-4D6C-8902-365C3A34E048.jpeg
 

Lee

Zorg Guru (V)
British Zeds
M Power
#ZedShed
Joined
Mar 26, 2014
Points
193
Location
Basingstoke
Model of Z
Z4 Coupe 3.0si
Finally got everything back from the powder coaters. The guys there are crazy busy, plus they had quite a few bits from me, two cars worth. I’ve also found ordering parts for Z3M’s now becoming a problem, I might of just bought the last front shocks in the country, I’ve had 3 purchases cancelled due to stock, even Bilstein rang me to say they have no stock world wide for the Z3M and don’t expect to till June.

The wagon filled to the brim.
E4384960-1A8B-4DAC-8C7B-1F7853F9CD1A.jpeg

first up was a stock take and check everything.
7F3BBC57-4FF2-4E55-8F56-1E8CAE5E3661.jpeg

0534A6C9-5603-4935-A63B-66677E869374.jpeg

everything looks great.
6F97F4BC-8BF4-4FD4-8DD5-286AD8E00B8E.jpeg

First job was getting the engine sat back on the subframe. Also fitting the new engine mounts.
9C96F458-7717-437A-B7BB-BBAD513B0393.jpeg

these are far easier to install fitted to the subframe. Also new bolts for the subframe. One engine mount has a heat shield due to the close proximity of the exhaust manifolds.
23C61790-D7C0-4905-A9DD-F4FDBC064065.jpeg

looking pretty on fresh mounts, now a lot stiffer.
F9E2A54B-9FAE-45AE-AC36-B4EB0551F80D.jpeg

next up was the wishbones. I reused the lollipop brackets and fitted new bushes.
30DC6ECA-36A0-4244-A8BD-5A34EEC81046.jpeg

drivers side is always a pain to do up, made so much easier with the roll bar out the way. Once these were on I fitted the steering assembly. The M has a unique looking tab so make sure she’s locked.
AB45ECCE-C365-43C9-89B2-ECACFD1CABE2.jpeg

locking done, stops rotation.
F74717C3-54E0-4AB8-87A6-390ABB7F4136.jpeg

lots of shinny bits.
62CB5E98-30F6-4F00-9D86-3152D42C276A.jpeg

now with the roll bar in place. Not much more I can do now till I have shocks.
A91D49E1-D11F-4DE0-B05E-4E0996A96DE1.jpeg

This is the first time I’ve had the knuckles coated, they’ve come up really well.
C8132A1E-4BF0-448C-A6AE-0D4058804A03.jpeg

Next job was fitting the new hardware to the diff. The oil in this stuff seriously stinks my garage out for hours.
BC7D0F34-9EA0-47F4-8155-133A47C654EA.jpeg

cover removed. (Oil to be replaced later)
EE248BDE-8EAE-41BF-88F7-A302F313FBEA.jpeg

There was a right mix of old gasket and old sealant. Took a bit of time to remove it all and re flatten the surface again ready for a new gasket.
65347E5E-0FCC-4E6A-8D0D-4A81995713C3.jpeg

All these items need painting now, didn’t notice I was out of brushes so that will have to wait a few days. I also fitted the new tank straps, just getting all the little jobs out the way. I reckon she will be very nearly finished this weekend.

Also some photos, copied over from the drive shaft thread. I used the BMW drive shaft repair kit, god knows how this shaft got in such a bad way. Was a very simple job just very messy.
E5DFB17D-6320-487C-A00C-8D4819863F87.jpeg

Twisted boot.
0FB394DF-4750-47D0-B293-9A694C38DED1.jpeg
All removed and new boots fitted with new clips.
5DE26205-5C9F-44FF-9146-52D1B0F31FB4.jpeg

Diff end.
9EF1CD59-35C6-4E59-8815-EB0F4D5246E5.jpeg
Whole shaft. As much as it would be nice to redo both shafts these kits are very pricey so I would recommend doing them only if you really need too.
FD4938EB-9B7C-4F2A-B9CF-53DD2E4805FD.jpeg

This weekend will be rear subframe install.
 

137699

Zorg Legend
Joined
Jan 30, 2020
Points
84
Location
Hampshire
Model of Z
M Coupe 3.2 S50
Excitement mounting! So.… looks like you have sourced the shocks then?
 

BillH

Zorg Addict
Supporter
Joined
Jun 30, 2020
Points
63
I’ve also found ordering parts for Z3M’s now becoming a problem, I might of just bought the last front shocks in the country,
Oooo - that's a bit of a worry 😱 I'm so looking forward to having my refurb, hope this won't hold it up too much - still on track for mid/ late May 🙏?
 

Lee

Zorg Guru (V)
British Zeds
M Power
#ZedShed
Joined
Mar 26, 2014
Points
193
Location
Basingstoke
Model of Z
Z4 Coupe 3.0si
Oooo - that's a bit of a worry 😱 I'm so looking forward to having my refurb, hope this won't hold it up too much - still on track for mid/ late May 🙏?
See if you can source a set between now and us starting your zed. The other option we have which is not a bad idea, the Koni shocks are a great buy I used to run these on my old M.
 

BillH

Zorg Addict
Supporter
Joined
Jun 30, 2020
Points
63
Hi Lee, I had the front shocks changed about 300 miles ago (last July) - apparently genuine bmw with standard springs. If I kept them with the lowered springs would it be OK to have koni/ bilstein on the back with lowered springs or do you recommend going the same make all round? Seems a shame to dump the new ones after forking out £650 for them! Let me know what you think and I'll get on the case 👍
 

Lee

Zorg Guru (V)
British Zeds
M Power
#ZedShed
Joined
Mar 26, 2014
Points
193
Location
Basingstoke
Model of Z
Z4 Coupe 3.0si
Hi Lee, I had the front shocks changed about 300 miles ago (last July) - apparently genuine bmw with standard springs. If I kept them with the lowered springs would it be OK to have koni/ bilstein on the back with lowered springs or do you recommend going the same make all round? Seems a shame to dump the new ones after forking out £650 for them! Let me know what you think and I'll get on the case 👍
If you’ve had the fronts done we should be ok :) talk nearer the time.
 
Top