Chassis sill refresh (or lessons in optimism bias..)

DrWong

Zorg Guru (III)
Joined
May 8, 2017
Points
125
Model of Z
3.0i
My Z has been on stands in my back yard for the past two months whilst I attended to rust on the chassis sills. I took lots of pictures so thought I'd share.

I originally booked a week off work at the start of October to do this, which was a bit (i.e. severely) optimistic. In my defence though this was my first time doing car body work. It took me the whole week just to strip the car down as I didn't really know what I was doing. Big shout to @Mazza for reassuring me that I wasn't going mental during this stage:thumbsup:

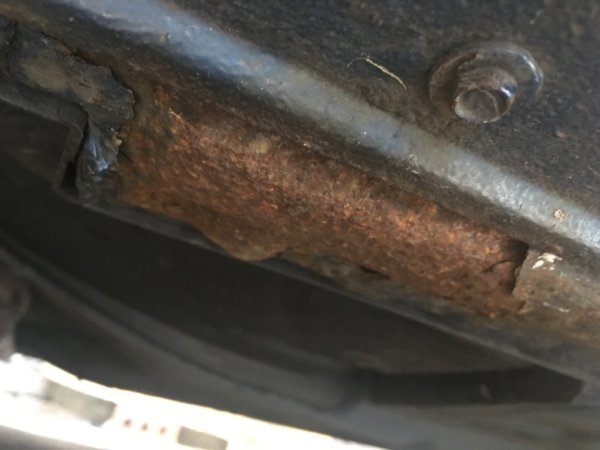
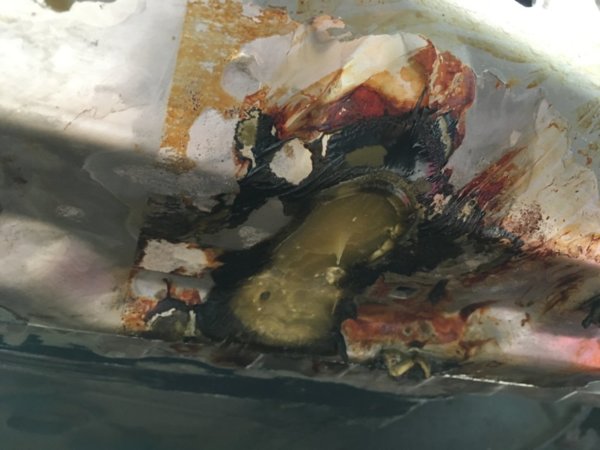
This was what we were dealing with. Photo of driver sill taken not long after I bought the car in Feb 2017. All four corners were similarly crusty:
IMG_2998.JPG
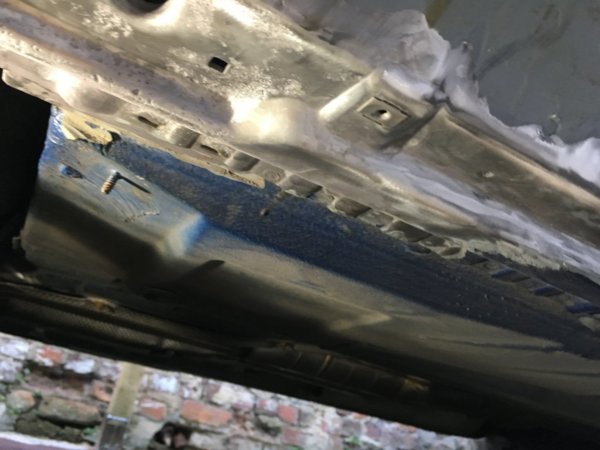
I attacked it with various combinations of polycarbide discs on my angle grinder and drill until I got to clean metal. This is what the sill ends looked like afterwards:
IMG_5187.JPG

Not great and lots of pretty engrained rot. I'd bought a big 5ltr bottle of Bilt Hamber Deox gel which I applied and covered with clingfilm as per the instructions. This is a picture of it doing its stuff:
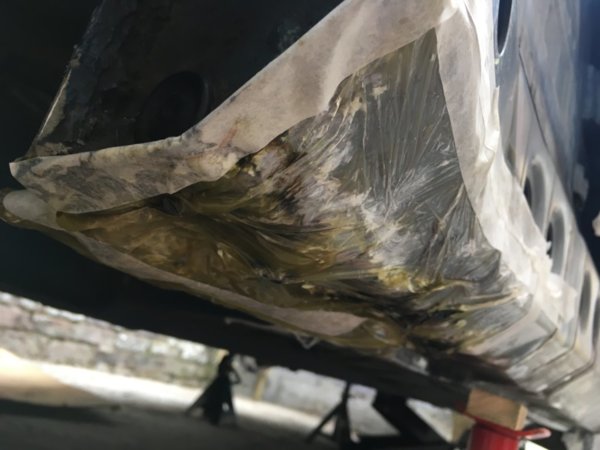
IMG_5191.JPG
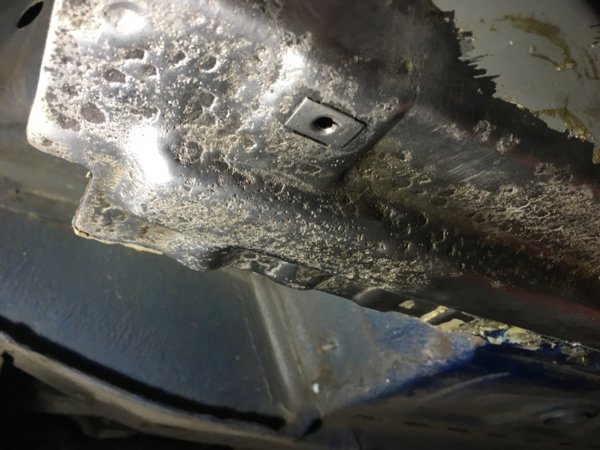
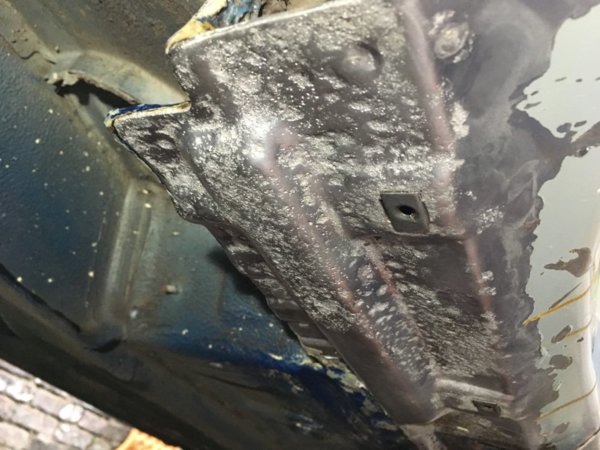
The gel needs multiple applications if the steel is badly pitted as mine was and works better the longer you leave it. This is one of the reasons why the job took much longer than I expected. But I was shocked by how well the gel worked. It almost seemed like cheating. It does take ages though. There were a couple of tiny specs in the photo below which were removed with one more lot of the gel. Horrifically pitted but now back to clean bright steel and still solid underneath, which was the case for all four corners.
IMG_5214.JPG
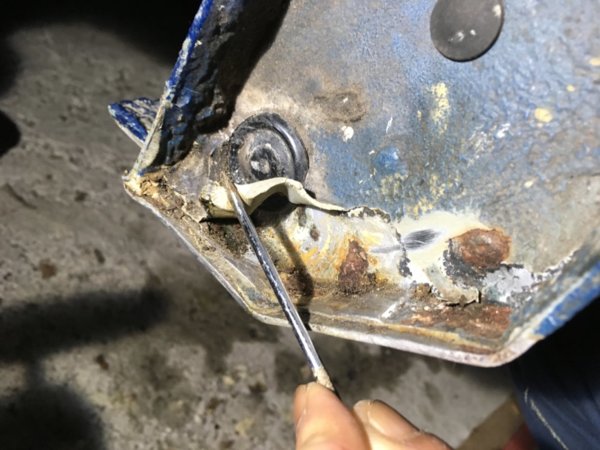
Decided to do the bottom parts of vertical surfaces as well, mainly because they weren't looking too clever. Before:
IMG_5232.JPG
After:
IMG_5468.JPG
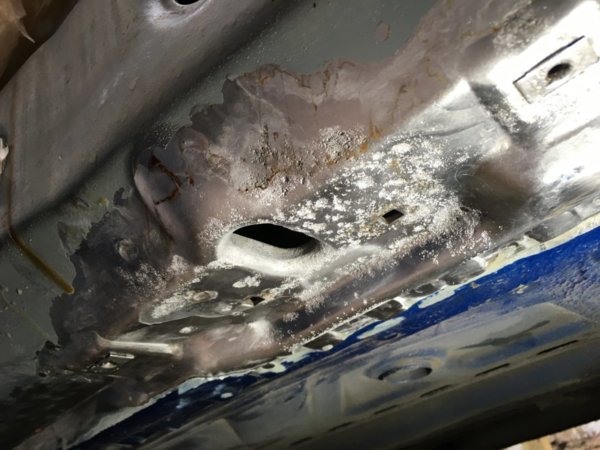
The little triangular holes were stuffed with seam sealer which took ages to pick out and which were hiding rust. Slapped some gel on and left for a week and they came up bright steel which I was really stoked about. Similarly pleased with how the inside lips of the jack points came up as some of them were also pretty crusty:
IMG_5370.JPG
The whole de-rusting process took about six weeks in total. Just endless cycles of angle grinding, applying and taping up gel, and then wire-brushing and cleaning it off whenever I could find the time. Worth it though as I honestly think I got rid of every bit of rust on the bottom of the sills. I'll return to where they join the floor pan when the weather improves (i.e. next year).

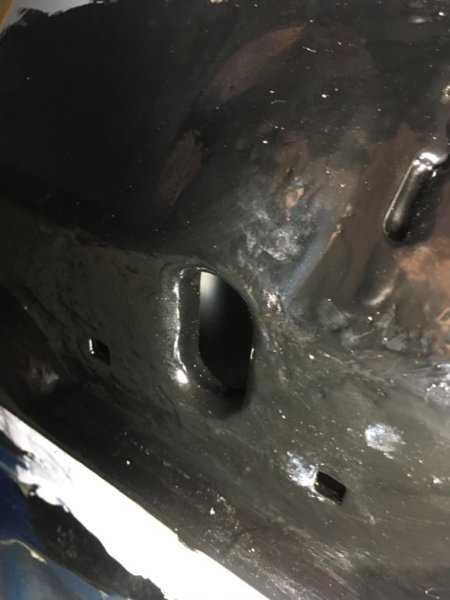
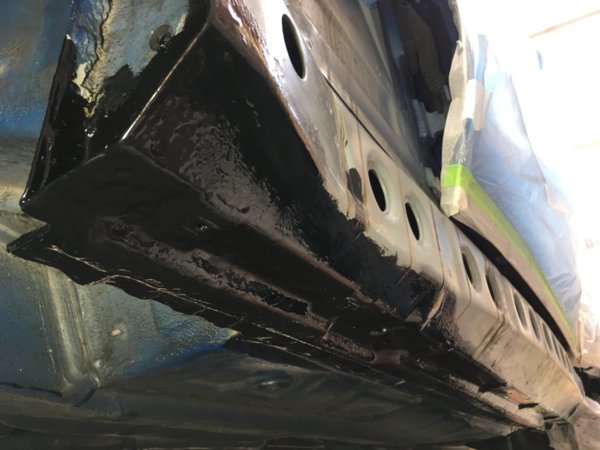
Brushed two coats of Lechler epoxy primer on all the bare metal. I specified black because I think it looks badass haha
IMG_5503.JPG
Gratuitous jack point shot :happy::
IMG_5536.JPG
Also rubbed down and epoxy'd all the chassis tabs that hold the outer panels.
IMG_5554.JPG
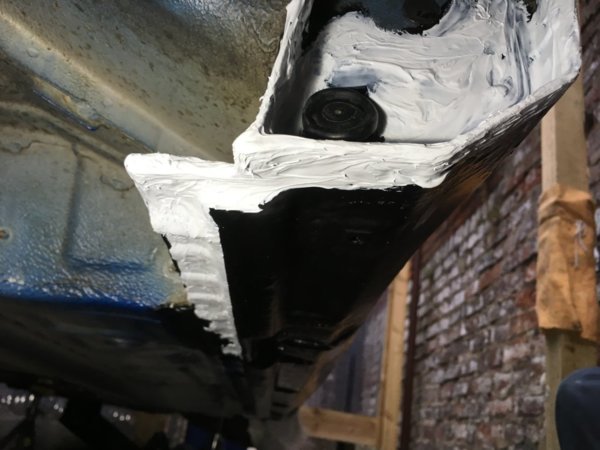
Polyurethane seam sealer on all the metal edges and also to provide a bit of build:
IMG_5543.JPG
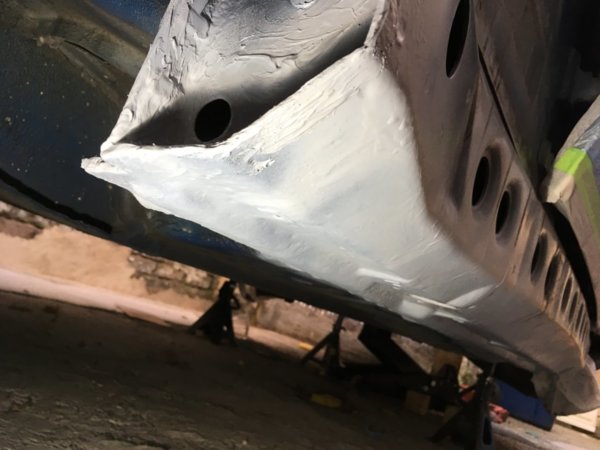
Grey primer from a rattle can:
IMG_5589.JPG
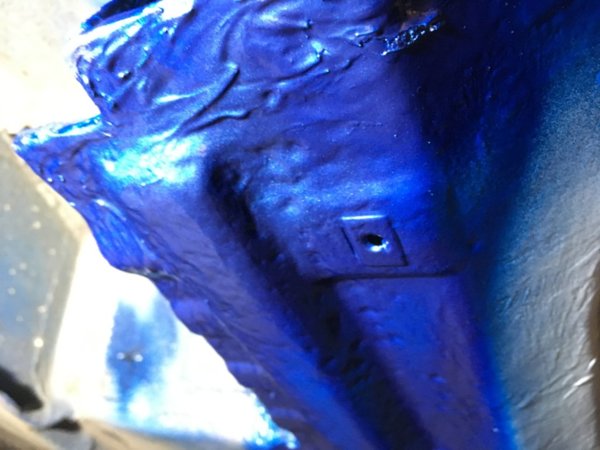
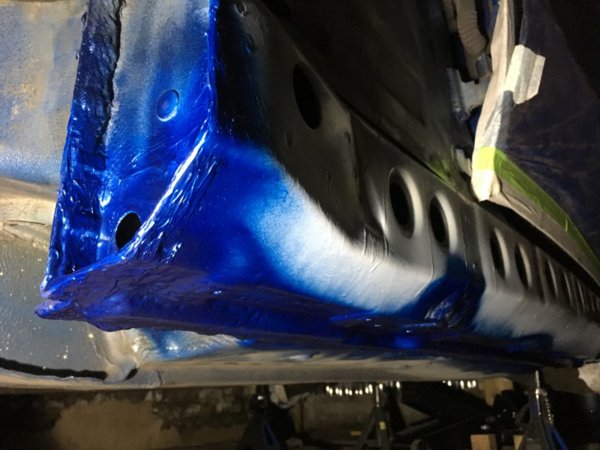
Colour coded top coat from a rattle can followed by two coats of lacquer:
IMG_5591.JPG
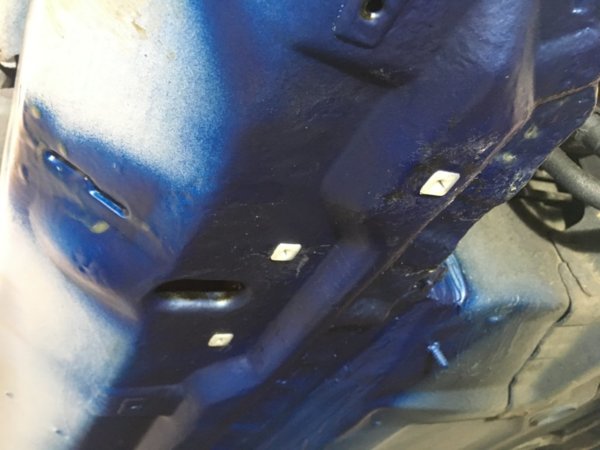
New sill screws, wheel arch screws, speed clips and plastic clips all round. Massive thanks to @Brian H for being an absolute gent and sending me replacement chassis blind plugs when one of mine succumbed to my heat gun. Thanks Brian!
IMG_5616.JPG
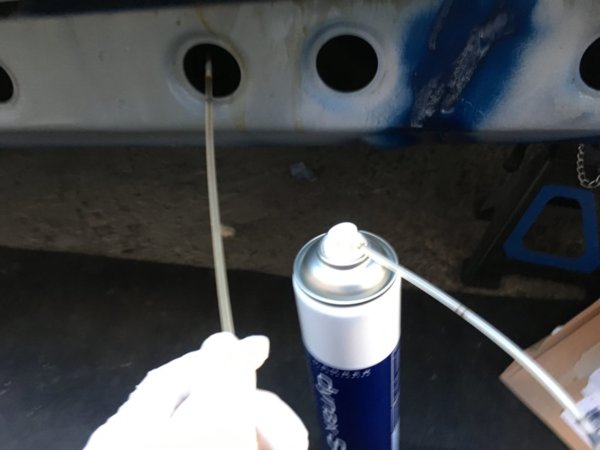
Blast with cavity and underbody wax before putting it all back together this weekend just gone:
IMG_5615.JPG
I strongly suspect where the sills join the floor pan will be hiding some badness. But my motivation to continue this job rapidly decreased along with the temperature so I'll come back to it next year. My main aim was to sort the worst of the rust at the ends of the sills for now so they wouldn't get any worse over the coming winter. Not that I drive it when there's standing water, but still...:bag:

I got the car put back together yesterday and went for a little spin to celebrate. As I was taking it out my yard I looked at the clock and it was still on British Summer Time!=))
 

Attachments

Last edited:

Sean d

Zorg Expert (I)
Supporter
British Zeds
Joined
Sep 29, 2015
Points
201
Location
Lincolnshire
Model of Z
Z3 2.8
Excellent work, looks like the gel has done a great job of removing the rust, it will certainly slow it down for a few years
 

Brian H

Zorg Expert (I)
Supporter
British Zeds
Scottish Zeds
Joined
Dec 5, 2011
Points
205
Location
Killin
Model of Z
E36/7 3.0i - E85 Z4///M
My Z has been on stands in my back yard for the past two months whilst I attended to rust on the chassis sills. I took lots of pictures so thought I'd share.

I originally booked a week off work at the start of October to do this, which was a bit (i.e. severely) optimistic. In my defence though this was my first time doing car body work. It took me the whole week just to strip the car down as I didn't really know what I was doing. Big shout to @Mazza for reassuring me that I wasn't going mental during this stage:thumbsup:

This was what we were dealing with. Photo of driver sill taken not long after I bought the car in Feb 2017. All four corners were similarly crusty:
View attachment 93168 I attacked it with various combinations of polycarbonate discs on my angle grinder and drill until I I got to clean metal. This is what the sill ends looked like afterwards:
View attachment 93170
Not great and lots of pretty engrained rot. I'd bought a big 5ltr bottle of citric acid gel which I applied and covered with clingfilm as per the instructions. This is a picture of it doing its stuff:
View attachment 93171
The gel needs multiple applications if the steel is badly pitted as mine was and works better the longer you leave it. This is one of the reasons why the job took much longer than I expected. But I was shocked by how well the gel worked. It almost seemed like cheating. It does take ages though. There were a couple of tiny specs in the photo below which were removed with one more lot of the gel. Horrifically pitted but now back to clean bright steel and still solid underneath, which was the case for all four corners.
View attachment 93173
Decided to do the bottom parts of vertical surfaces as well, mainly because they weren't looking too clever. Before:
View attachment 93174
After:
View attachment 93178
The little triangular holes were stuffed with seam sealer which took ages to pick out and which were hiding rust. Slapped some gel on and left for a week and they came up bright steel which I was really stoked about. Similarly pleased with how the inside lips of the jack points came up as some of them were also pretty crusty:
View attachment 93176
The whole de-rusting process took about six weeks in total. Just endless cycles of angle grinding, applying and taping up gel, and then wire-brushing and cleaning it off whenever I could find the time. Worth it though as I honestly think I got rid of every bit of rust on the bottom of the sills. I'll return to where they join the floor pan when the weather improves (i.e. next year).

Brushed two coats of Lechler epoxy primer on all the bare metal. I specified black because I think it looks badass haha
View attachment 93179
Gratuitous jack point shot :happy::
View attachment 93180
Also rubbed down and epoxy'd all the chassis tabs that hold the outer panels.
View attachment 93181
Polyurethane seam sealer on all the metal edges and also to provide a bit of build:
View attachment 93195
Grey primer from a rattle can:
View attachment 93183
Colour coded top coat from a rattle can followed by two coats of lacquer:
View attachment 93184
New sill screws, wheel arch screws, speed clips and plastic clips all round. Massive thanks to @Brian H for being an absolute gent and sending me replacement chassis blind plugs when one of mine succumbed to my heat gun. Thanks Brian!
View attachment 93187
Blast with cavity and underbody wax before putting it all back together this weekend just gone:
View attachment 93186
I strongly suspect where the sills join the floor pan will be hiding some badness. But my motivation to continue this job rapidly decreased along with the temperature so I'll come back to it next year. My main aim was to sort the worst of the rust at the ends of the sills for now so they wouldn't get any worse over the coming winter. Not that I drive it when there's standing water, but still...:bag:

I got the car put back together yesterday and went for a little spin to celebrate. As I was taking it out my yard I looked at the clock and it was still on British Summer Time!=))
Great work, I’ll be doing something similar to mine soon.
 

Jack Ratt

Zorg Expert (I)
Supporter
British Zeds
The West Country
Joined
Dec 3, 2013
Points
200
Location
TRURO, CORNWALL
Model of Z
2.8i AUTO and 2.8i MANUAL
You've done a great job there Doc :beer
 

DrWong

Zorg Guru (III)
Joined
May 8, 2017
Points
125
Model of Z
3.0i
Excellent work, looks like the gel has done a great job of removing the rust, it will certainly slow it down for a few years
Thanks mate, that means a lot from a bodywork guru like yourself. And yeah, hopefully I've done enough to keep the rot at bay for a few years so I can keep on driving her:thumbsup:
 

Sean d

Zorg Expert (I)
Supporter
British Zeds
Joined
Sep 29, 2015
Points
201
Location
Lincolnshire
Model of Z
Z3 2.8
Thanks mate, that means a lot from a bodywork guru like yourself. And yeah, hopefully I've done enough to keep the rot at bay for a few years so I can keep on driving her:thumbsup:
I'm really impressed mate, I see so many threads where peeps just give the rust a clean and then paint over it
 

petecossie

Zorg Guru (IV)
British Zeds
M Power
Joined
Dec 7, 2011
Points
158
Location
Teesside
Model of Z
Z3 M Coupe
Now I know why we haven’t seen you for a while at Champs.
That gel stuff seems to do a wonderful job of clearing rust from steel and giving you a good clean surface to paint on.
Well done especially as you have never tackled anything like this before.
:thumbsup:
 

Sean d

Zorg Expert (I)
Supporter
British Zeds
Joined
Sep 29, 2015
Points
201
Location
Lincolnshire
Model of Z
Z3 2.8
Great work, I’ll be doing something similar to mine soon.
the above approach makes perfect sense mate as it removes most if not all the rust, before I fitted my inner sills I took them to the powder coaters to put them in their tank, they had very little rust on them but the acid got rid of it so I had a fresh start with them
 

DrWong

Zorg Guru (III)
Joined
May 8, 2017
Points
125
Model of Z
3.0i
I did get mildly obsessed with removing every last bit of rust that I could find, which was why the job took so long as I kept finding more. I really didn't see the point in just painting over. I had to draw a line under it though as the weather was getting colder, which makes the gel less efficient and also not great for applying paint. The gel is truly magical stuff though:thumbsup:
 
Last edited:

t-tony

Zorg Expert (II)
Supporter
British Zeds
#ZedShed
Joined
Dec 31, 2013
Points
226
Location
Torksey Lock,Lincoln, England
Model of Z
E89 Z4 23i Auto
Great work Doc, I'm impressed with the acid's effect. Well worth the effort you put into that, benefits to come mate.:thumbsup:

Tony.
 

DrWong

Zorg Guru (III)
Joined
May 8, 2017
Points
125
Model of Z
3.0i
Great work Doc, I'm impressed with the acid's effect. Well worth the effort you put into that, benefits to come mate.:thumbsup:

Tony.
Thanks Tony, hope so. The gel just dissolves any rust that it touches if applied thickly, left for a long time and with enough applications. The problem is, of course, the areas you can't get to as it needs to be wire-brushed and washed off afterwards. For bits you can see though it's amazing.
 
Last edited:

How 29

Zorg Legend
British Zeds
Joined
Feb 26, 2018
Points
77
Location
Rochdale
Model of Z
Z4 2.0 Edition Exclusive
Looks good a lot of patience went into that.
 

DrWong

Zorg Guru (III)
Joined
May 8, 2017
Points
125
Model of Z
3.0i
the above approach makes perfect sense mate as it removes most if not all the rust, before I fitted my inner sills I took them to the powder coaters to put them in their tank, they had very little rust on them but the acid got rid of it so I had a fresh start with them
Sean, can I ask you - when you did the chassis on your Z did you remove the prestal cages? The little metal things in the chassis that the sill screw locate into. I tried to remove one, but for the life of me couldn't so just cleaned up and tried to seal with the epoxy. It's the one thing that bugs me about the job as I was able to remove everything else but those:banghead:
 

Sean d

Zorg Expert (I)
Supporter
British Zeds
Joined
Sep 29, 2015
Points
201
Location
Lincolnshire
Model of Z
Z3 2.8
Sean, can I ask you - when you did the chassis on your Z did you remove the prestal cages? The little metal things in the chassis that the sill screw locate into. I tried to remove one, but for the life of me couldn't so just cleaned up and tried to seal with the epoxy. It's the one thing that bugs me about the job as I was able to remove everything else but those:banghead:
Yes, I knocked them out and replaced them with the plastic style clips that snap in
 

DrWong

Zorg Guru (III)
Joined
May 8, 2017
Points
125
Model of Z
3.0i
Yes, I knocked them out and replaced them with the plastic style clips that snap in
Thanks for that mate, I just needed to try harder haha. At least I know they can come out if I ever have to do this again
 

mrscalex

Zorg Guru (IV)
Supporter
British Zeds
3rd Party Trader
Joined
Jun 10, 2016
Points
165
Location
Swindon & Swansea
I wouldn't worry about how long it took you when you achieved such a good result.

It's interesting you brushed the Lechler Epoxy rather than sprayed it. I looked into that particular paint recently and thought it was for spraying only?
 

DrWong

Zorg Guru (III)
Joined
May 8, 2017
Points
125
Model of Z
3.0i
I wouldn't worry about how long it took you when you achieved such a good result.

It's interesting you brushed the Lechler Epoxy rather than sprayed it. I looked into that particular paint recently and thought it was for spraying only?
Thanks for the kind words Rob. The end result basically seemed directly related to how much time I was willing to spend on it. Fortunately I don't need the car day-to-day and I was willing to take as long as it needed.

Re: Lechlar, I don't have a compressor so had to brush it on. I did lots of research beforehand on the migwelding.co.uk forum which is a fantastic resource for this sort of stuff. The people posting there are really knowledgeable but also pragmatic in their approach, which is great for DIY'ers and hobbyists (like me).

The consensus on that forum was that epoxy primer is the way forward, Jotun87 or Lechlar 29107 were the most highly regarded, and many had brushed them on. Of the two, Lechlar was reported to be better for brushing if a tiny bit more thinner was added (I didn't bother with that bit) as the Jotun was inherently thicker stuff. Some people had gotten amazing results using foam rollers to apply Lechlar. I did a bit of the inside of the outer sills with a foam brush and the finish was much better/smoother than bristles, but I'd already bristle'd the chassis sills by that point.

Lechlar was also cheaper than Jotun. A litre of Lechlar, plus a litre of hardener and 500ml of thinner was £40 and is enough to mix up a litre and half of epoxy, which is a shed load. I've still got half the tin left. I was originally going to get Bilt Hamber epoxy mastic but it was expensive in comparison. Their gel is the dogs danglies tho:thumbsup:
 
Last edited:

mrscalex

Zorg Guru (IV)
Supporter
British Zeds
3rd Party Trader
Joined
Jun 10, 2016
Points
165
Location
Swindon & Swansea
Thanks @DrWong . Some really good info there on an area I'm still learning.

Did you stroke the foam brush or stipple it?

What sort of temperature did you put the Lechler on? I don't think some epoxies like the cold. They become more paste like?

Is this the citric acid Gel?


I think I'm going to stick with this for in-situ items for now but I'll try your stuff for smaller things that can be immersed as looking at the reviews as well as your own experience people seem to rave about it!


DrWong

Zorg Guru (III)
Joined
May 8, 2017
Points
125
Model of Z
3.0i
I just treated the foam brush like a bristle and blasted the epoxy on with it haha. I'm similarly inexperienced in all this which was probably a blessing. Luckily, all this was all underneath the car where it can't be seen, so getting a good level of protection on was more important than the finish.

The epoxy went on last week and the temperature was around 8 or 9 deg C in Newcastle. I was keeping a close watch on weekly temp forecasts. I think ideally it needs 10 deg but I just let it cure for 48 hrs, rather than the recommended 24 hrs, before putting anything on top of it. Don't seem to have had any ill effects - the epoxy was rock hard after a couple days.

That's the Bilt Hamber Deox C you posted a pic of. That's Deox in powder form you dissolve in water and then submerge rusty parts into. I was using the Deox suspended in gel, so good for applying to big pieces that you can't soak in Deox C (like a car chassis). It dissolves the rust in situ and you just wire brush the gel off after leaving on for a few days and it leaves bright steel behind.

You're right though, people rave about both products and I'm happy to sing the gel's praises (no affiliation etc..)

I considered a rust converter but discounted them fairly quickly unless as an absolute last resort. With the gel, you can pretty much remove any rust that you'd be able to get to with a convertor, so it seemed like a no-brainer to aim for removal rather than converting it. The big kicker, of course, is that it takes much, much longer:bag:
 
Last edited:
Top